You need at least WordPress version 5.0+ installed for this theme to work properly. It is strongly recommended that you always use the latest stable version of Wordpress to ensure all known bugs and security issues are fixed. Other requirements:
PHP version 7.2 or greater. But for maximum speed, we recommend to use PHP version 7.4.
MySQL version 5.6 or greater.
WordPress memory limit of 512 MB or greater
2| Theme Installation
When you are ready to install a theme, you must first upload the theme files and then activate the theme itself. The theme files can be uploaded in two ways:
FTP Upload: Using your FTP client, upload the non-zipped theme folder into the /wp-content/themes/ folder on your server.
WordPress Upload: Navigate to Appearance -> Themes -> Add New -> Upload. Go to browse, and select the zipped theme folder. Hit "Install Now" and the theme will be uploaded and installed.
Once the theme is uploaded, you need to activate it. Go to Appearance -> Themes and activate your chosen theme.
After that you need to install and activate the following pre-packaged plugins:
Medilink Core: Required and must install plugin.
RT Framework: Required and must install plugin.
Redux Framework: Required and must install plugin.
Breadcrumb NavXT: Required and must install plugin.
RT Demo Importer: Required if you want to import demo contents. You can deactivate it after demo is imported.
Elementor: Recommended. Page builder plugin.
WP Extended Search: Recommended. Install if you want to include/exclude certain post types in search result page.
Contact Form 7: Optional. Install if you want to use contact form.
WooCommerce: Optional. Install if you want ecommerce/store functionality.
WP Retina 2x: Optional. Install if you want your site to be retina ready.
YITH WooCommerce Quick View: Optional. Install if you want quickview icon over products.
YITH WooCommerce Wishlist: Optional. Install if you want wishlist icon over products.
N.B: All plugins must be installed and activated if you want your site to look exactly like demo.
To install these plugins, navigate to Appearance -> Install Plugins and start installation.
3| Importing Demo contents
Want to build your site like the demo? You can do it by only one click!
** Note: Before proceeding, please remember that when you are done with the demo import, all existing settings and contents will be removed and replaced by the demo contents. So it is highly recommended that you should only do this in fresh site. **
First please make sure that Medilink Parent Theme is activated on your site.
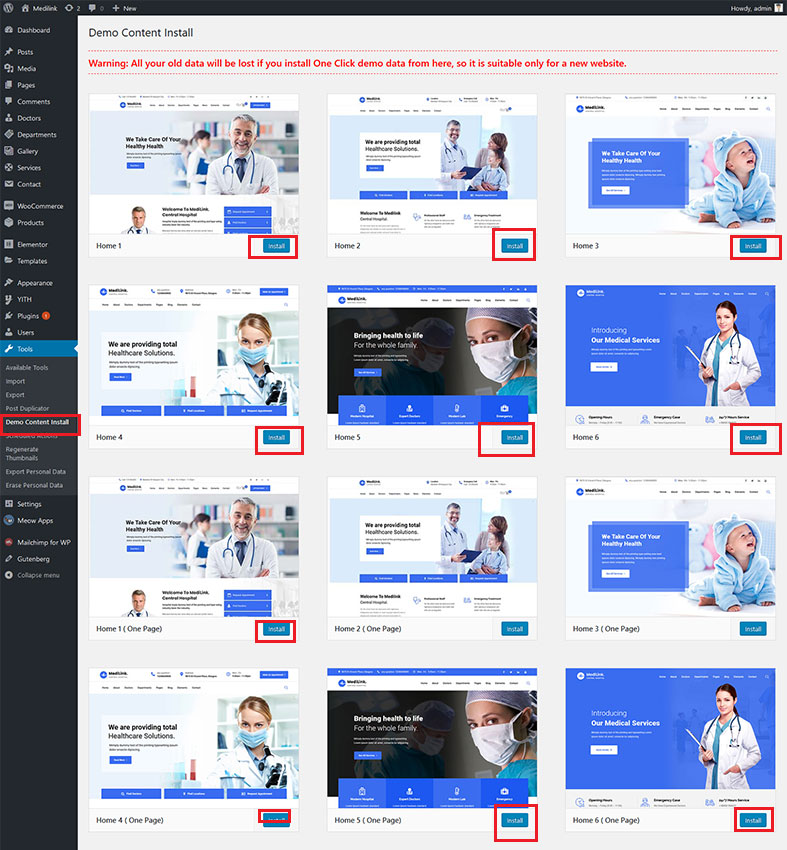
From Admin menu, navigate to Tools -> Demo Content Install. Or alternatively, navigate to Plugins -> RT Demo Importer -> Install Demo Contents.
In this page, Click on the Install button for installing the demo.
It will take some time for importing the demo contents. Please note: Some images are replaced with a placeholder image because of licensing.
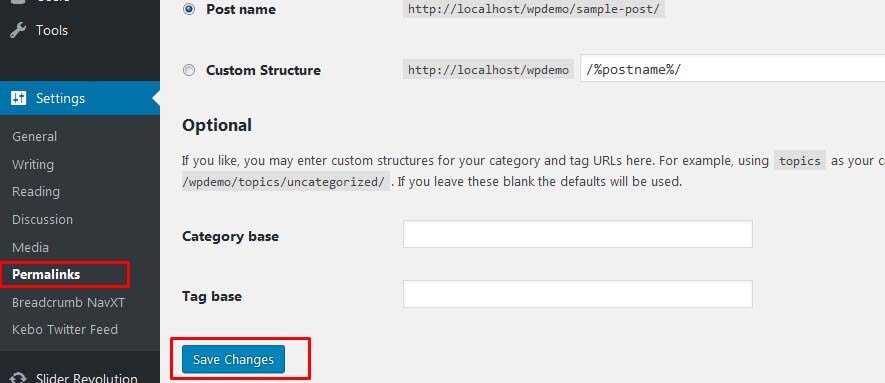
After importing demo data, please update your permalink. To update permalink, navigate to Settings -> Permalink and then click on Save Settings button.
If you face any issue, check the Troubleshooting section from here.
3.2| Manual Import
We have provided some sample contents inside "sample-data" directory which comes with your theme package. You have to import those contents.
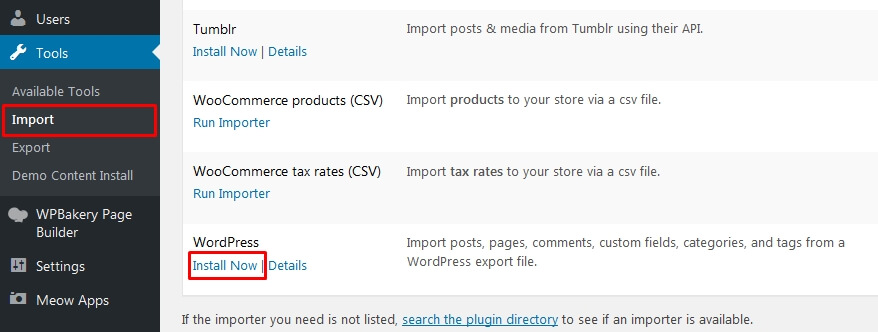
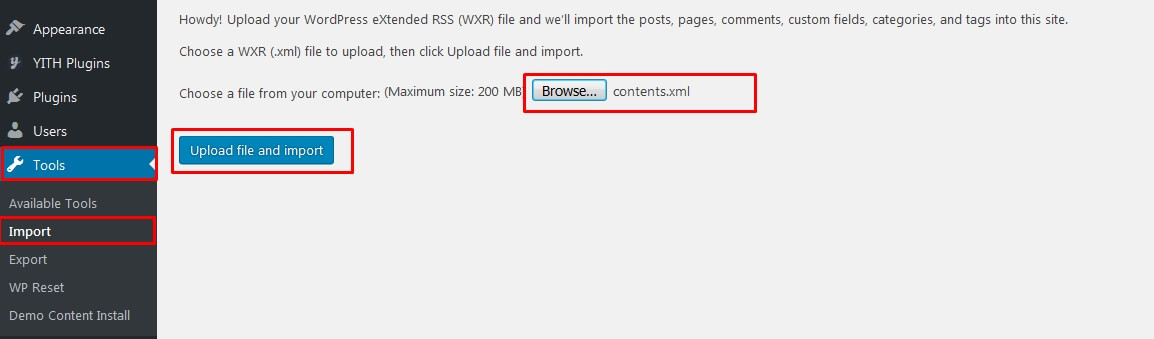
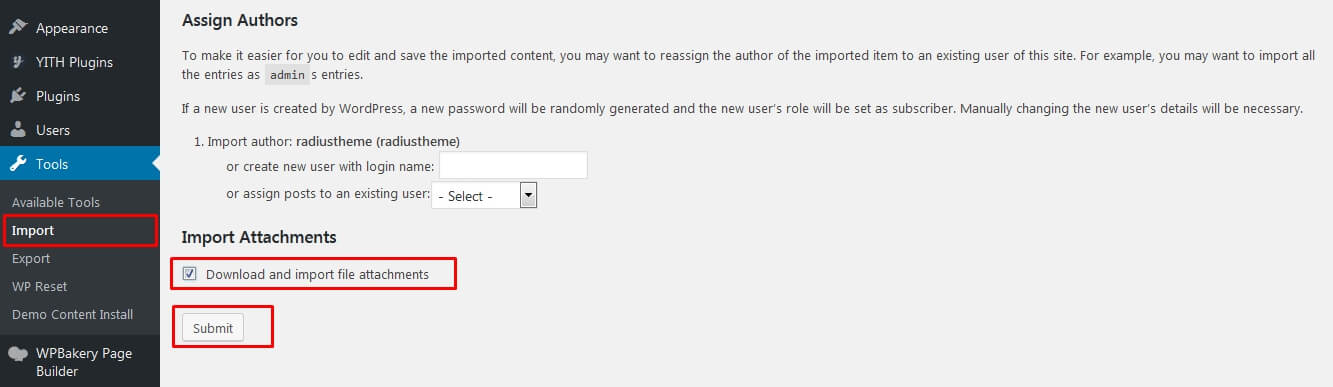
Importing Contents: From Admin menu, navigate to Tools->Import. From there select the "WordPress" and then run the importer(It will ask you to install the importer before if this is your first time). In the next step when file uploading option appears, select the "contents.xml" file from sample-data and start uploading. In next step select the checkbox saying "Download and import file attachments" and click on "Submit". Then it'll start uploading contents eg. pages, posts etc.
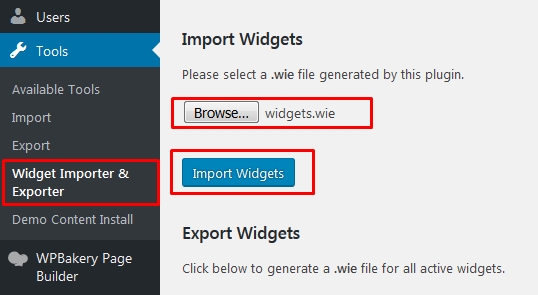
Importing Widgets: You can import widgets using plugin Widget Importer & Exporter. After installing this plugin, navigate to Tools->Widget Importer & Exporter. In the next step when file uploading option appears, select the "widgets.wie" file from sample-data and start importing.
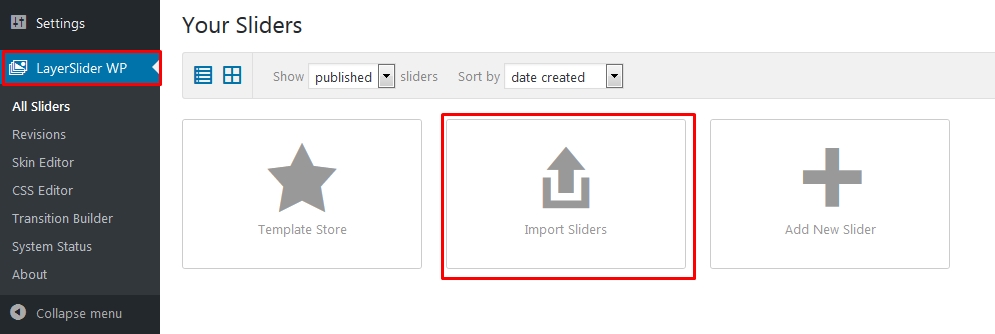
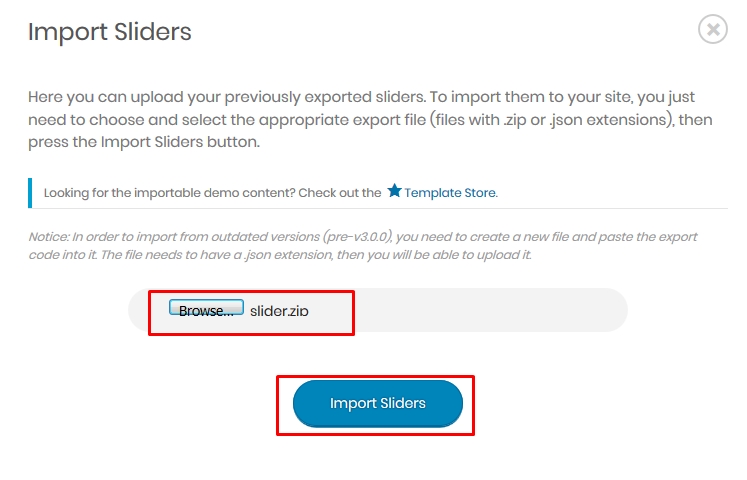
Importing Sliders: From Admin menu, navigate to LayerSlider WP, then click on "Import Sliders" option. In the next step when file uploading option appears, select the "slider.zip" file from sample-data and start importing.
Importing options: First open the file "options.json" in any text editor and copy the whole contents. Now from Admin menu, navigate to Appearance -> Medilink Options, then go to import/Export tab. From there click on "Import from file" option. A textbox will appear, paste the copied contents on that textbox and click on "Import" button.
More Configurations: This theme comes with many pre-packaged plugins eg. Contact Form 7, Breadcrumb NavXT, AddToAny Share Buttons etc . You should also configuire these plugin settings too as per your needs.
4.1| Sitewise Colors
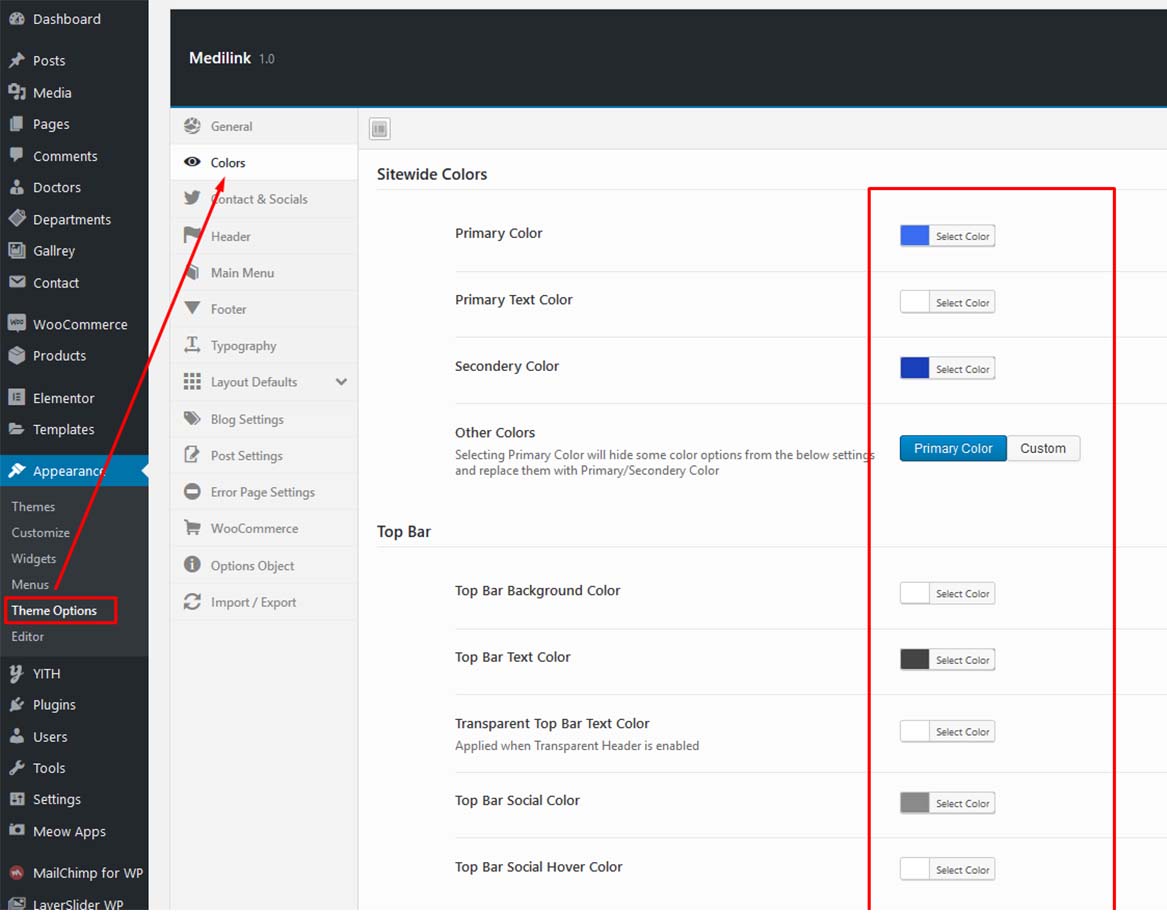
From Admin menu, navigate to Appearance -> Theme Options. Then go to Colors tab.
Choose your preferred primary and secondary color from the color palette.
After changing the settings, Click on Save Changes button.
4.2| Logo
From Admin menu, navigate to Appearance -> Theme Options. Then go to Header tab.
After changing the settings, Click on Save Changes button.
4.3| Preloader
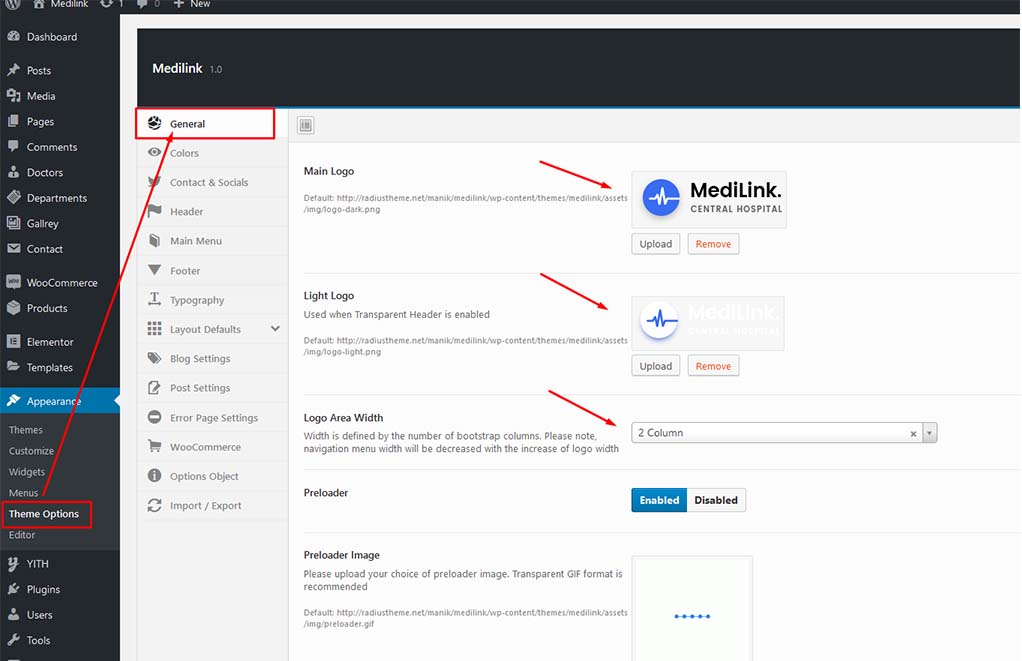
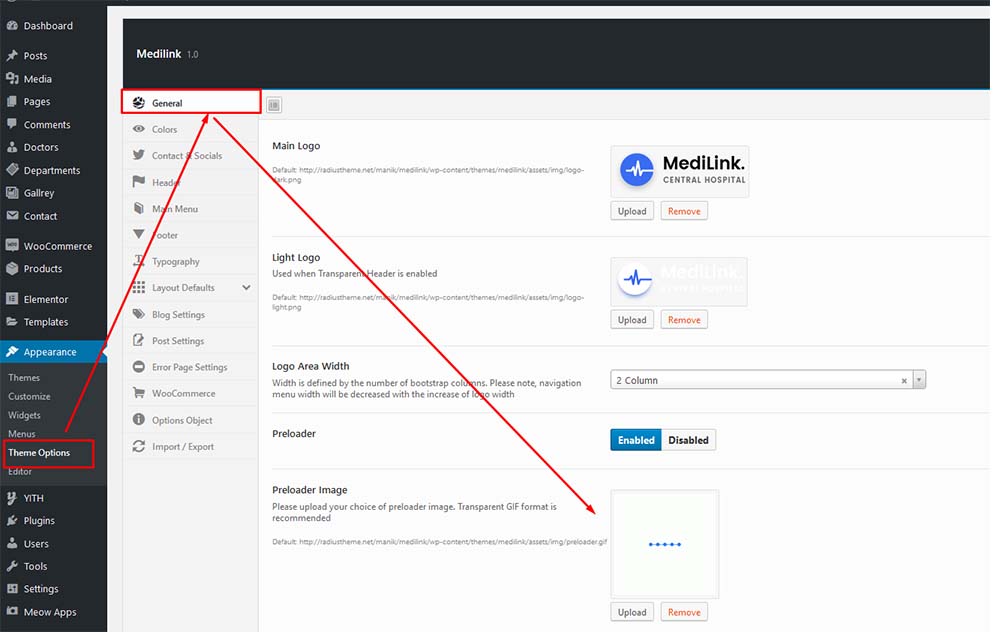
From Admin menu, navigate to Appearance -> Theme Options. Then go to General tab
Here you can find the option for enabling/disabling "Preloader" option. Also you can upload your custom preloader image. When uploading image, make sure it's a transparent GIF image.
After changing the settings, Click on Save Changes button.
4.4| Back to Top Arrow
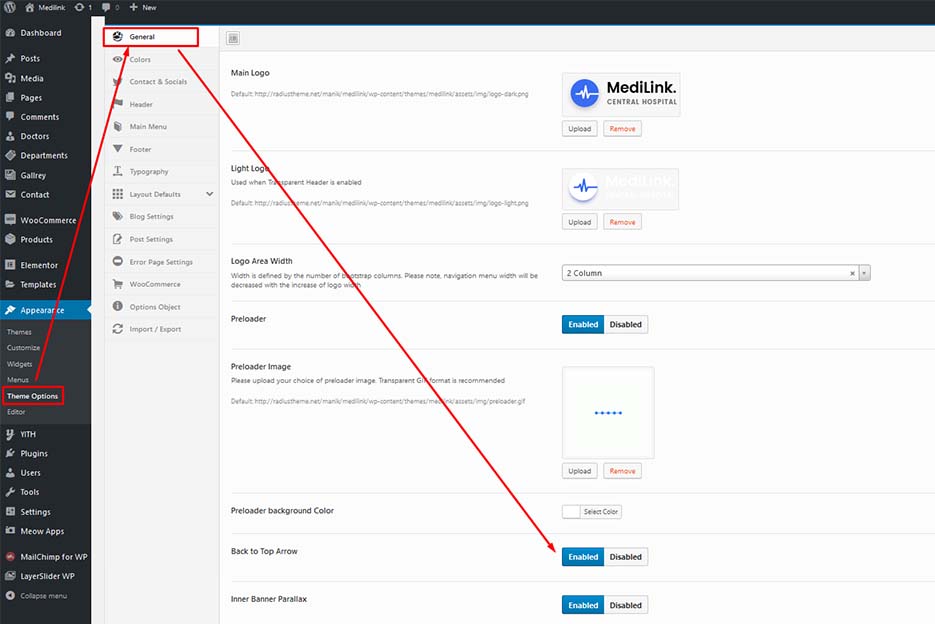
From Admin menu, navigate to Appearance -> Theme Options. Then go to General tab
Here you can find the option for enabling/disabling "Back to Top Arrow" option. Choose your preferred option
After changing the settings, Click on Save Changes button.
4.5| Header and Top Bar
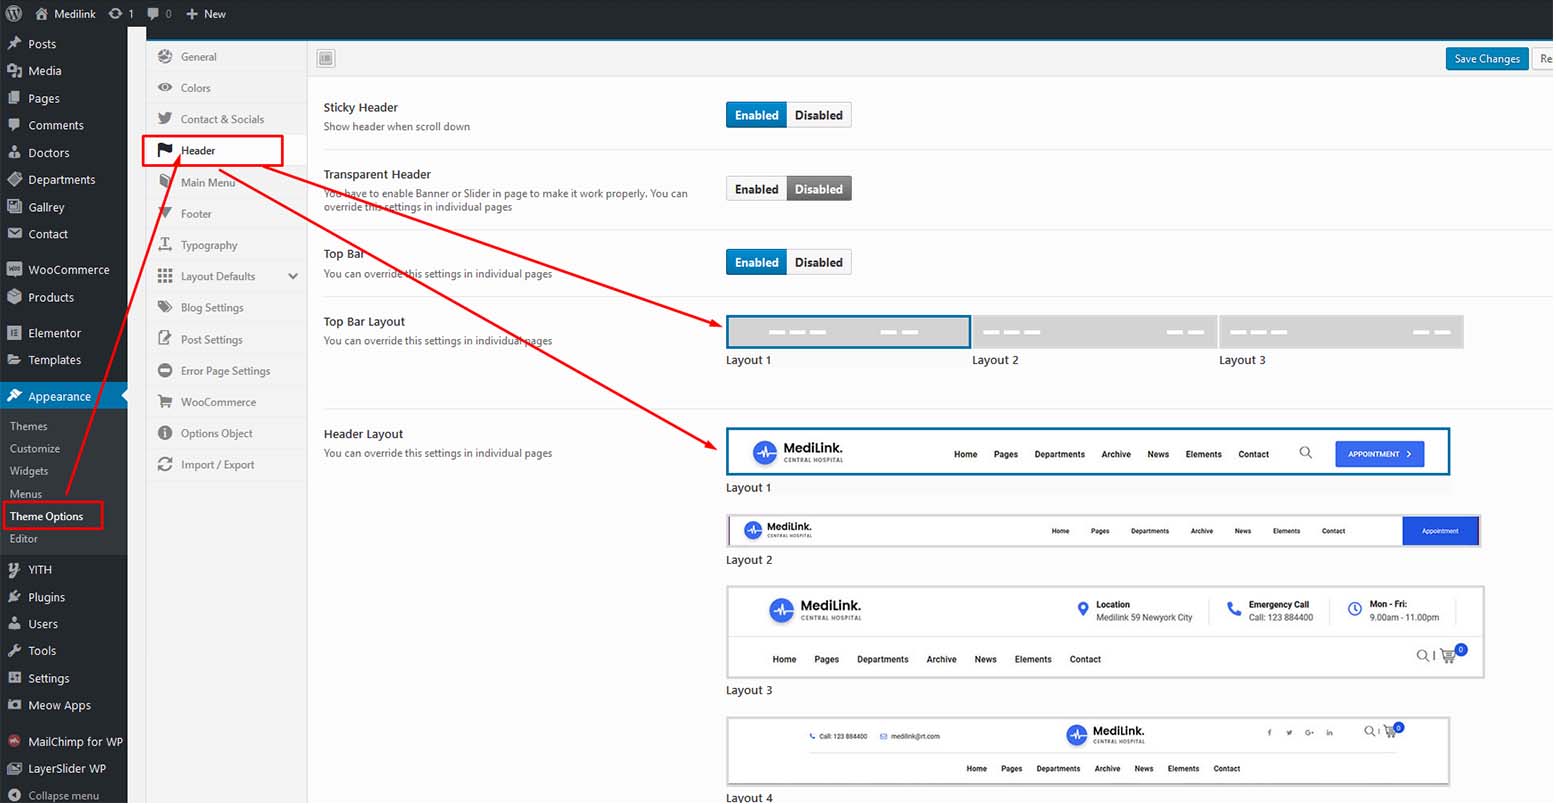
To change the Header related settings, please go to Appearance -> Theme Options. Then go to Header tab. Following features are available:
There are total 5 Header Layouts. You can choose your preferred layout combinations from here. You can change this settings from any individual pages too.
You have options to enable/disable Sticky Header.
After changing the settings, Click on Save Changes button.
4.6| Doctor Appointment
RadiusBooking is an appointment booking plugin integrated into the Medilink theme. It allows medical clinics and service-based businesses to manage their doctors, services, working hours, and bookings from one central place in the WordPress dashboard.
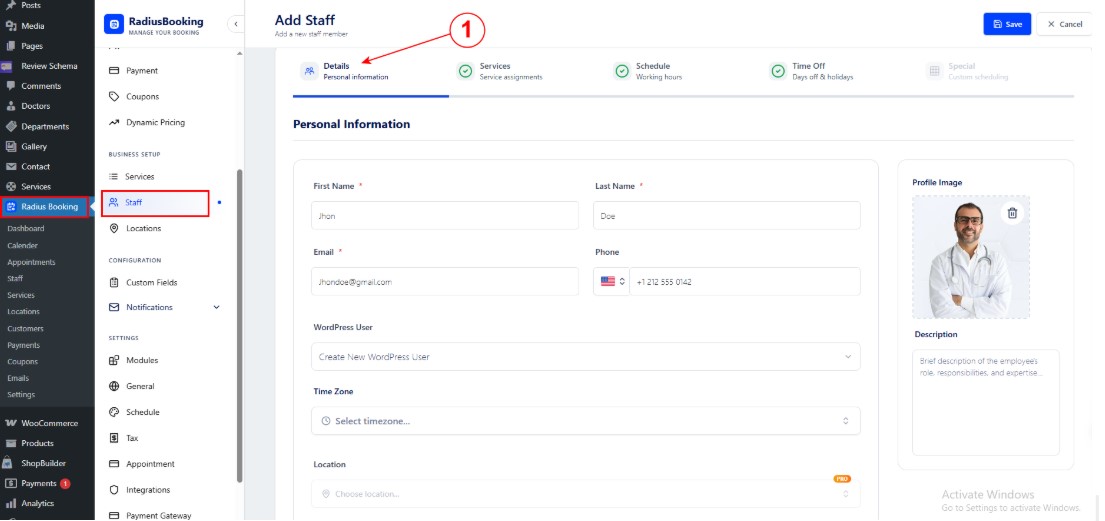
Log in to your WordPress admin dashboard.
Click Radius Booking in the left sidebar.
Click Staff to begin managing your team.
Add New Staff
When you click Add Staff, the system walks you through 5 steps:
Step
Tab Name
Purpose
1
Details
Enter personal information
2
Services
Assign services this staff can offer
3
Schedule
Set working hours
4
Time Off
Manage holidays and days off
5
Special
Set custom scheduling for specific dates
Each step must be completed before moving to the next. At the end, click Finish Setup to save.
1. Staff Details (Personal Information)
This is the first tab. Fill in the staff member's basic information here.
Field
Description
Required
First Name
Staff member’s first name (e.g., John)
Yes
Last Name
Staff member’s last name (e.g., Doe)
Yes
Email
Professional email address
Yes
Phone
Contact number with country code
Optional
WordPress User
Create a new WordPress login or link an existing account
Optional
Time Zone
Select the correct time zone for this staff member
Yes
Location
Assign a clinic or branch location
Optional (PRO)
Profile Image
Upload a professional photo
Optional
Description
Short bio or credentials summary
Optional
Tips:
Always set the correct time zone — wrong time zones cause scheduling errors
Add credentials in the description field (e.g., “MBBS, Cardiologist”)
Upload a clear, professional photo to build patient trust
Use a work email, not a personal one
When done, click Next Step to proceed to Services.
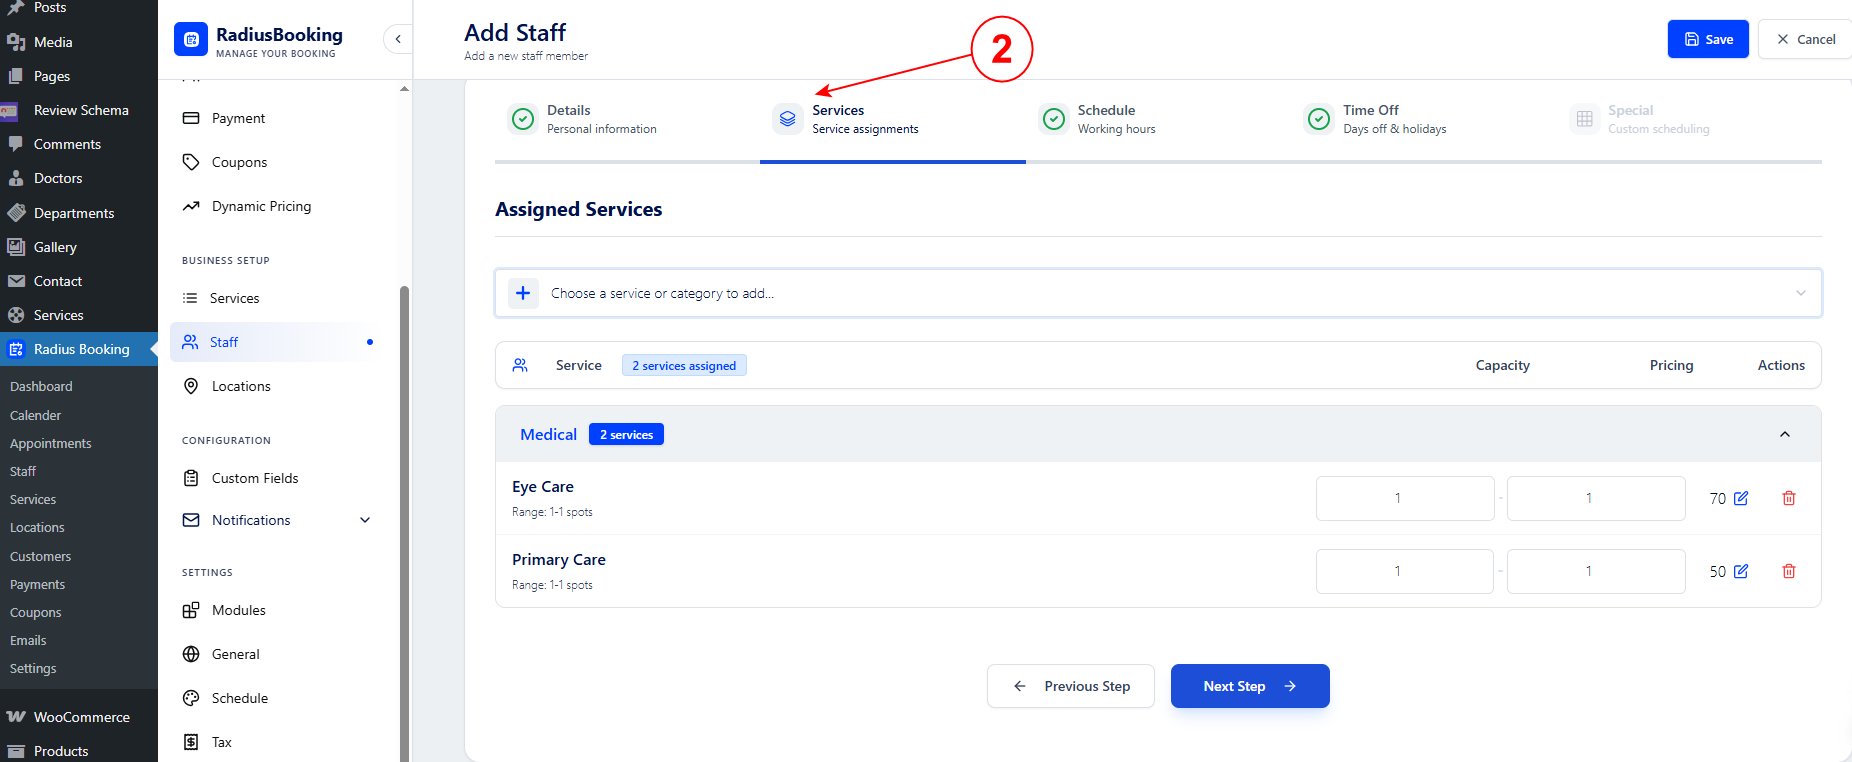
2. Assign Services
Here you assign which services this staff member can provide. You can assign one service or multiple services under different categories.
How to assign a service:
Click “Choose a service or category to add…”
Select the service or category from the dropdown
Set the Capacity — how many patients can book per time slot
Set the Pricing — the cost for this service
Managing assigned services:
Click the edit icon to update capacity or price
Click the delete icon to remove a service from this staff member
Tips:
Only assign services the staff member is qualified to provide
A capacity of "1" means one-on-one appointments only
Higher capacity (e.g., 3) is for group sessions or shared consultations
Update pricing when your rates change
When done, click Next Step to proceed to Schedule.
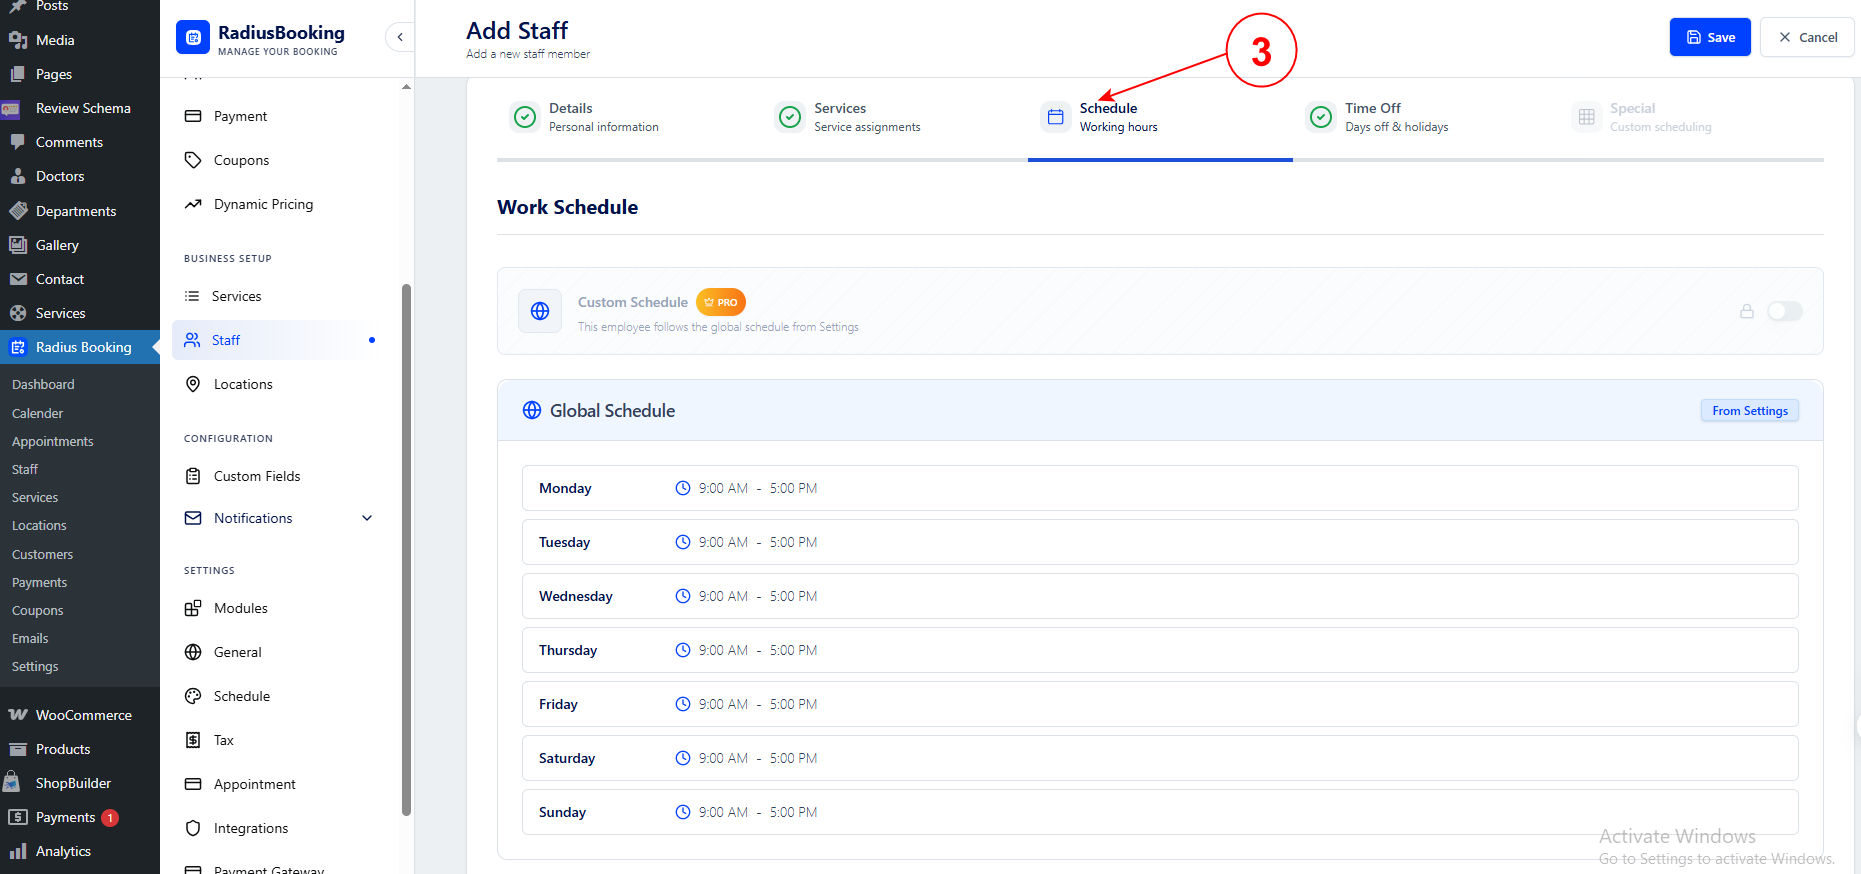
3. Schedule Settings (Working Hours)
This step sets the staff member's regular working days and hours.
Two schedule options:
Global Schedule (Default)
The staff member follows the working hours set globally in your system Settings. This is the easiest option for full-time staff with standard hours.
Custom Schedule (PRO Feature)
You can set unique hours for this specific staff member — useful for part-time staff or visiting specialists.
Tips:
Match hours to when the staff member is actually available
Consider adding buffer time between appointments
Update seasonal changes as needed
When done, click Next Step to proceed to Time Off.
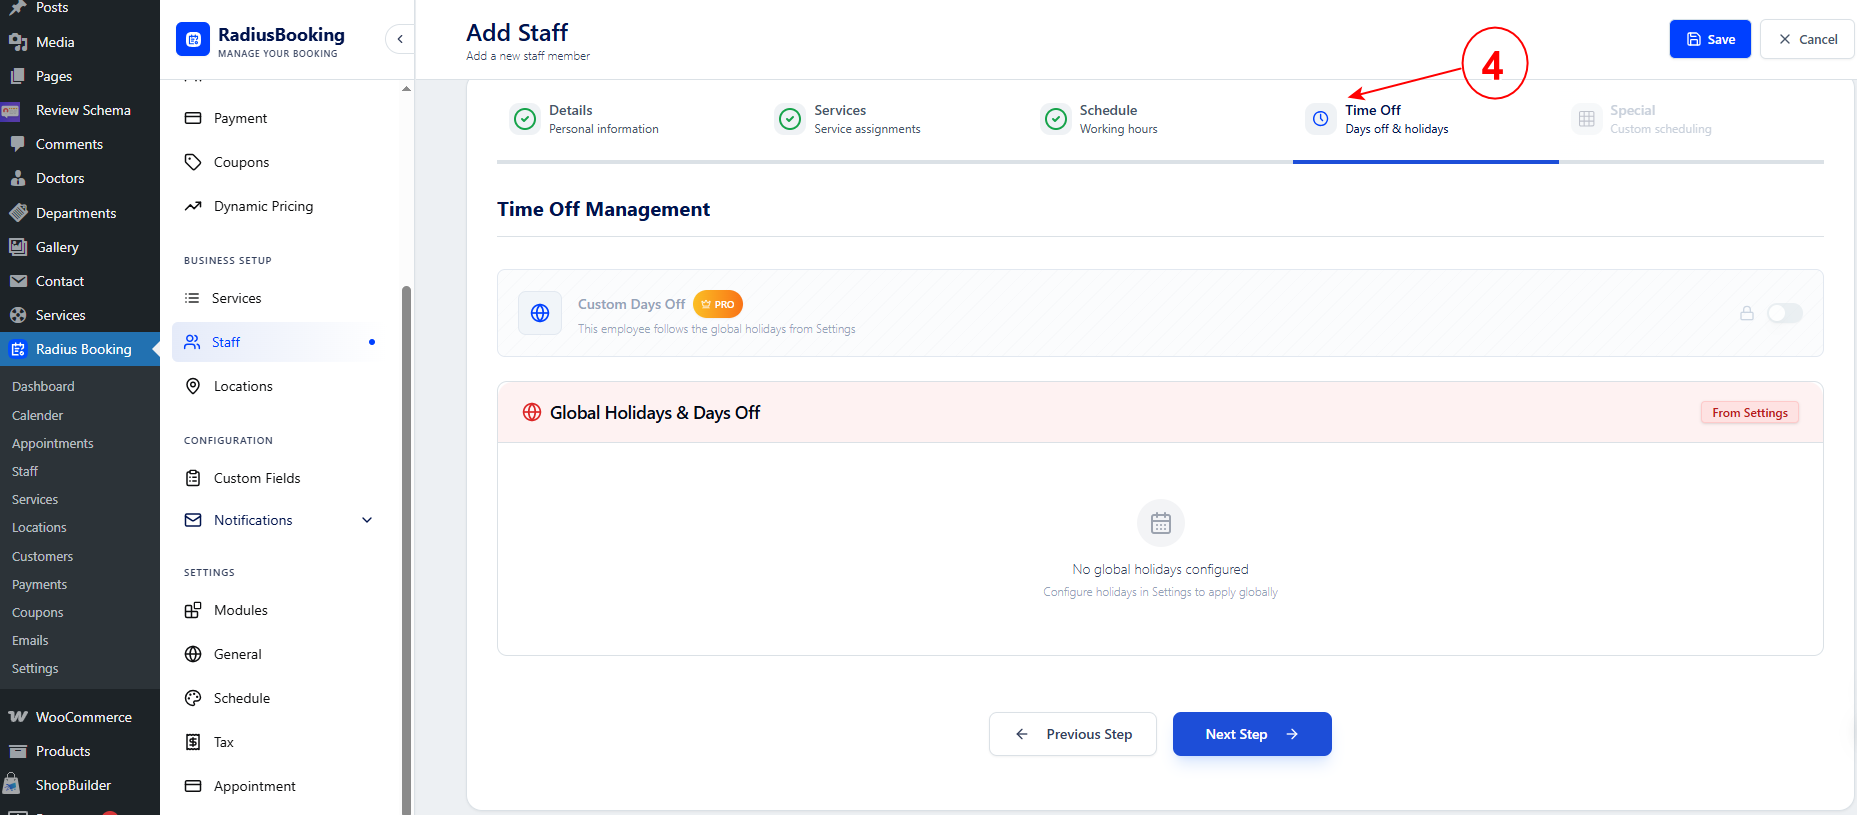
4. Time Off Management
This step manages when staff members are unavailable — holidays, sick days, vacations, or any other absence.
Two types of time off:
Custom Days Off (PRO Feature)
Individual time off for a specific staff member. Use this for:
Vacation
Sick leave
Personal days
Training sessions
Global Holidays & Days Off
These are system-wide holidays that apply to all staff. They are configured once in Settings and automatically block all staff availability on those dates.
Note: If no global holidays have been configured yet, the system will show: "No global holidays configured."
Tips:
Record time off as soon as it is requested — don’t wait
Arrange patient coverage before the absence starts
Add global holidays at the start of each year so all staff are automatically blocked
Existing appointments are not auto-cancelled — you must reschedule them manually
When done, click Next Step to proceed to the
Special Schedule.
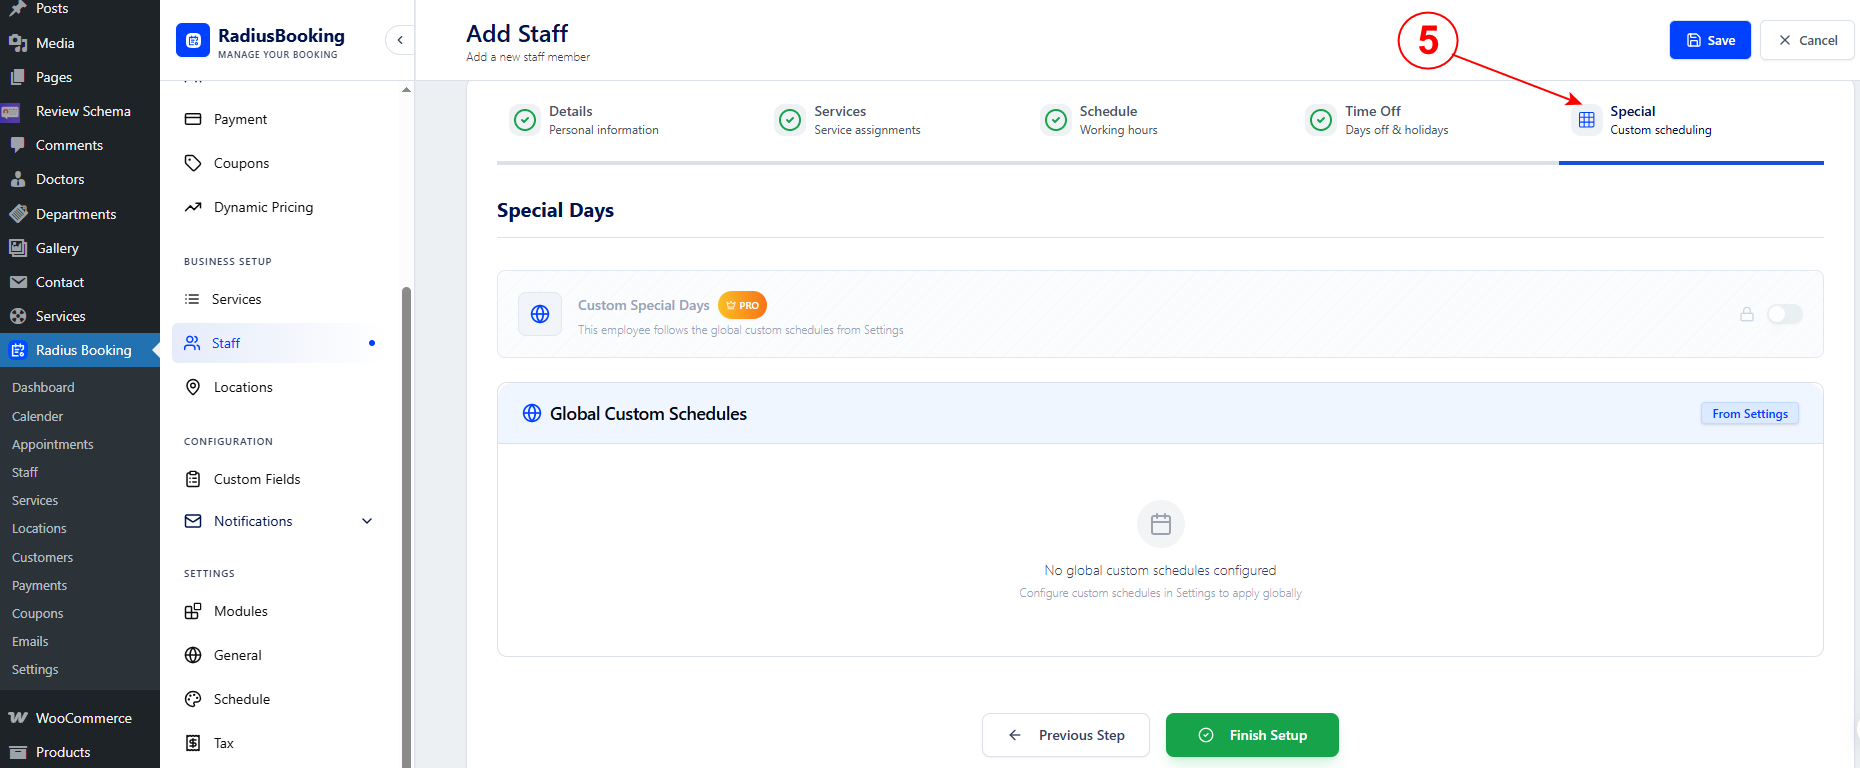
5. Special Schedule (Custom Scheduling)
This is the final step and is optional. Use it to set temporary or one-off
schedule changes for specific dates.
What this is used for:
Extended hours during a busy period
Conference attendance (staff unavailable for a few days)
Seasonal schedule changes
Covering for another staff member temporarily
Two options:
Custom Special Days (PRO Feature)
Override this staff member’s normal schedule on specific dates.
For example, if a doctor will work 8:00 AM – 8:00 PM during a
health camp week, you set that here.
Global Custom Schedules
System-wide schedule templates configured in Settings.
These apply to all staff and can be turned on when needed.
Note: If no global custom schedules have been set up,
the system will show:
“No global custom schedules configured.”
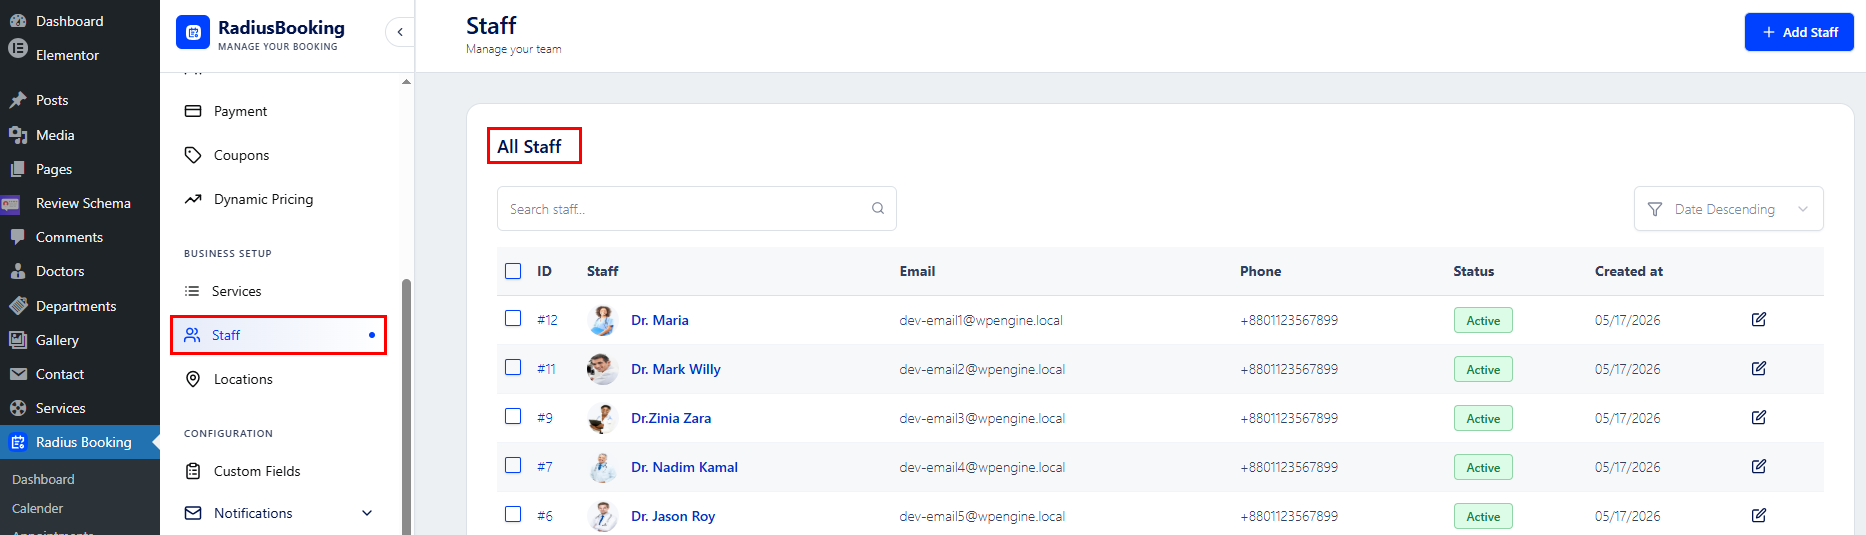
All Staff Page
When you click on Staff in the
RadiusBooking sidebar,
you land on the All Staff page.
This is where you can view, search, and manage all your
existing staff members at a glance.
What You See on This Page
The staff list displays all added staff members in a table
with the following columns:
Column
Description
ID
A unique number automatically assigned to each staff member
Staff
Profile photo and full name of the staff member
Email
The email address linked to their account
Phone
Their contact phone number
Status
Shows whether the staff member is
Active or inactive
Created at
The date the staff profile was created
How to Search for a Staff Member
Use the Search staff bar at the top of the list.
Type any part of the staff member’s name to filter results instantly.
How to Sort the List
Click the Date Descending dropdown on the top right
to change the sort order.
You can sort by date to see the newest or oldest staff profiles first.
How to Edit a Staff Member
Click the edit icon (pencil/square icon)
on the far right of any staff row.
This opens their full profile where you can update their details,
services, schedule, time off, or special schedule.
How to Add a New Staff Member
Click the blue + Add Staff button
in the top right corner of the page.
This starts the 5-step setup process described above.
Staff Status
Active (green) —
The staff member is live in the system and available for patient bookings
Inactive —
The staff member is hidden from the booking system and cannot receive appointments
Bulk Actions
You can select multiple staff members using the checkboxes
on the left side of each row.
This allows you to perform bulk actions on several staff members at once if needed.
Tips
If a staff member is no longer working,
set their status to Inactive rather than deleting them,
to preserve historical appointment records
Use the search bar when you have a large team —
it filters results in real time
The ID number is useful when troubleshooting
or contacting support about a specific staff member
Newly added staff appear at the top when sorted by Date Descending
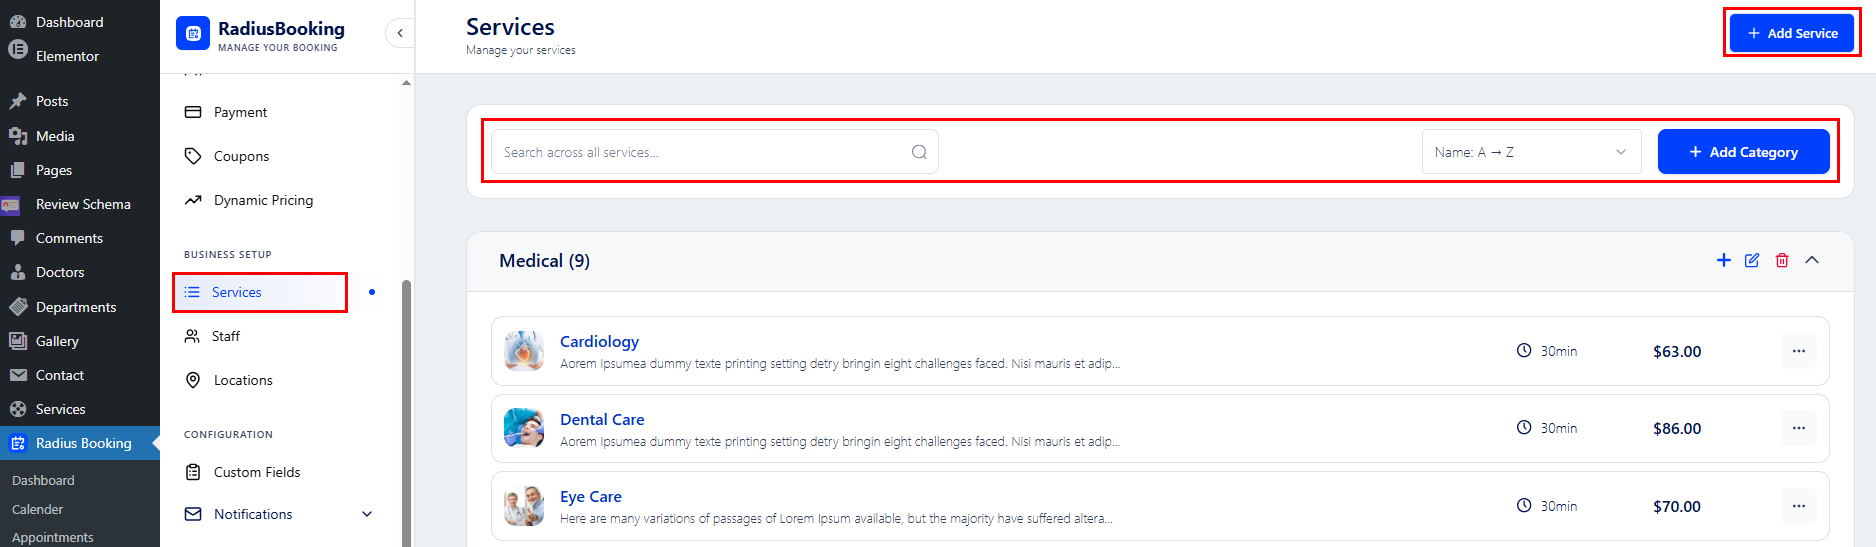
All Service List
Click Services in the RadiusBooking sidebar
to see all your services organized by category.
Each service displays its name, short description,
duration, and price. Services are grouped under
categories (e.g., Medical).
Available actions on this page:
Search —
Find any service using the search bar
Sort —
Sort by name A→Z or other options using the dropdown
+ Add Category —
Create a new category to group your services
+ Add Service —
Add a brand new service
On each category row:
+ add a service to that category,
edit the category name, or delete it
On each service row:
click the three-dot menu (…) to edit or delete that service
Add Service
Click + Add Service to open the setup.
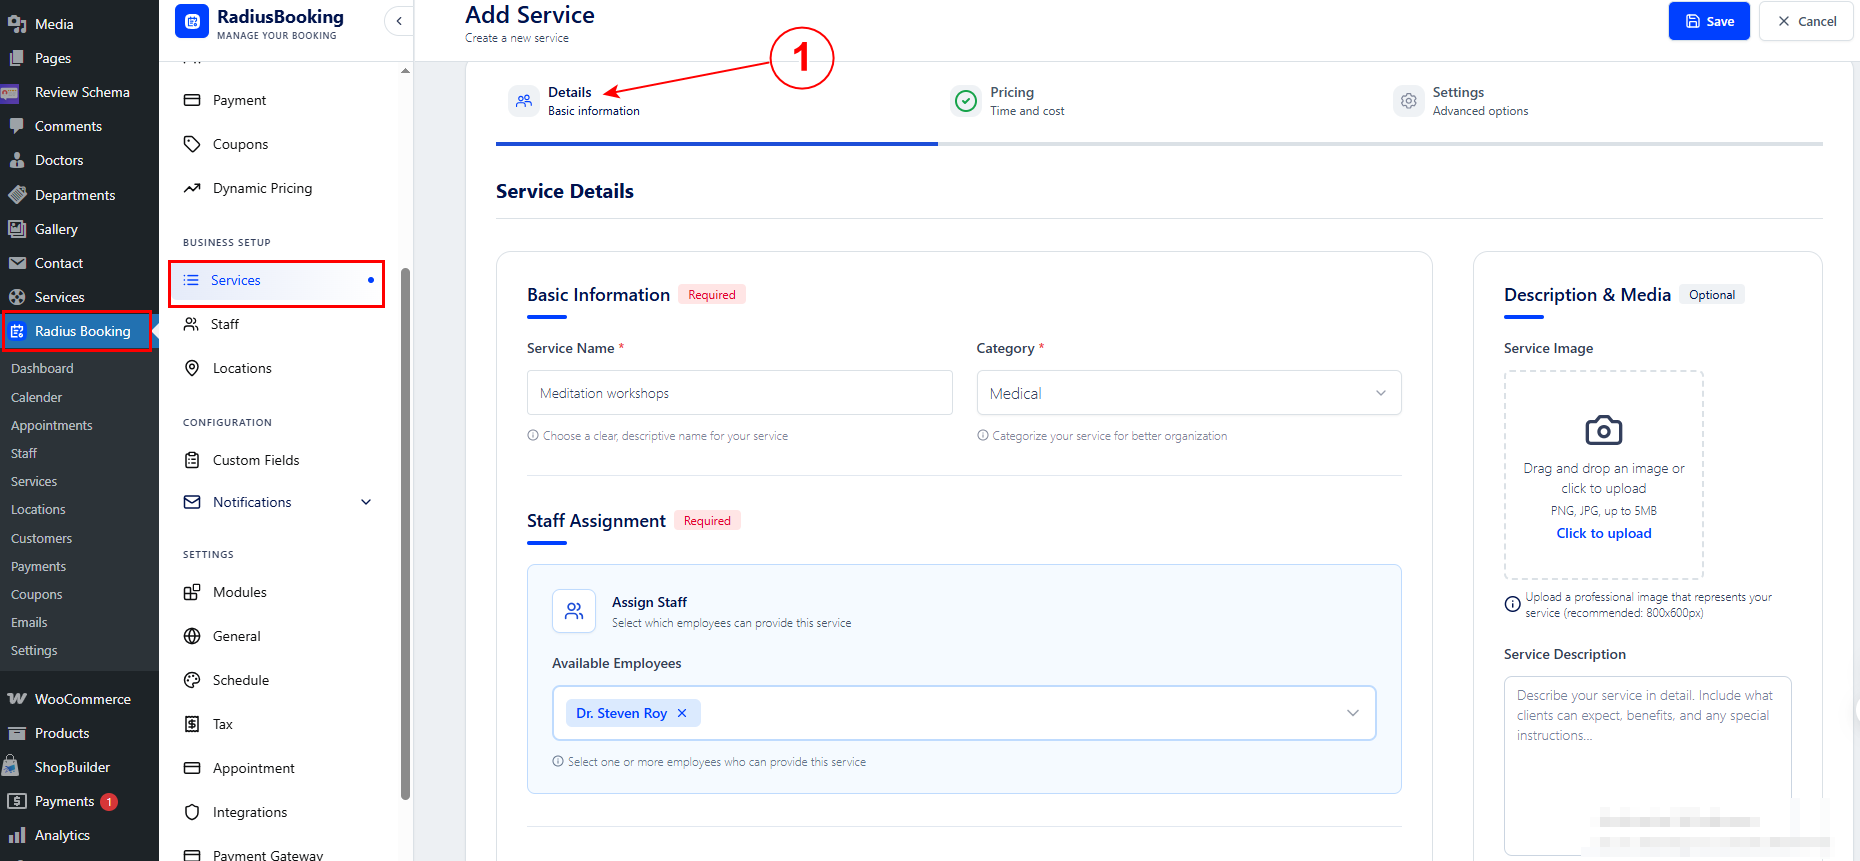
There are 3 steps:
Step
Tab
Purpose
1
Details
Basic information and staff assignment
2
Pricing
Duration, price, and buffer times
3
Settings
Advanced options and integrations
1. Details (Basic Information)
Basic Information (Required)
Service Name —
Clear, descriptive name.
Category —
Select a category to organize this service
(e.g., Medical).
Staff Assignment (Required)
Select which employees can provide this service
under Available Employees.
You can assign one or more staff members.
Description & Media (Optional)
Service Image —
Upload a professional image
(PNG or JPG, up to 5MB recommended).
Service Description —
Describe what clients can expect,
benefits, and any special instructions.
Service Settings (Optional)
Show Service on Site —
Toggle on to make this service visible
to customers on the booking form.
Recurring Appointments (PRO) —
Enable repeat bookings for this service.
Choose a frequency from the dropdown
(Daily, Weekly, Monthly, Yearly, or All).
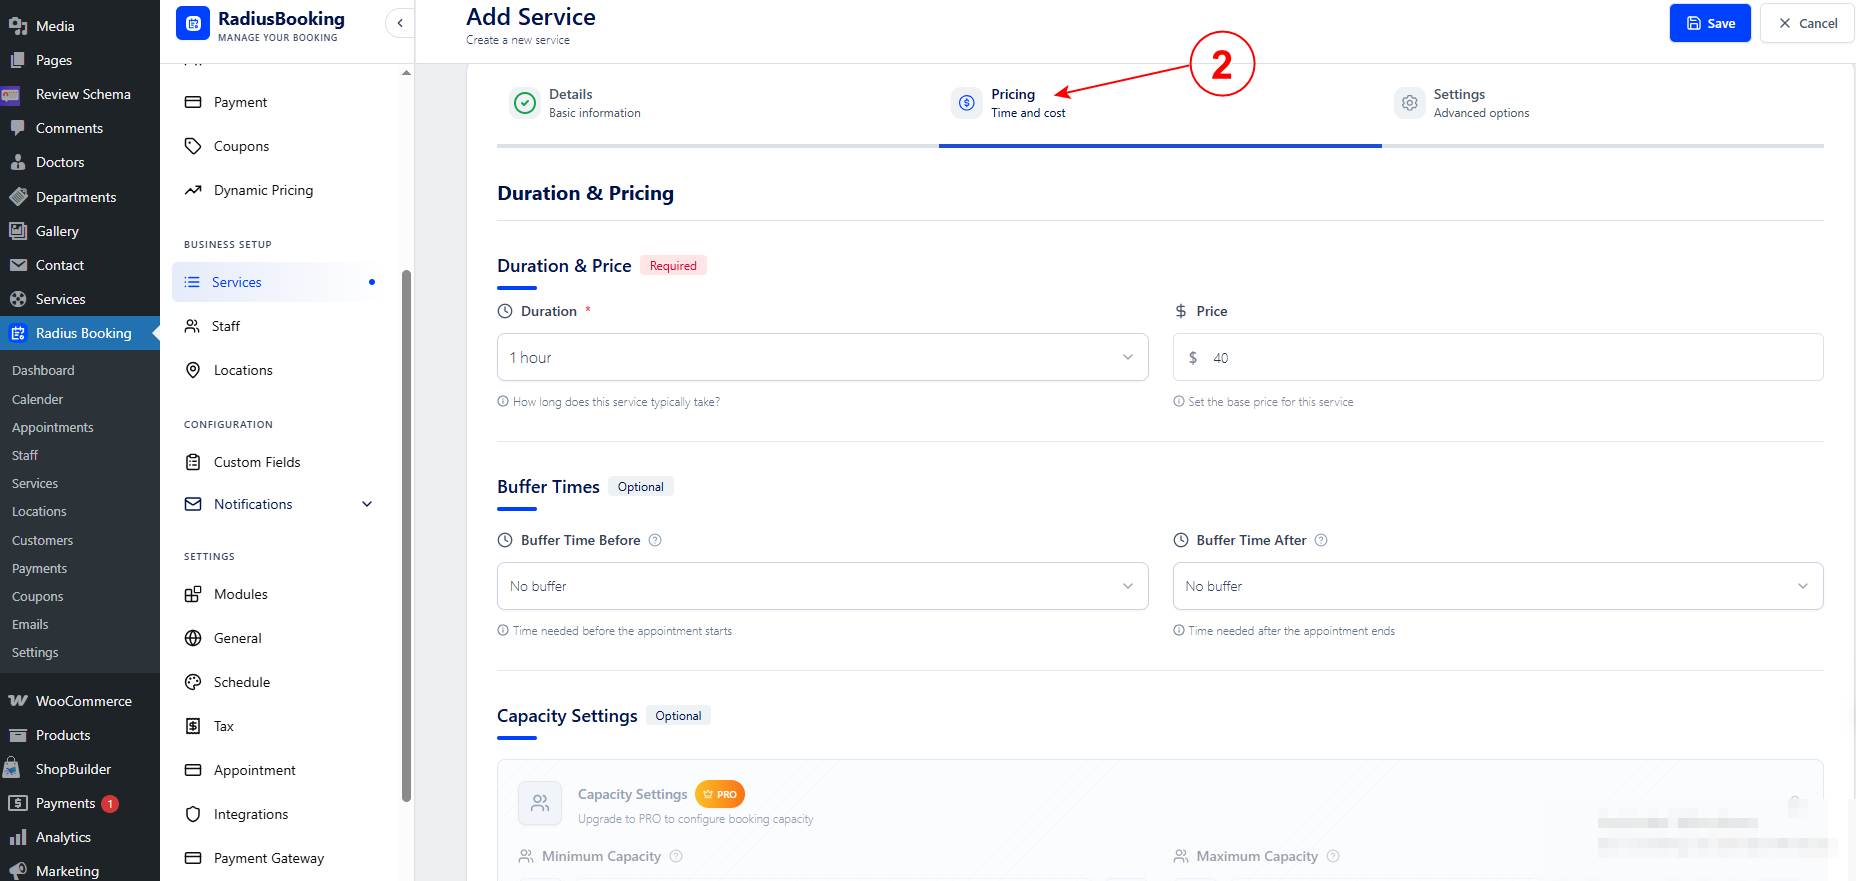
2. Pricing (Duration & Cost)
Duration & Price (Required)
Duration —
How long the service takes
(e.g., 1 hour).
Base Price —
Price for this service
(e.g., $40).
Buffer Times (Optional)
Buffer Time Before —
Preparation time needed before the appointment starts.
Buffer Time After —
Cleanup or reset time needed after the appointment ends.
Set these to avoid back-to-back bookings
with no breathing room.
Capacity Settings (PRO)
Set a minimum and maximum number of patients
that can book this service per slot.
Allow Full Payment Option —
Let customers pay the total amount upfront
Click Next to move to the
Settings tab,
or Back to return to the
Details tab.
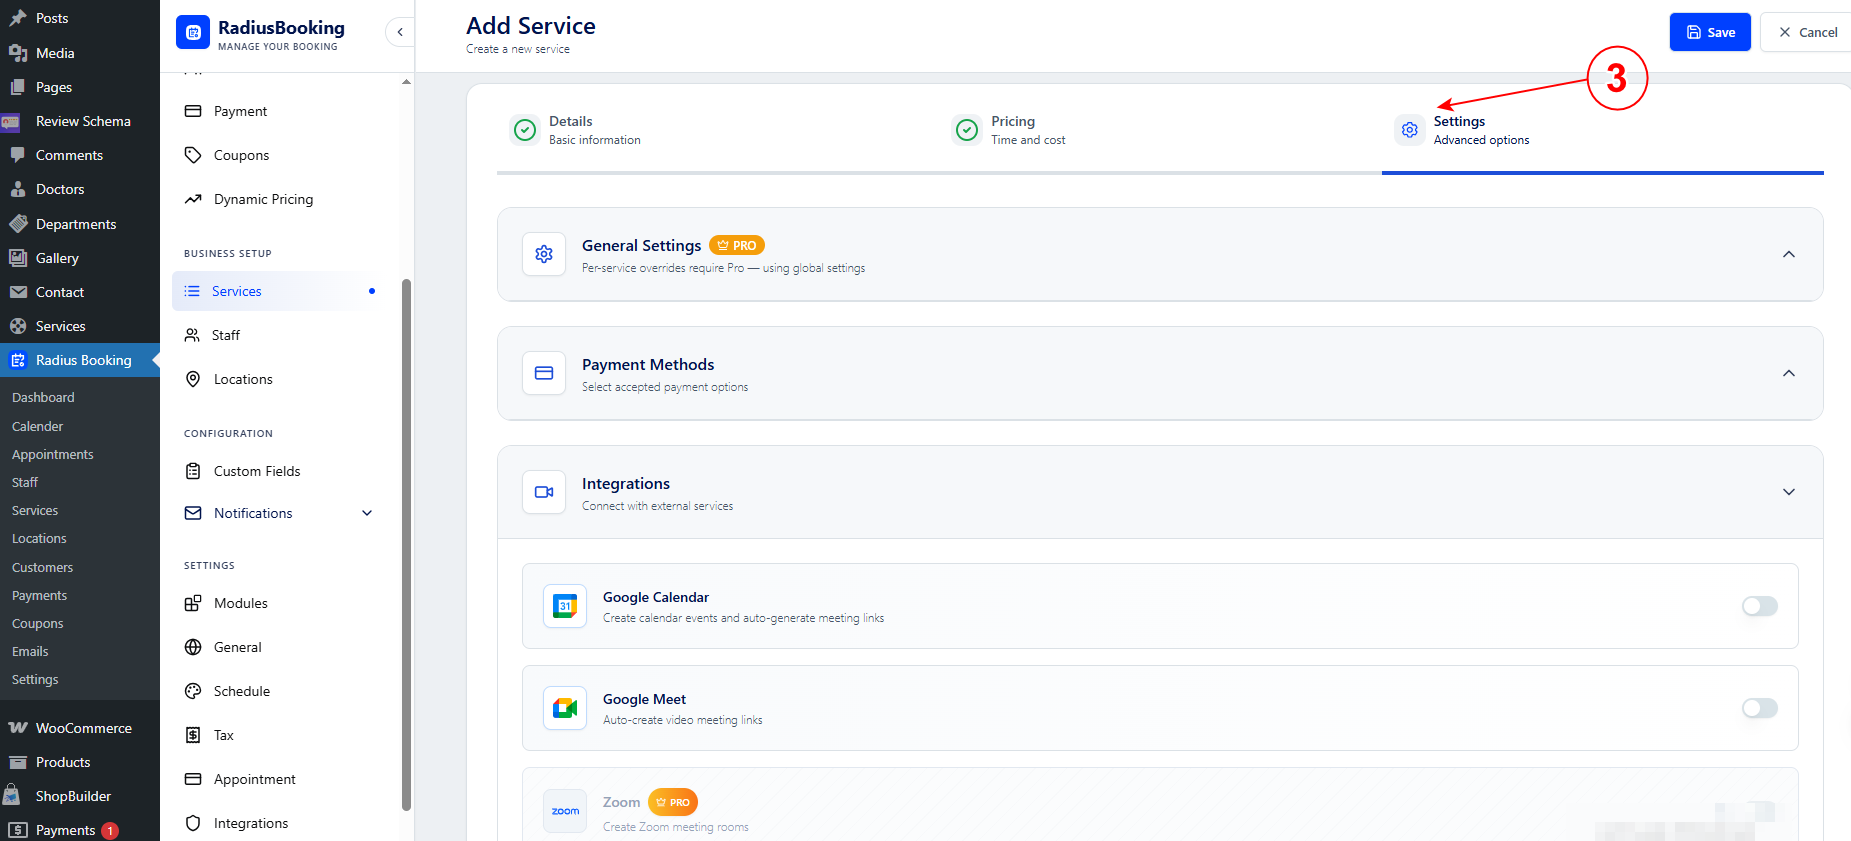
3. Settings (Advanced Options)
General Settings (PRO)
Per-service overrides for scheduling behavior.
The free version uses global settings.
Payment Methods
Select which payment methods customers can use
to pay for this service.
Stripe (PRO) —
Accept online card payments
PayPal —
Accept payments through PayPal
Cash Payment —
Allow customers to pay on-site in cash
Integrations
Connect this service with external apps
to enhance the booking experience.
Google Calendar —
Automatically create calendar events
for each booking
Google Meet —
Auto-create a Google Meet video link
Zoom (PRO) —
Automatically create a Zoom meeting room
Once all settings are configured,
click Create Service
to save and publish the service.
Use the Back button
to revisit previous tabs if needed.
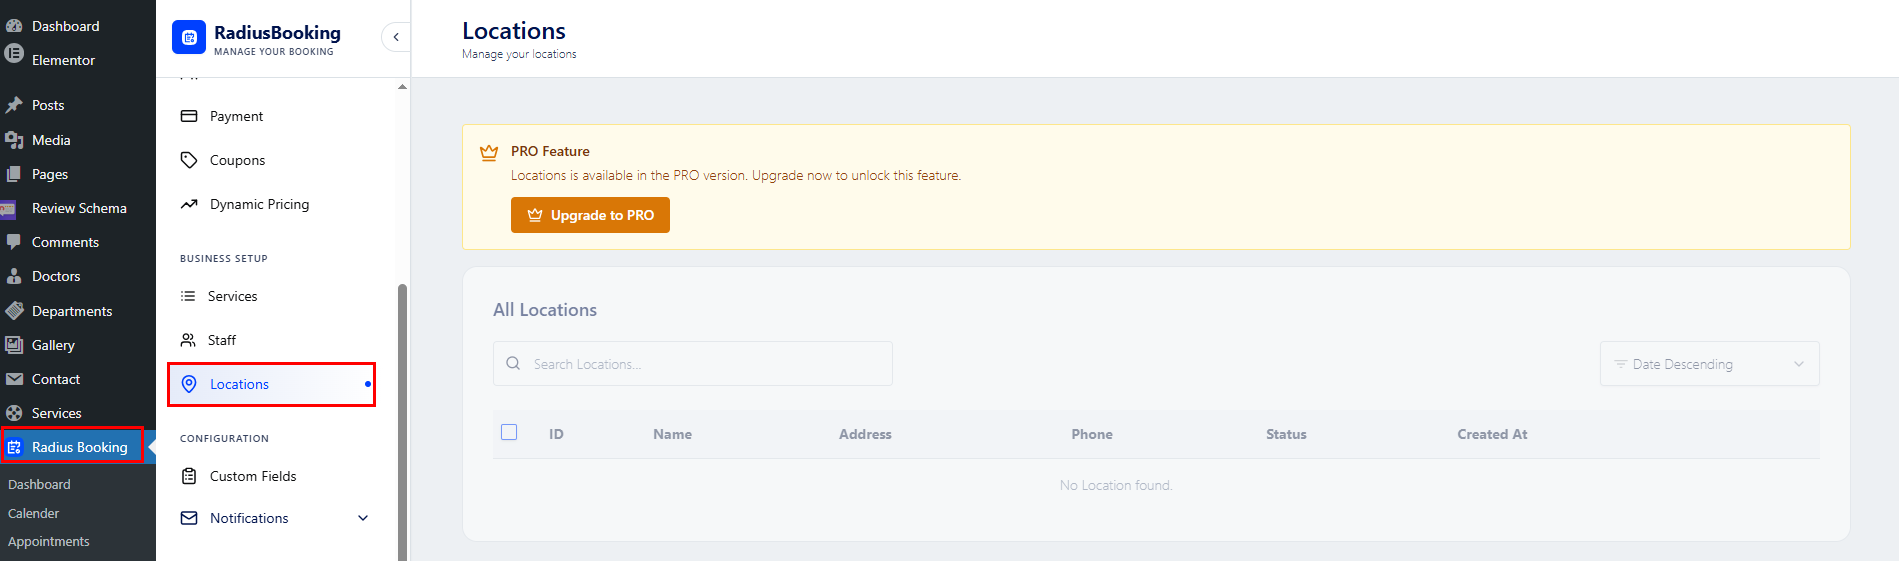
Location
Click Locations in the
RadiusBooking sidebar
to manage your clinic or branch locations.
PRO Feature
Locations is available on the PRO version only.
If you are on the free plan, you will see an
“Upgrade to PRO” banner at the top. Click it to unlock this feature.
The Locations List
Once unlocked, the All Locations table displays:
Column
Description
ID
Unique number assigned to each location
Name
Name of the branch or clinic
Address
Physical address of the location
Phone
Contact number for that location
Status
Whether the location is Active or inactive
Created At
The date the location was added
Use the Search Locations… bar to quickly find a specific location,
and the Date Descending dropdown to sort the list.
Why Locations Matter
Once you add locations, you can:
Assign staff members to specific branches
Let patients choose a location when booking
Manage separate schedules per location
Tip
If your clinic operates from a single location, you do not need this feature.
It is most useful for multi-branch clinics or hospitals with more than one physical office.
Add Booking on Doctor Page
This feature connects a doctor's profile page to the RadiusBooking system, so patients can book appointments directly from that doctor's page on the front end.
How to Add the Booking Option to a Doctor's Page
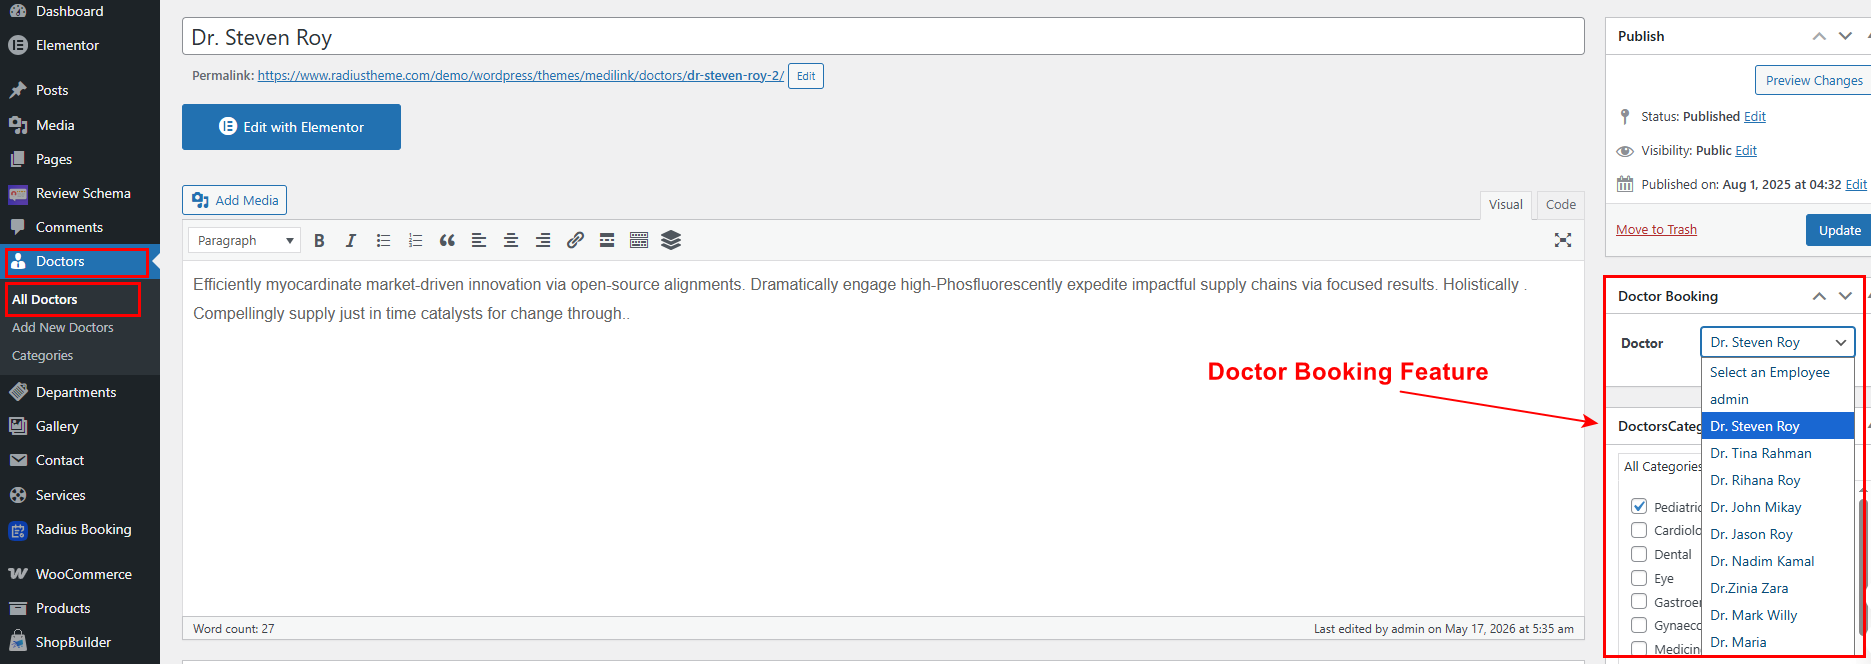
Step 1 Go to Doctors In the WordPress left sidebar, click Doctors → All Doctors
Step 2 Open the Doctor's Profile Find the doctor you want to link and click the Edit option under their name
Step 3 Find the Doctor Booking Panel On the right side of the edit screen, scroll down to find the Doctor Booking panel
Step 4 Select the Employee Click the Doctor dropdown and select the matching staff member from RadiusBooking
For example: If you are editing Dr. Steven Roy's profile page, select Dr. Steven Roy from the dropdown list
Step 5 Save Click the Update button at the top right to save the changes. What This Does Once linked, the doctor's public profile page will display a booking button or booking form connected to that staff member's availability, services, and schedule set up in RadiusBooking.
What This Does
Once linked, the doctor's public profile page will display a booking button or booking form connected to that staff member's availability, services, and schedule set up in RadiusBooking.
Important Notes
The dropdown lists all employees added in RadiusBooking → Staff. If a doctor's name is missing, make sure they have been added as a staff member in RadiusBooking first
Each doctor page should be linked to only one staff member
If you change the linked employee later, just repeat the steps above and click Update
Front End Booking
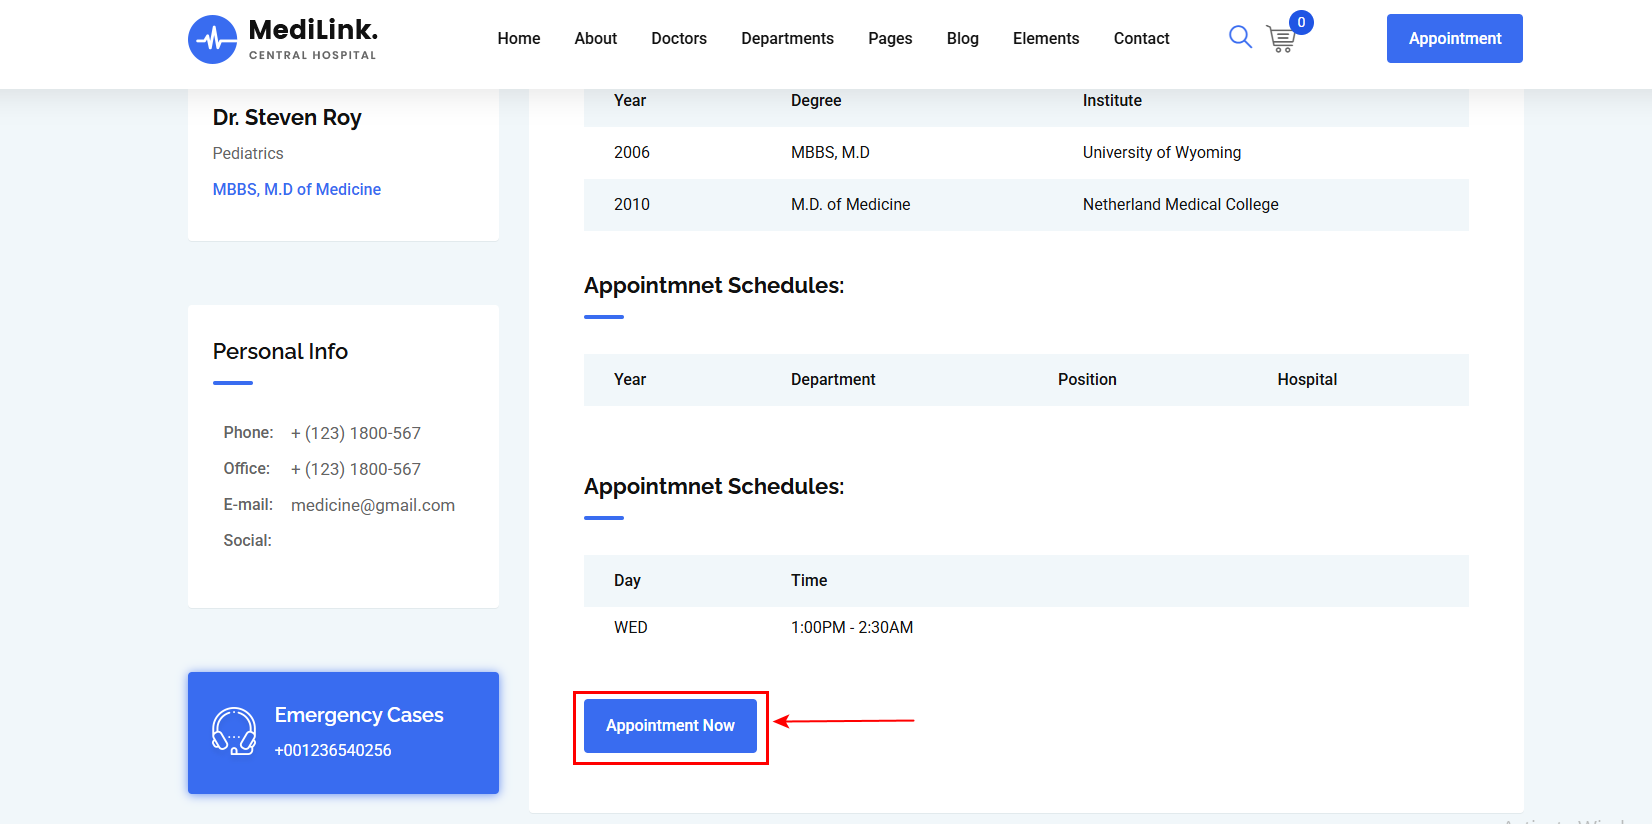
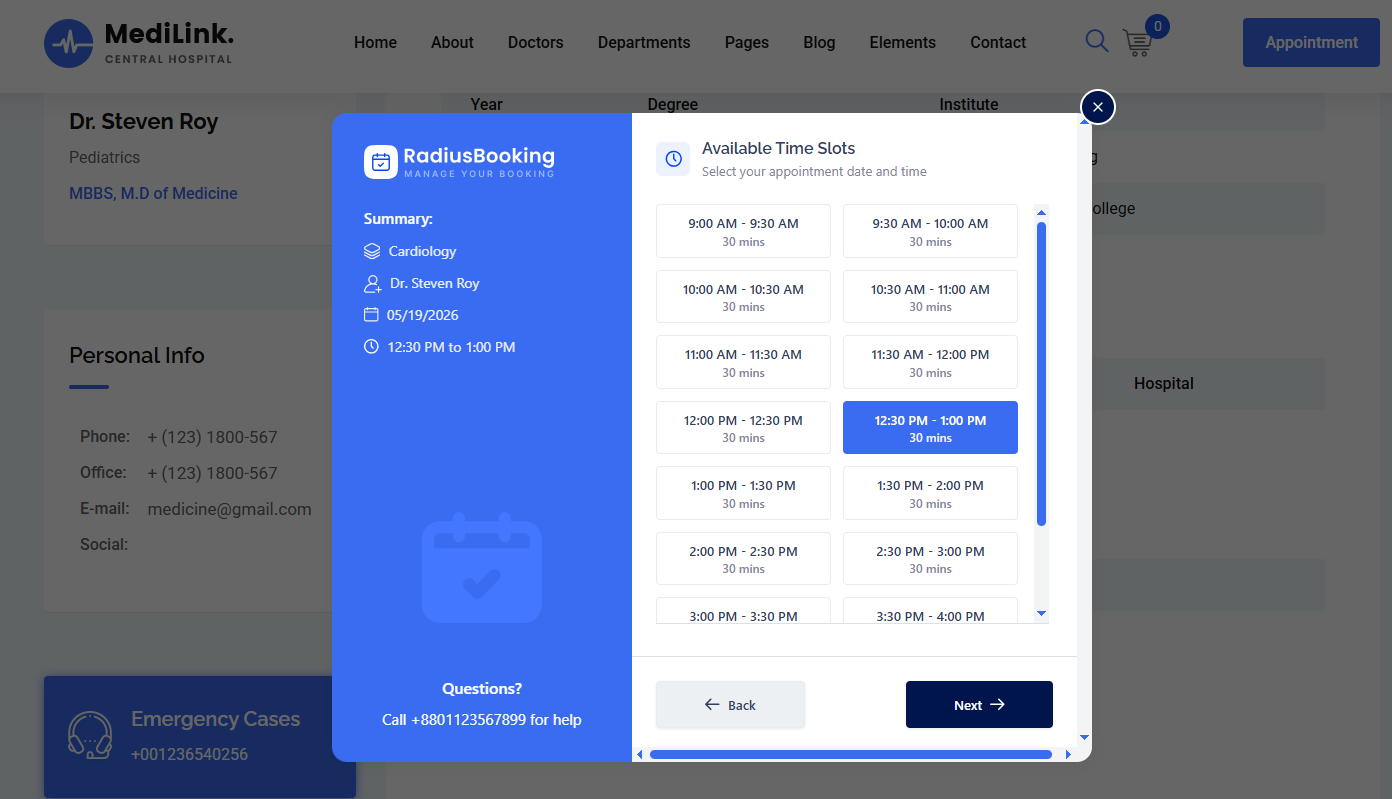
Once a doctor is linked to RadiusBooking, an "Appointment Now" button appears on their public profile page. When a patient clicks it, a RadiusBooking popup opens directly on the page without any redirect.
The patient simply clicks their preferred time slot, which gets highlighted in blue, then clicks Next to proceed. A Back button is also available to go to the previous step. At the bottom of the popup, a help line number is displayed for patients who need assistance during booking.
4.7| Menu
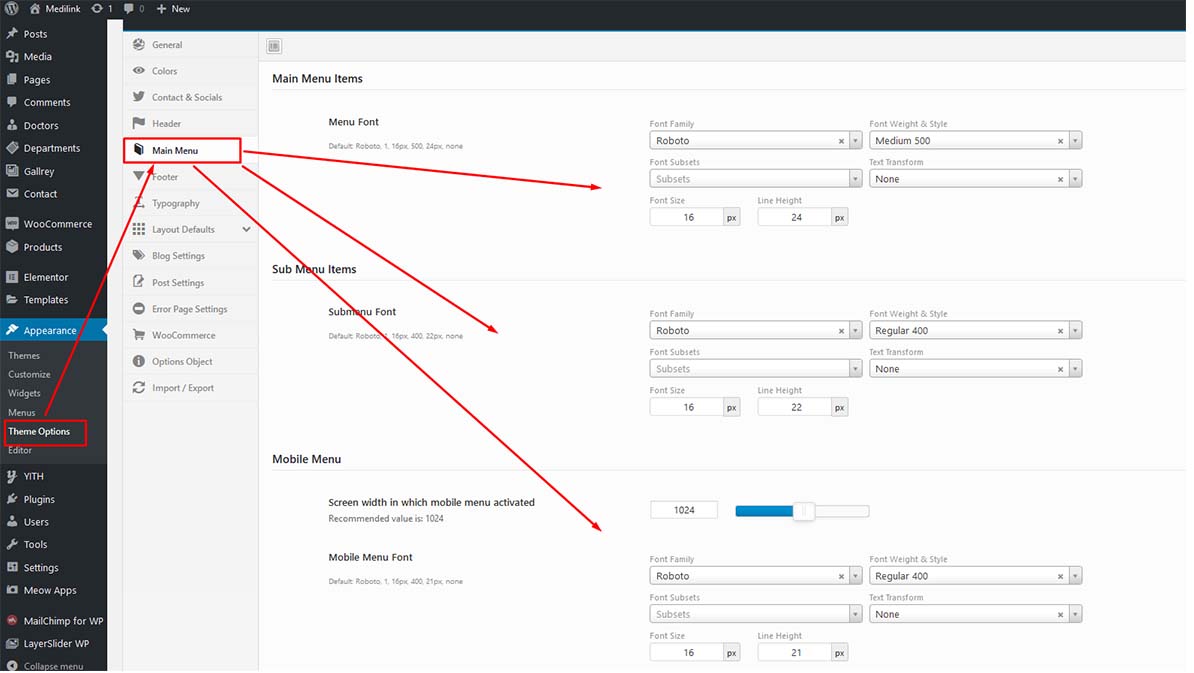
To customize the menu settings, navigate to Appearance -> Theme Options. Then go to Main Menu tab.
From here you can change the menu display behaviour. You can set menu fonts and Mobile menu Width as well.
After changing the settings, Click on Save Changes button.
4.8| Multi Column Menu
Multi column menu looks like this:
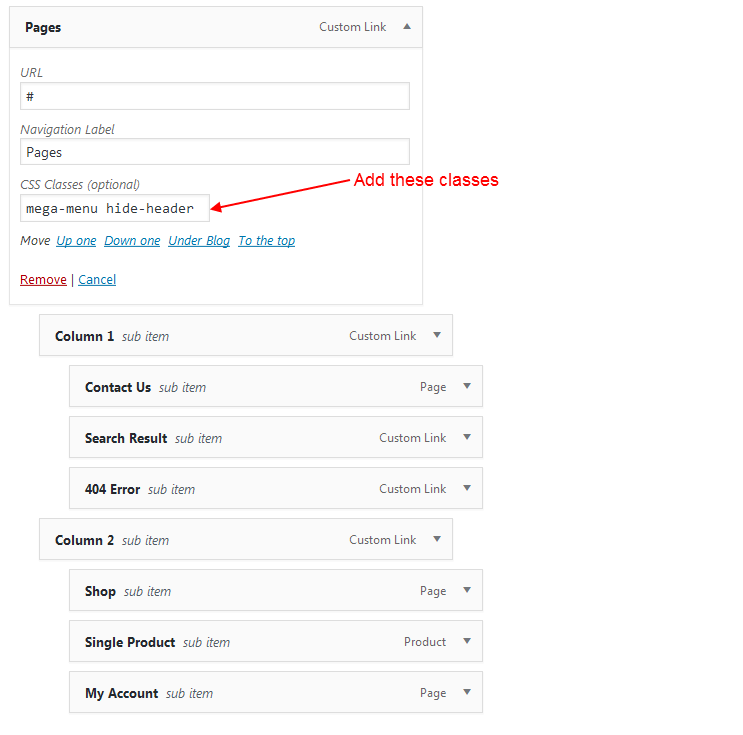
To make any menu item multi column, you have to add some specific classes in the parent menu item. Here's an example:
Here I used css class mega-menu which turns the submenu items into multi column. Also i used another class hide-header which hides the title "Column 1" and "Column 2" inside menu.
NB: If you can't see the field "CSS Classes", you have to enable it first. To do this, go to the top and follow this screenshot below:
4.9| Footer
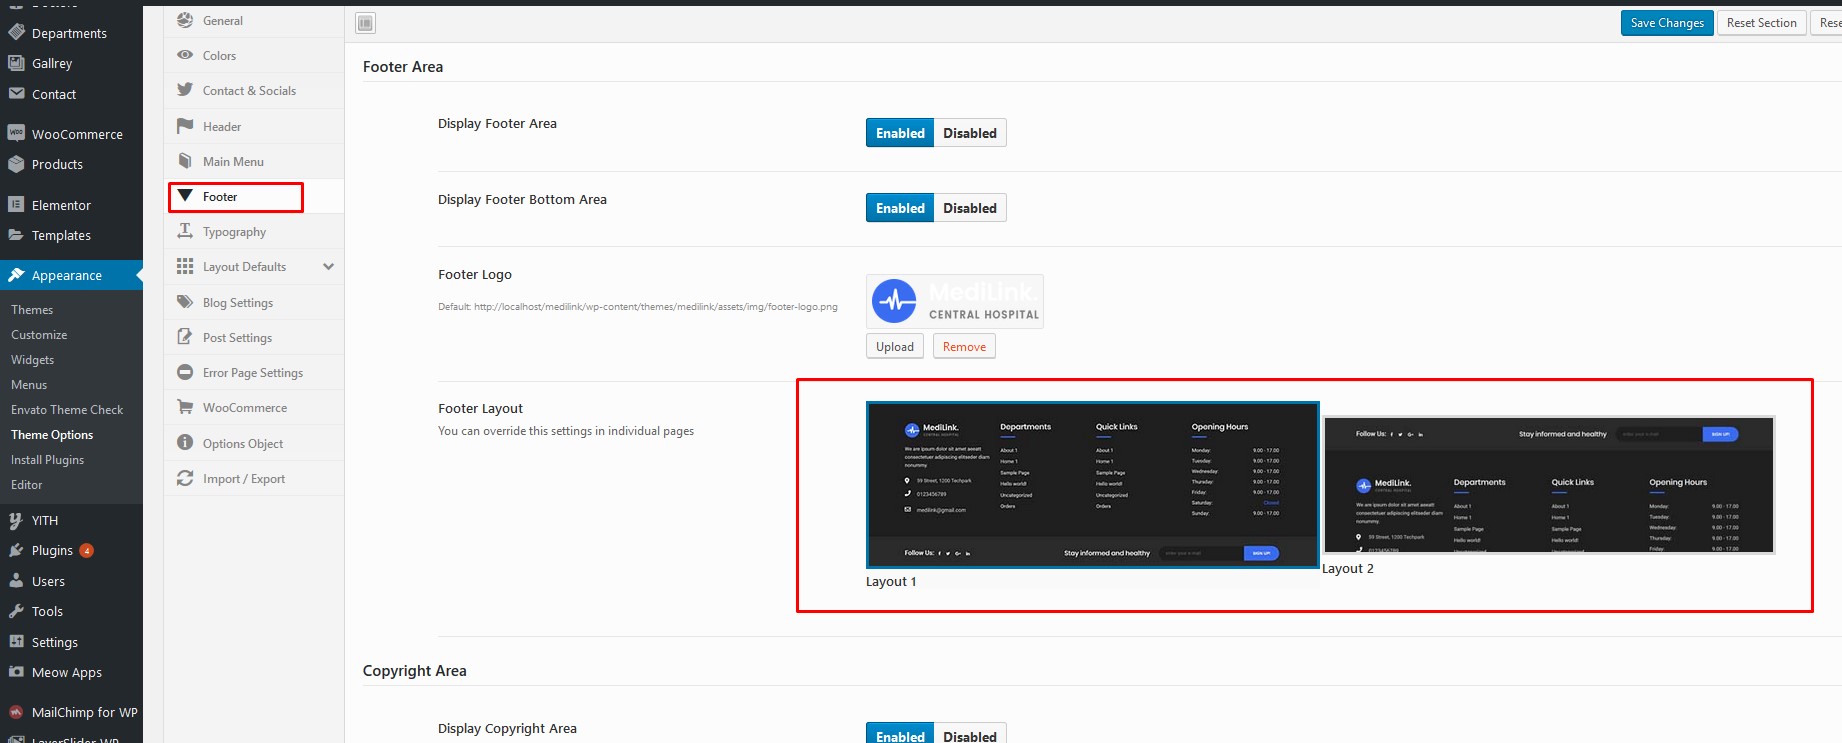
To change the footer settings, navigate to Appearance -> Theme Options. Then go to Footer tab. It looks like this:
After changing the settings, Click on Save Changes button.
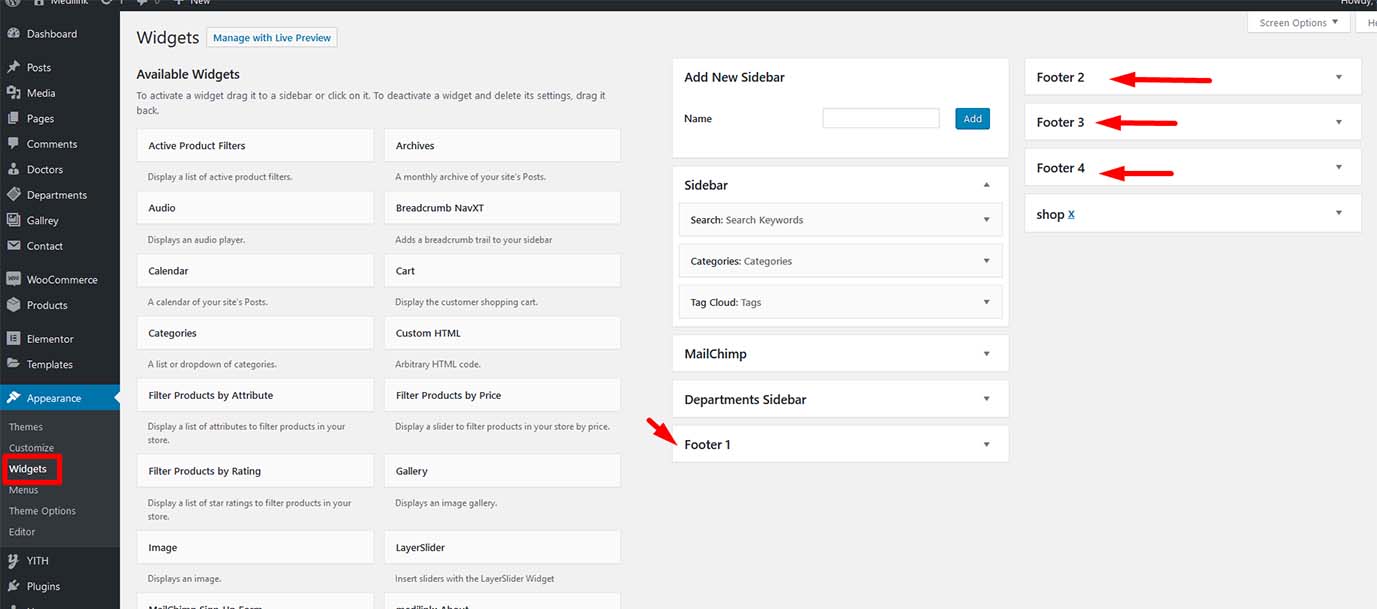
To set up footer widgets, navigate to Appearance -> Widgets. Here you can find available footer widget areas.
4.10| Typography
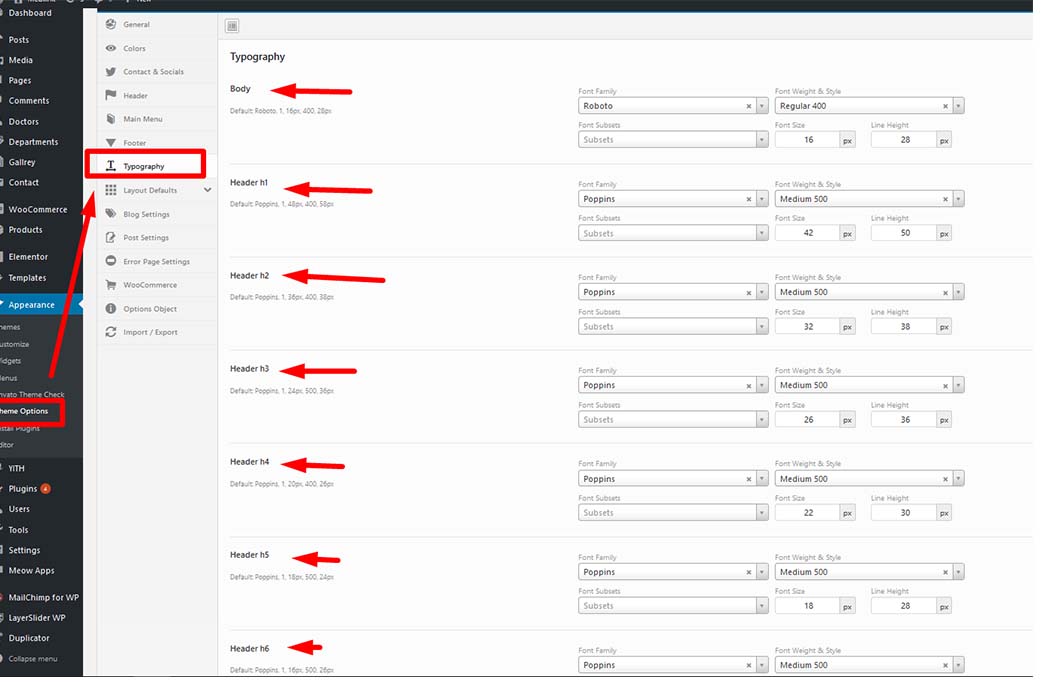
You can change the typography of Body and Headers. To do this, go to Appearance -> Theme Options. Then go to Typography tab.
After changing the Typography settings, Click on Save Changes button.
5| Layout Settings
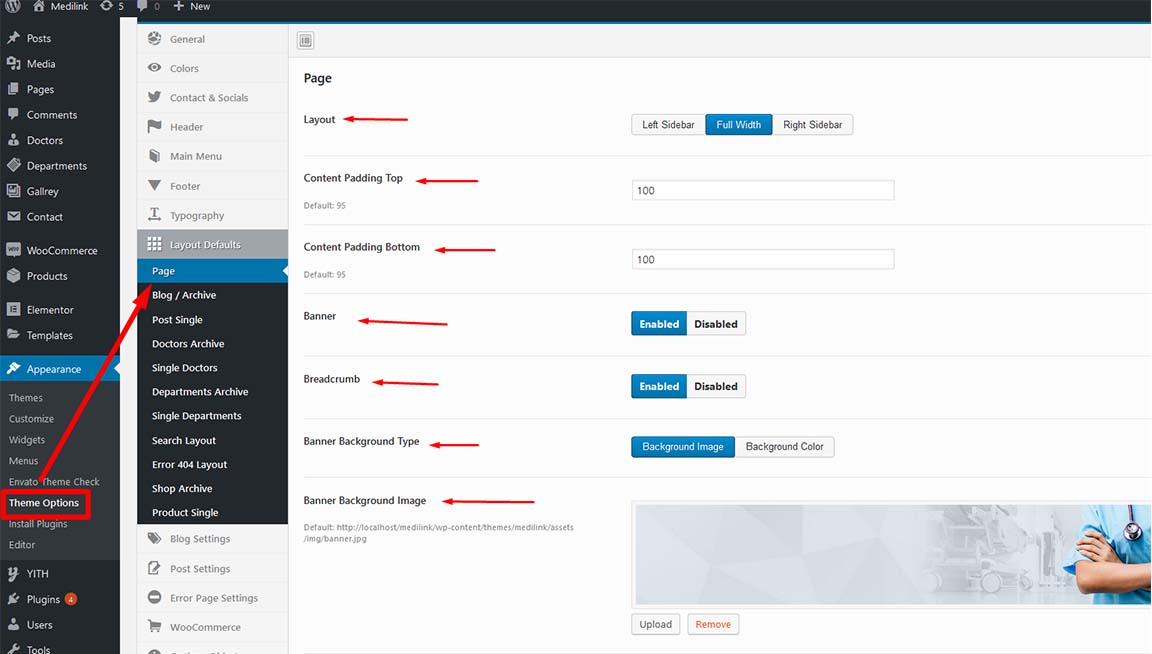
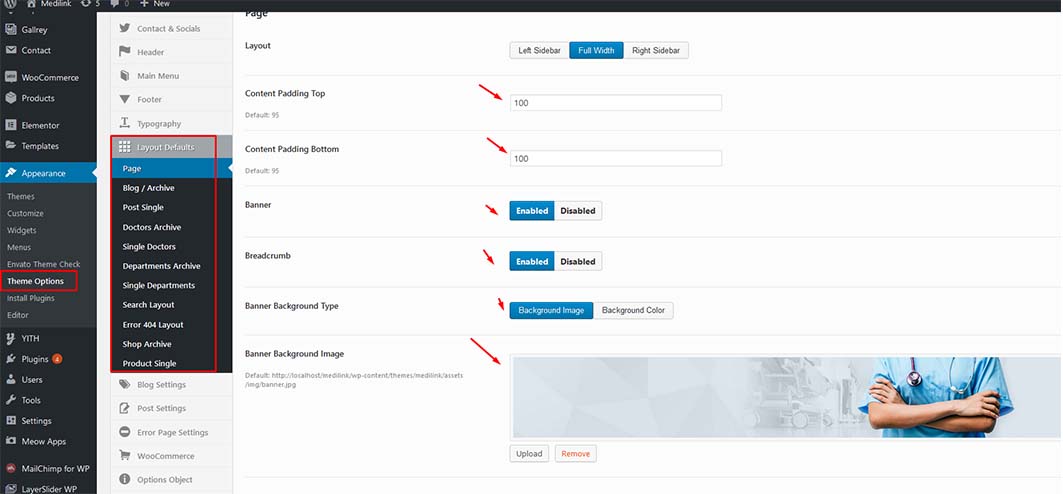
From here you can set default layouts for pages, blog, posts etc. You can find this settings on Appearance -> Theme Options and then Layout Defaults tab.
This settings is similar for all submenus under "Layout Defaults", so for convenience i'll just describe for one item (Pages).
Layout: You can choose various layout types for pages eg. Left Sidebar, Right Sidebar, Full Width.
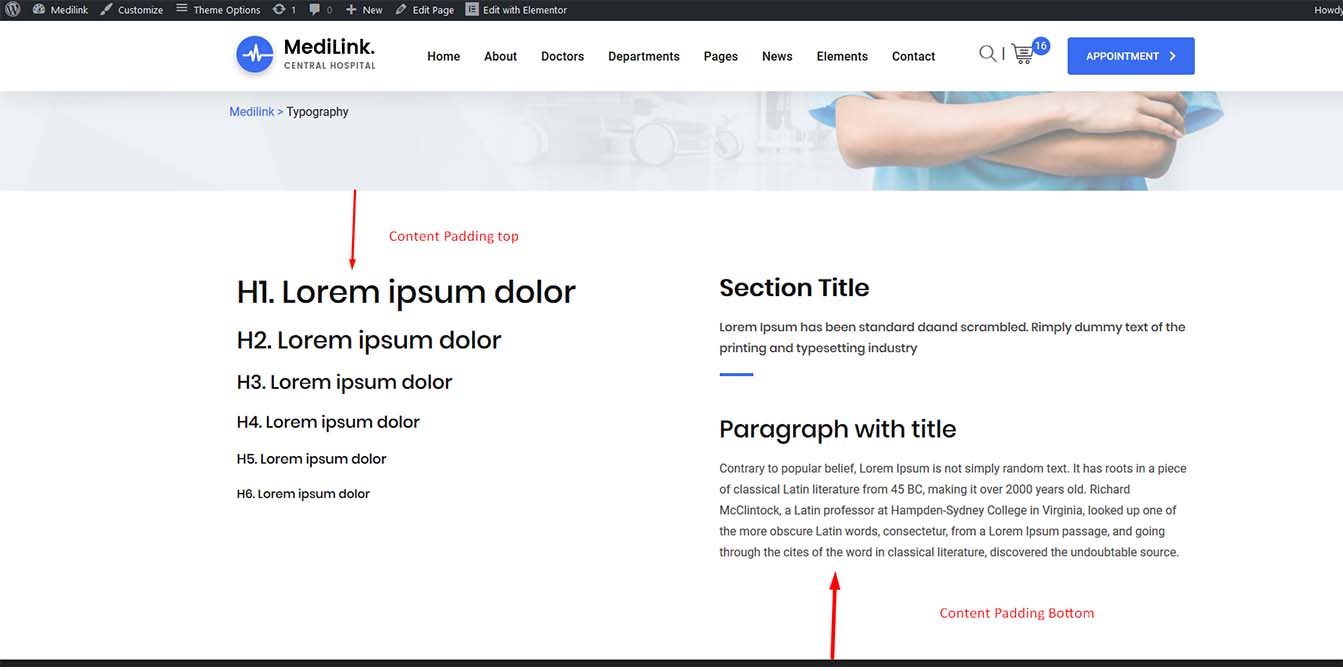
Content Padding Top: Paddings at the top of page contents. (see image below)
Content Padding Bottom: Paddings at the bottom of page contents.(see image below)
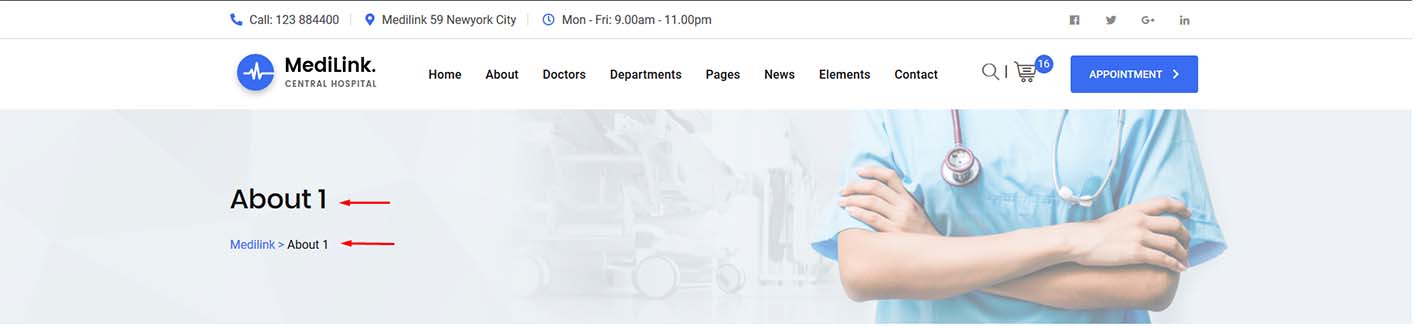
Banner: You can enable or disable banner (see image below).
Breadcrumb: You can enable or disable breadcrumb (see image below).
Banner Background Type: You can choose weather you want a background image or background color for banner.
Banner Background Color/Image: You can select the banner background color or image from here.
6| Layout Settings for Individual Post Types
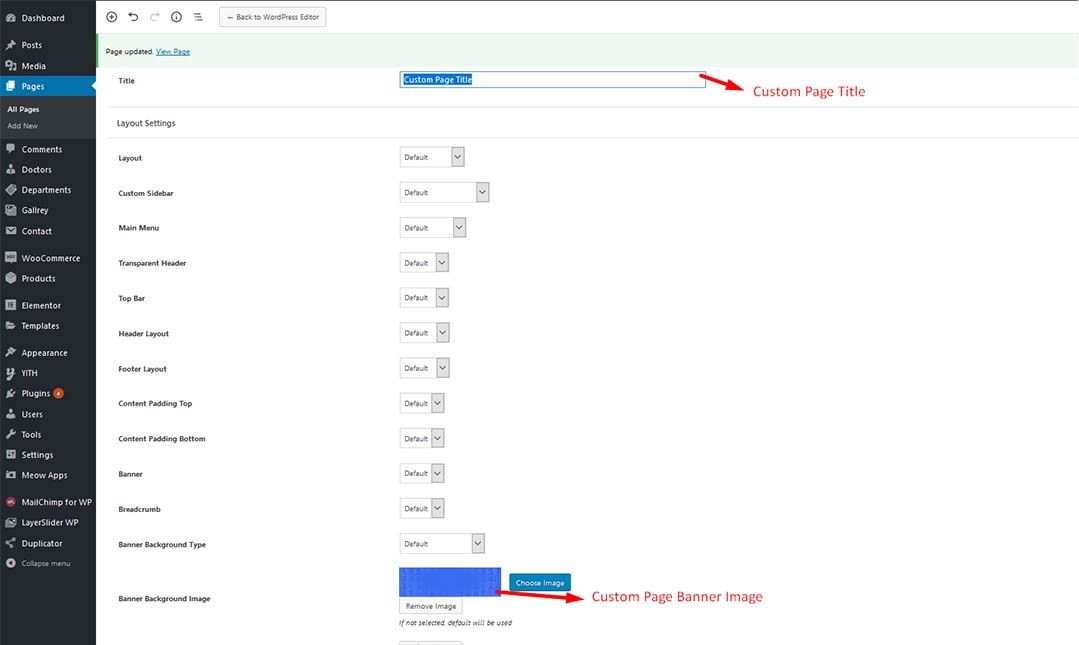
You can override the above settings for individual post types. For any post types (like Posts, Pages, Services, Team, etc), when you go to Add New or Edit page, you can find similar settings like above under the "Layout Settings" box. If you change any settings from here, this will take priority. If you choose default, settings from the Theme Options -> Layout Defaults (described above) will be used.
7| Blog/posts Settings
Navigate to Appearance -> Theme Options. Then go to Post Settings tab. From here you can change Blog/Archive related settings.
Also you can upload an Inner Page Banner ImageAppearance -> Theme Options. Then go to General tab. It'll look like this:
After changing the settings, Click on Save Changes button.
8| Post Settings
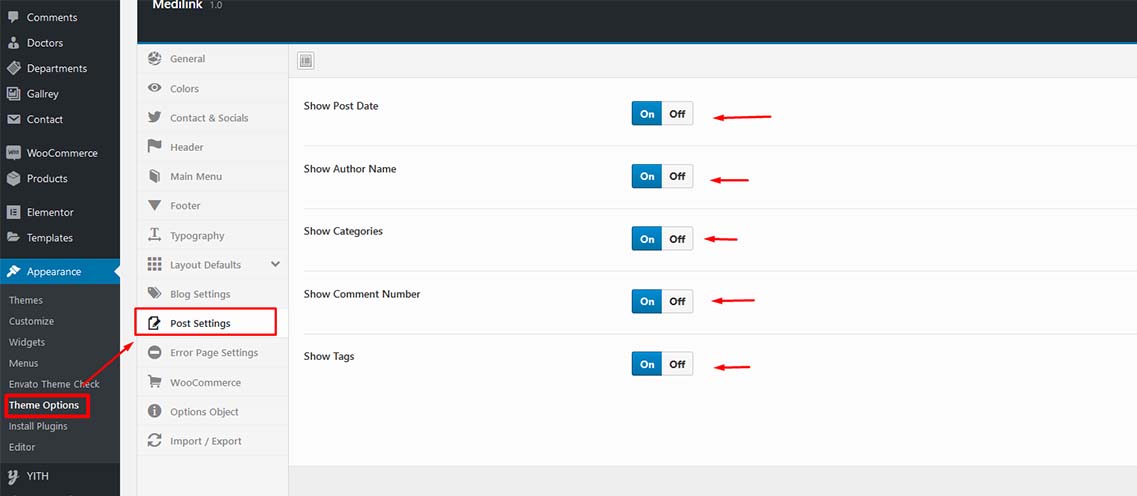
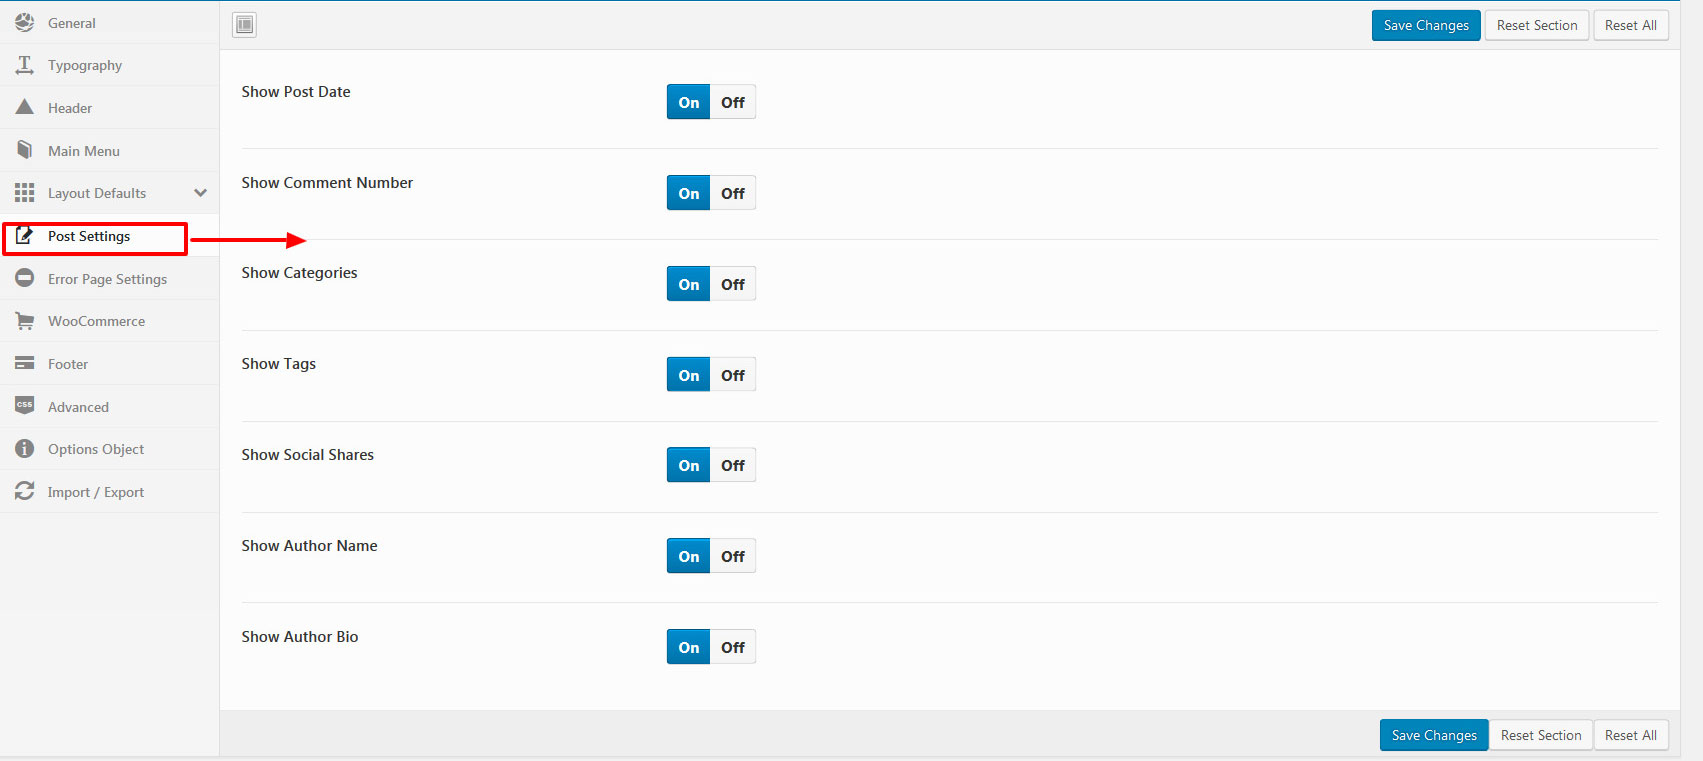
Navigate to Appearance -> Theme Options. Then go to Post Settings tab. From here you can change settings for single post .
After changing the settings, Click on Save Changes button.
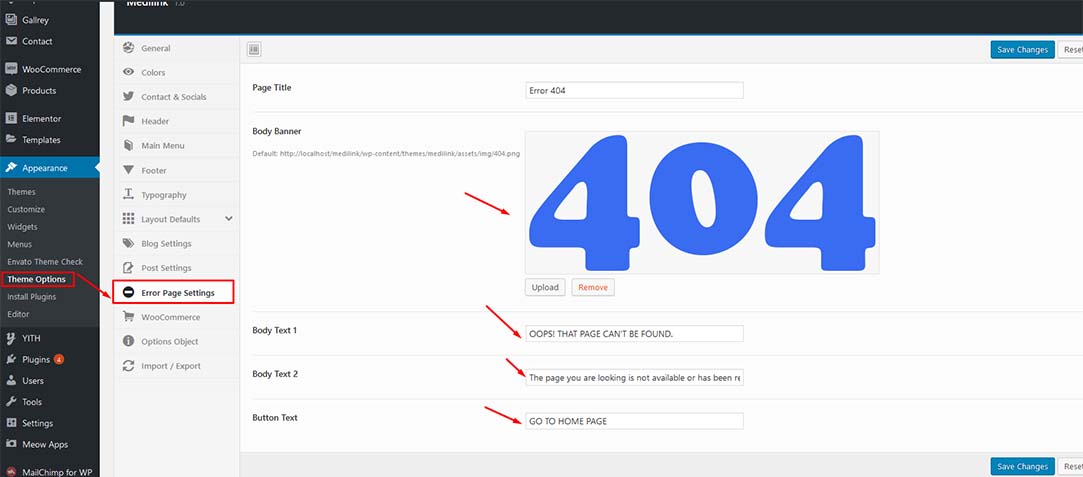
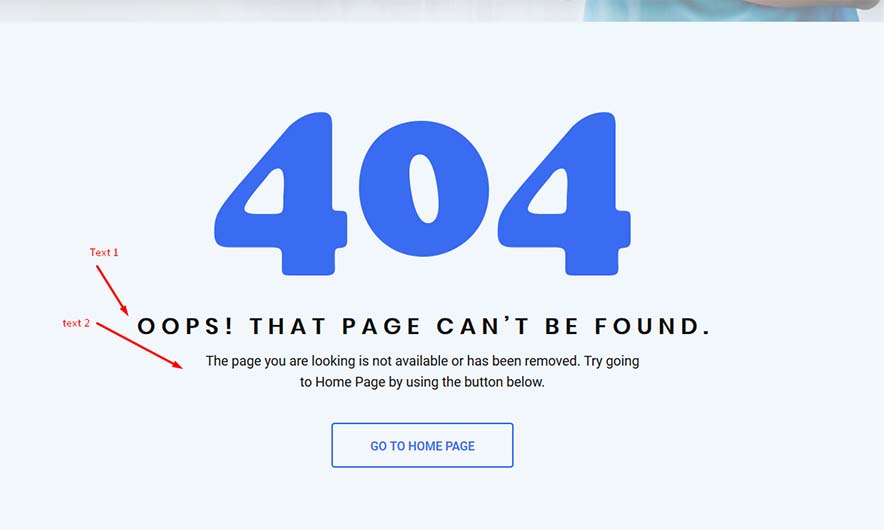
9| Error Page Settings
Navigate to Appearance -> Theme Options. Then go to Error Page Settings tab. Settings will look like this:
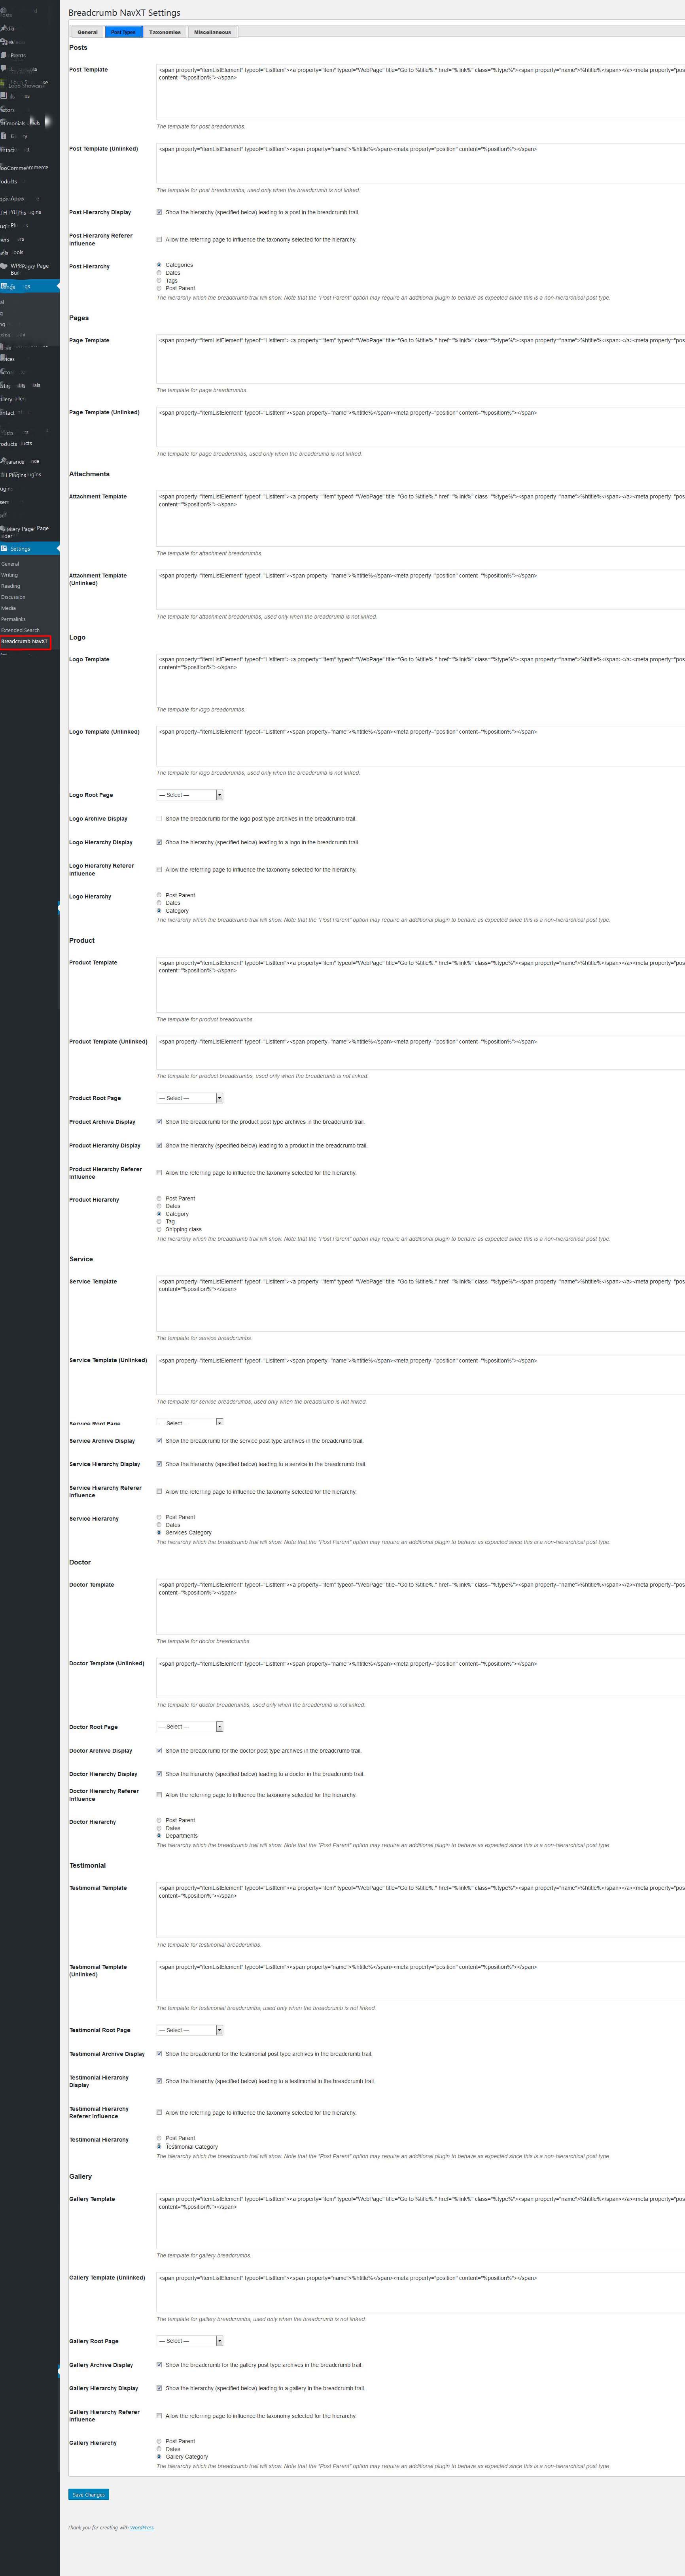
10| Breadcrum Setting for custom post type
You can set up root/archive pages for these Custom Post Types which will be used as breadcrumb. To do this, navigate to Settings -> Breadcrumb NavXT. In this page, Click on the Post Types tab.
Then select the root pages for Chef, Recipe and Event like the image below. It'll be used as archive page.
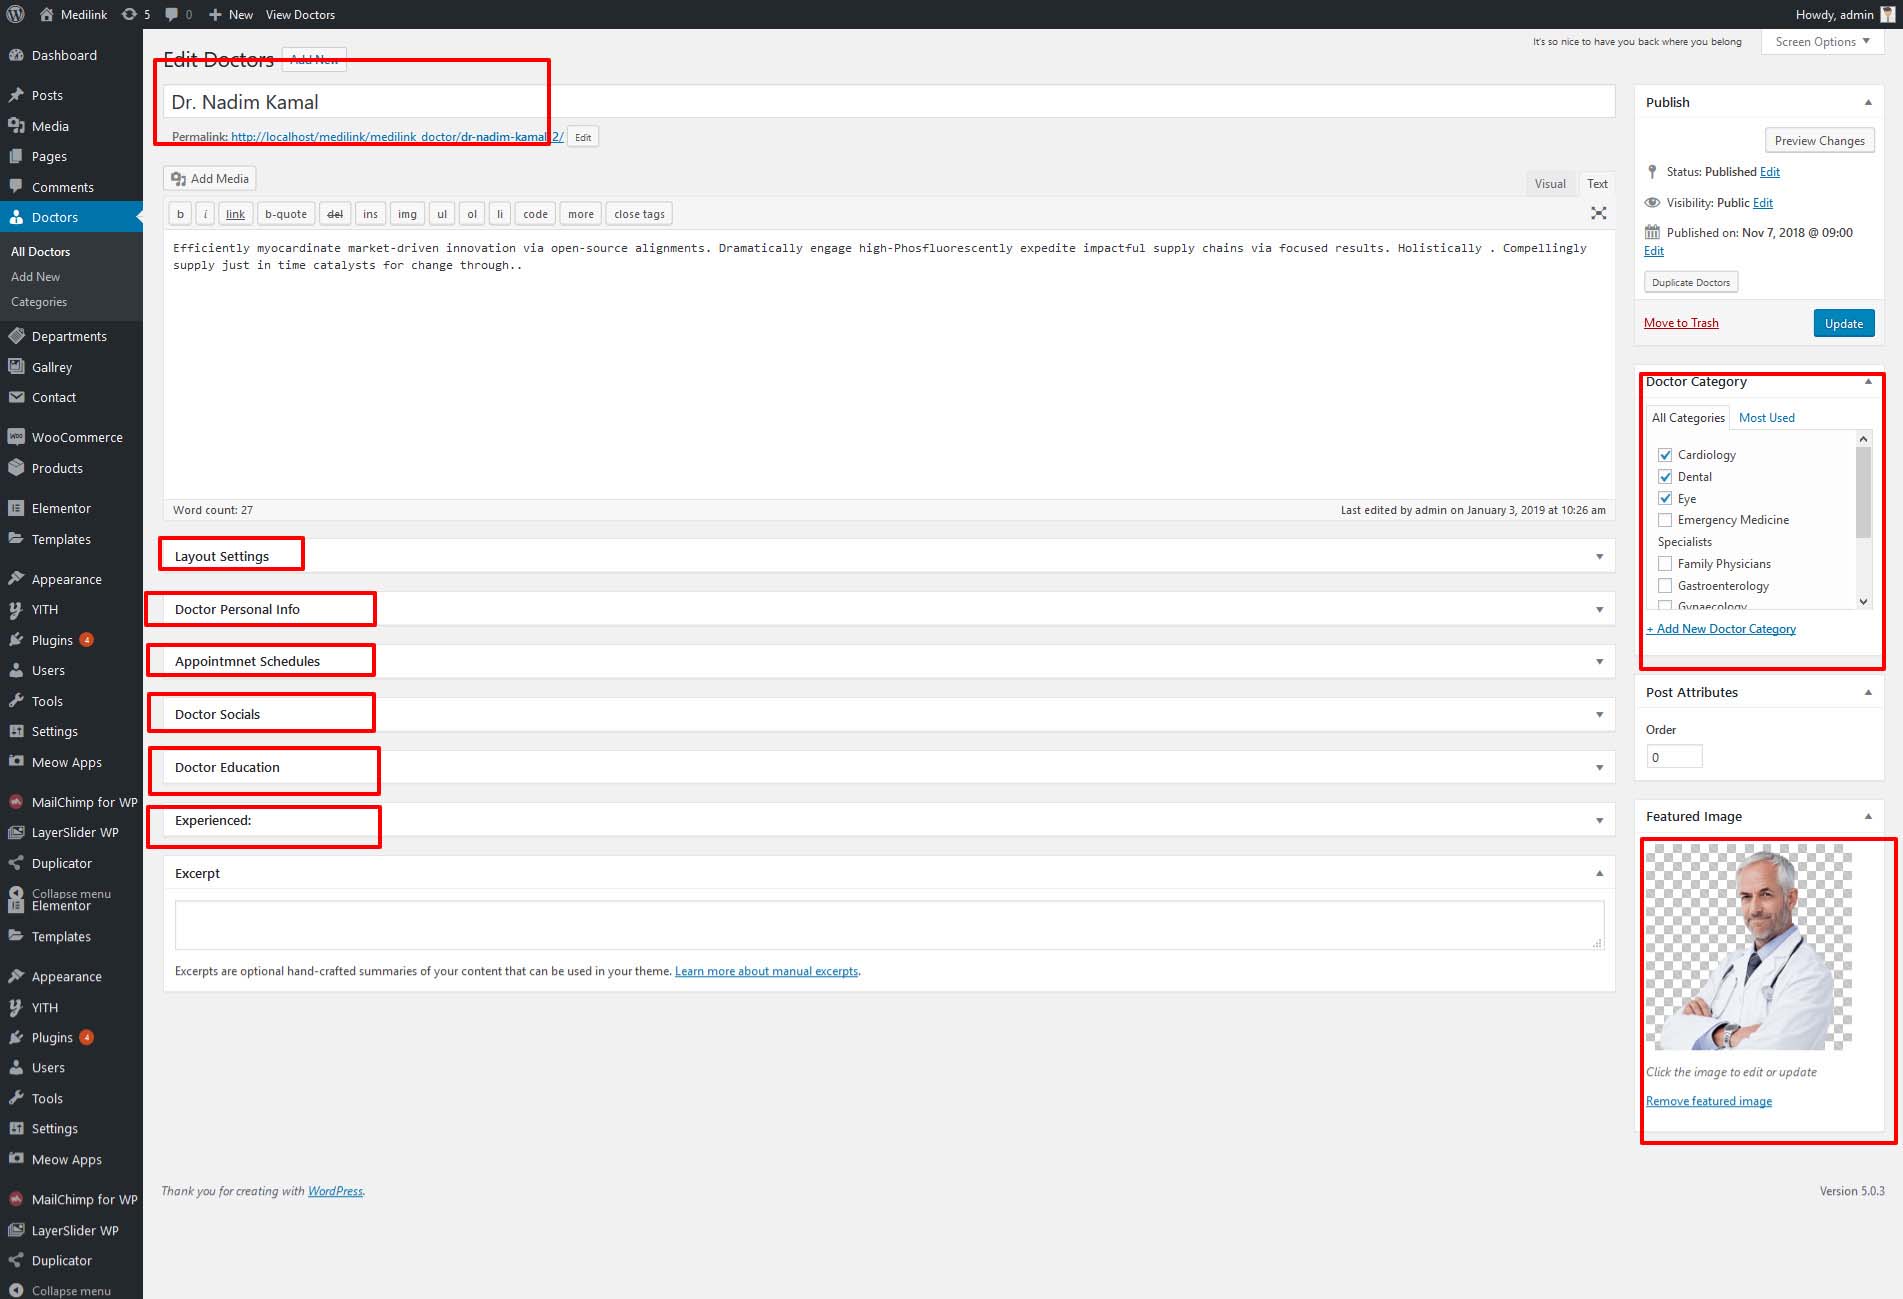
11| Doctors
You can add Doctor members from Doctors menu. For each Doctor you'll see the following settings:
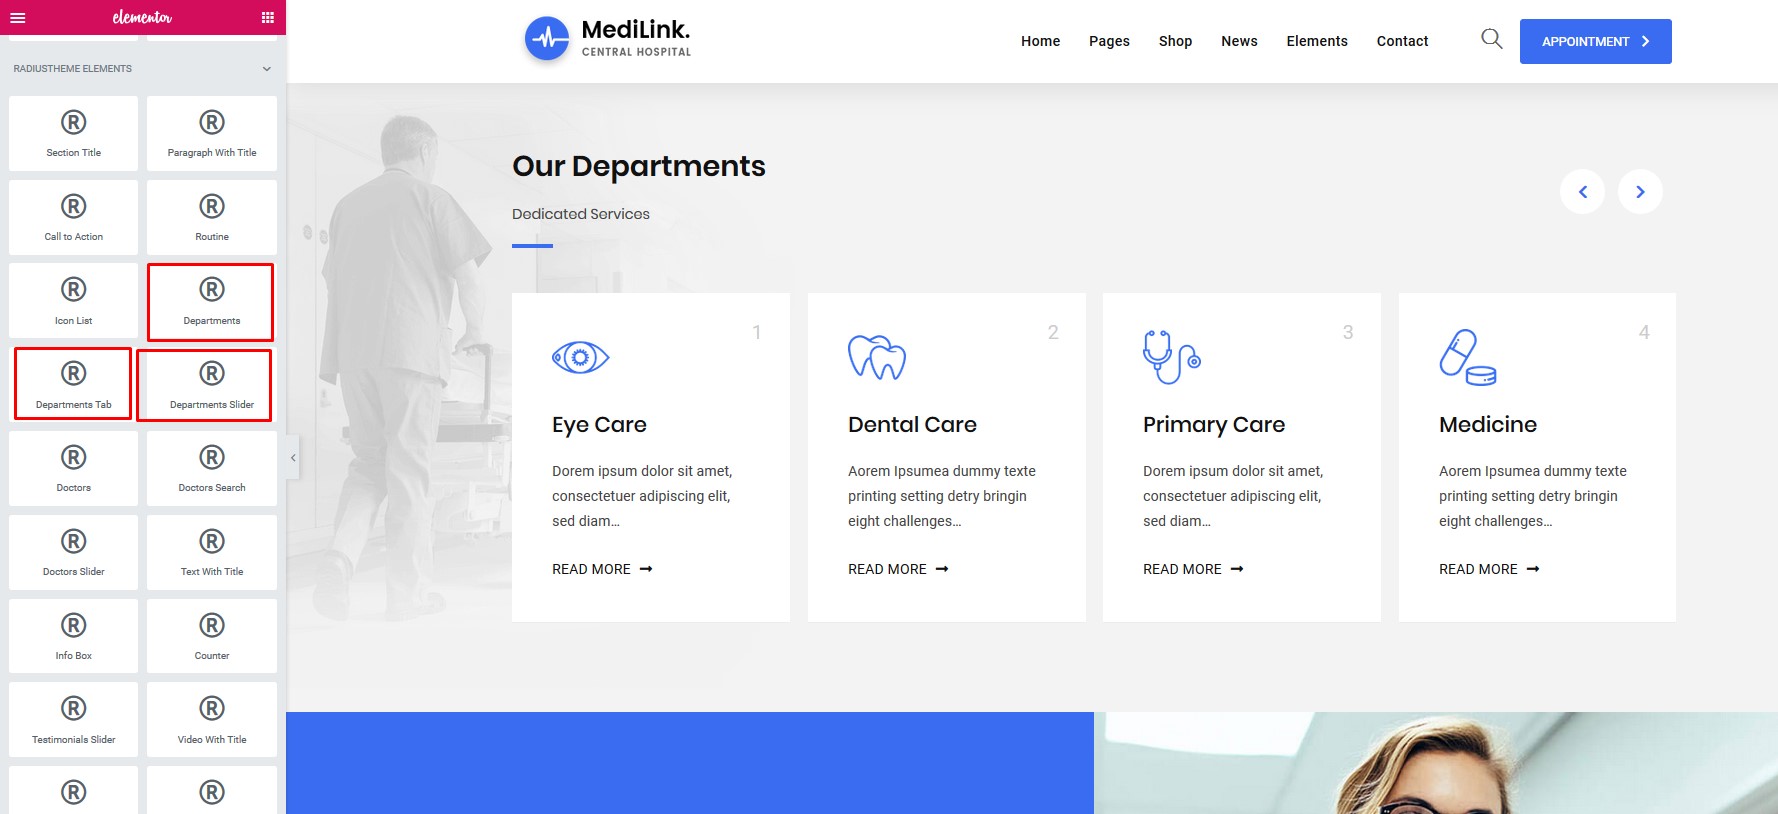
For displaying doctor, we have created Elementor elements for you. From Elementor, Go to RadiusTheme Elements Section, here you'll see Medilink: doctor element.
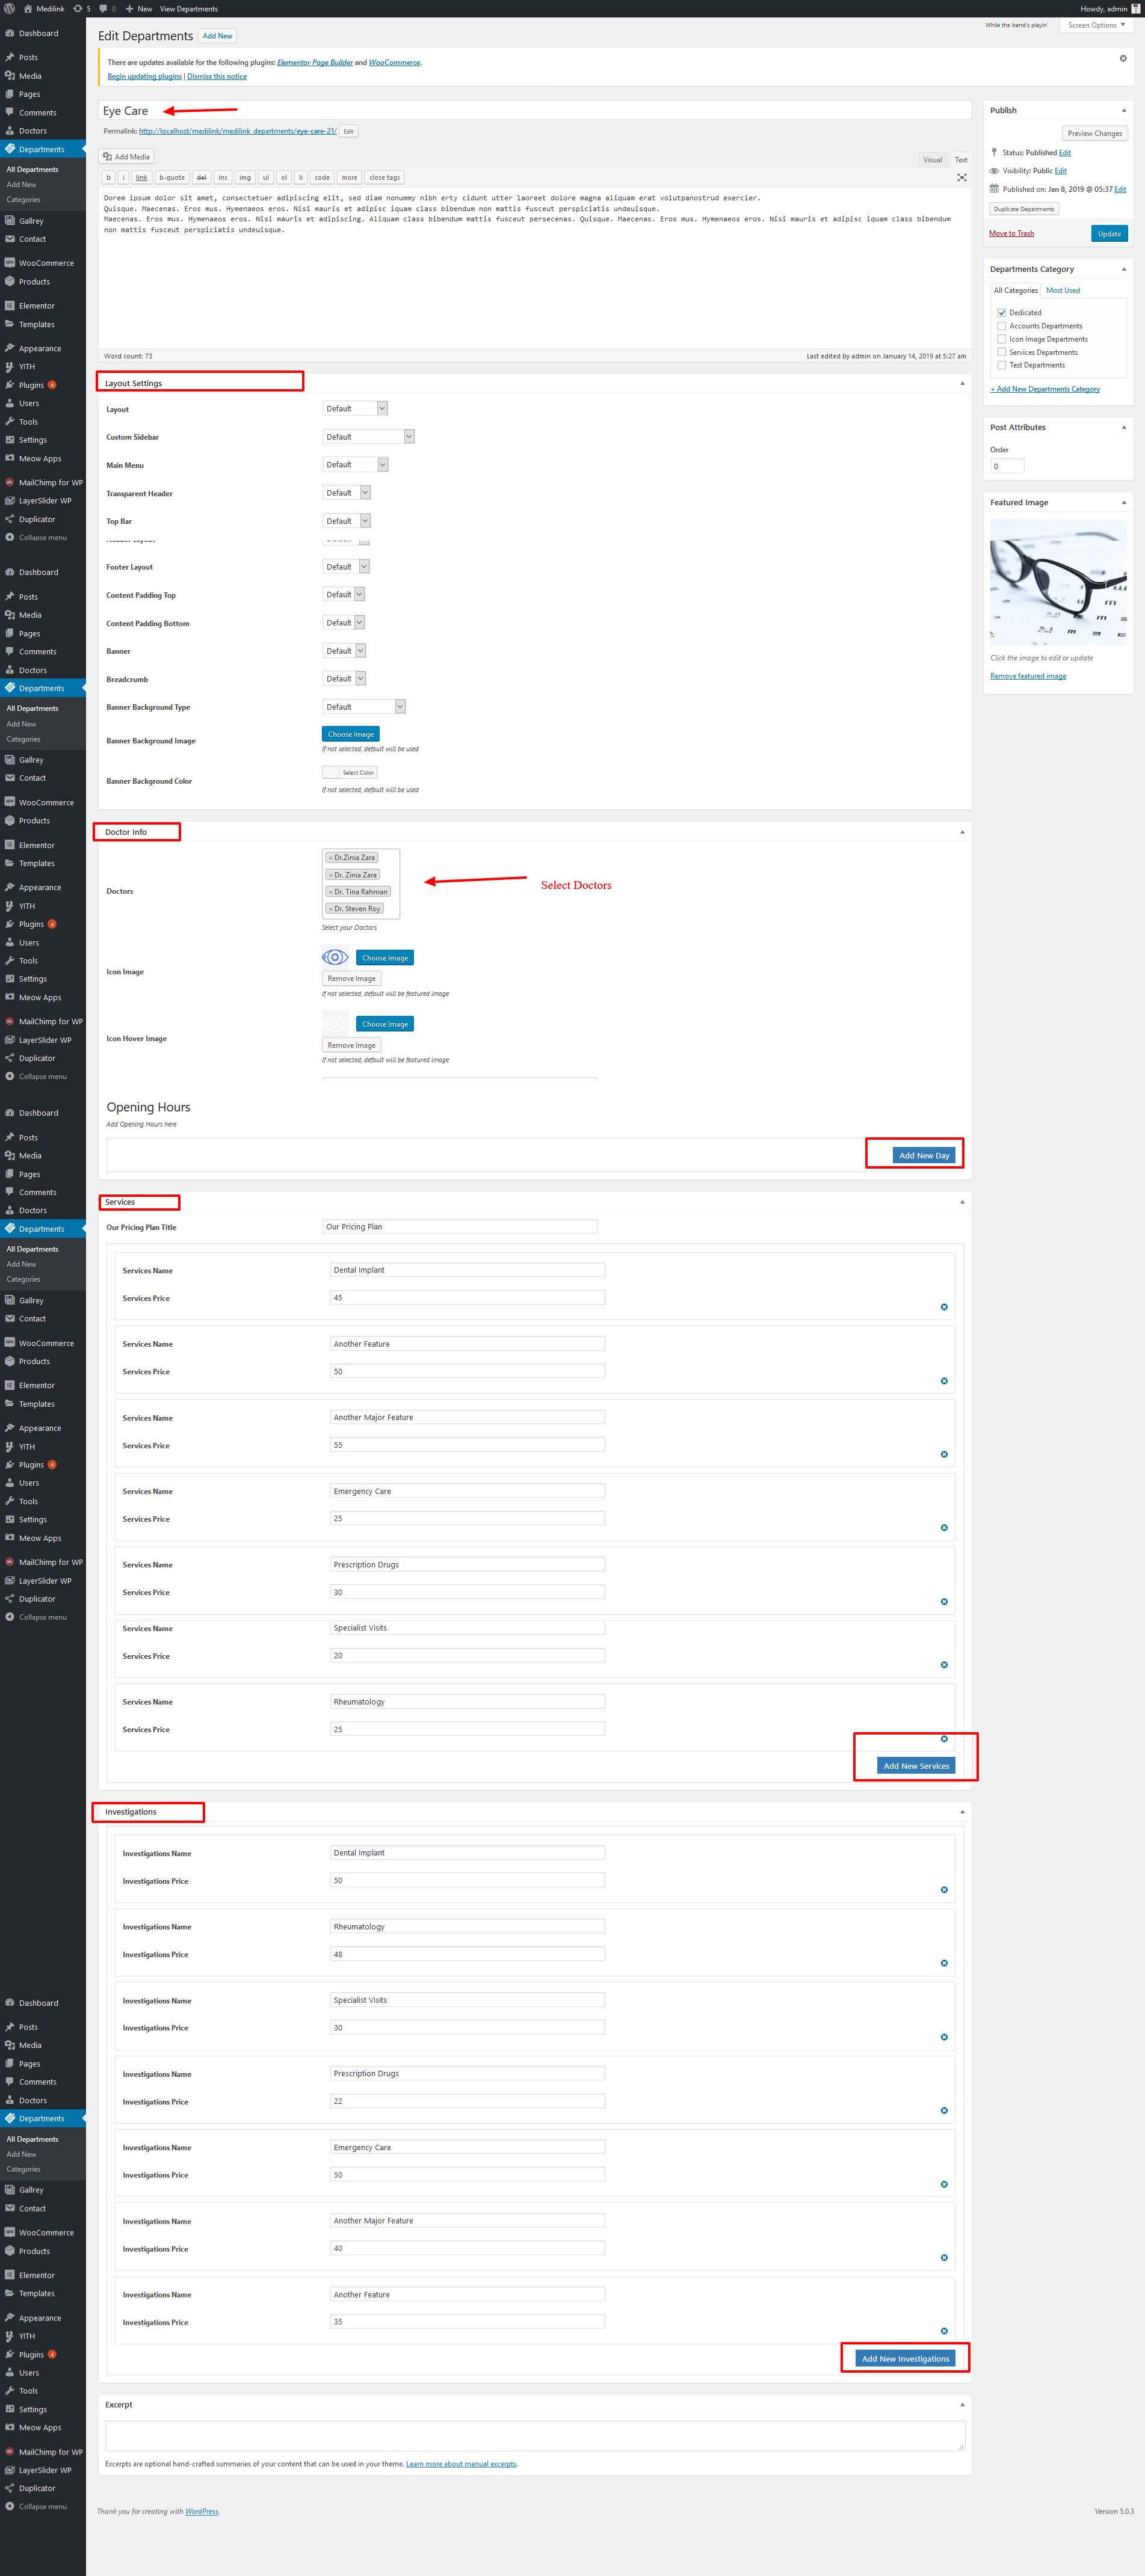
12| Medilink Departments
You can add class from departments menu. For each class you'll see the following settings:
For displaying Event, we have created Elementor elements for you. From Elementor elements, Go to RadiusTheme Elements Section, here you'll see class and element.
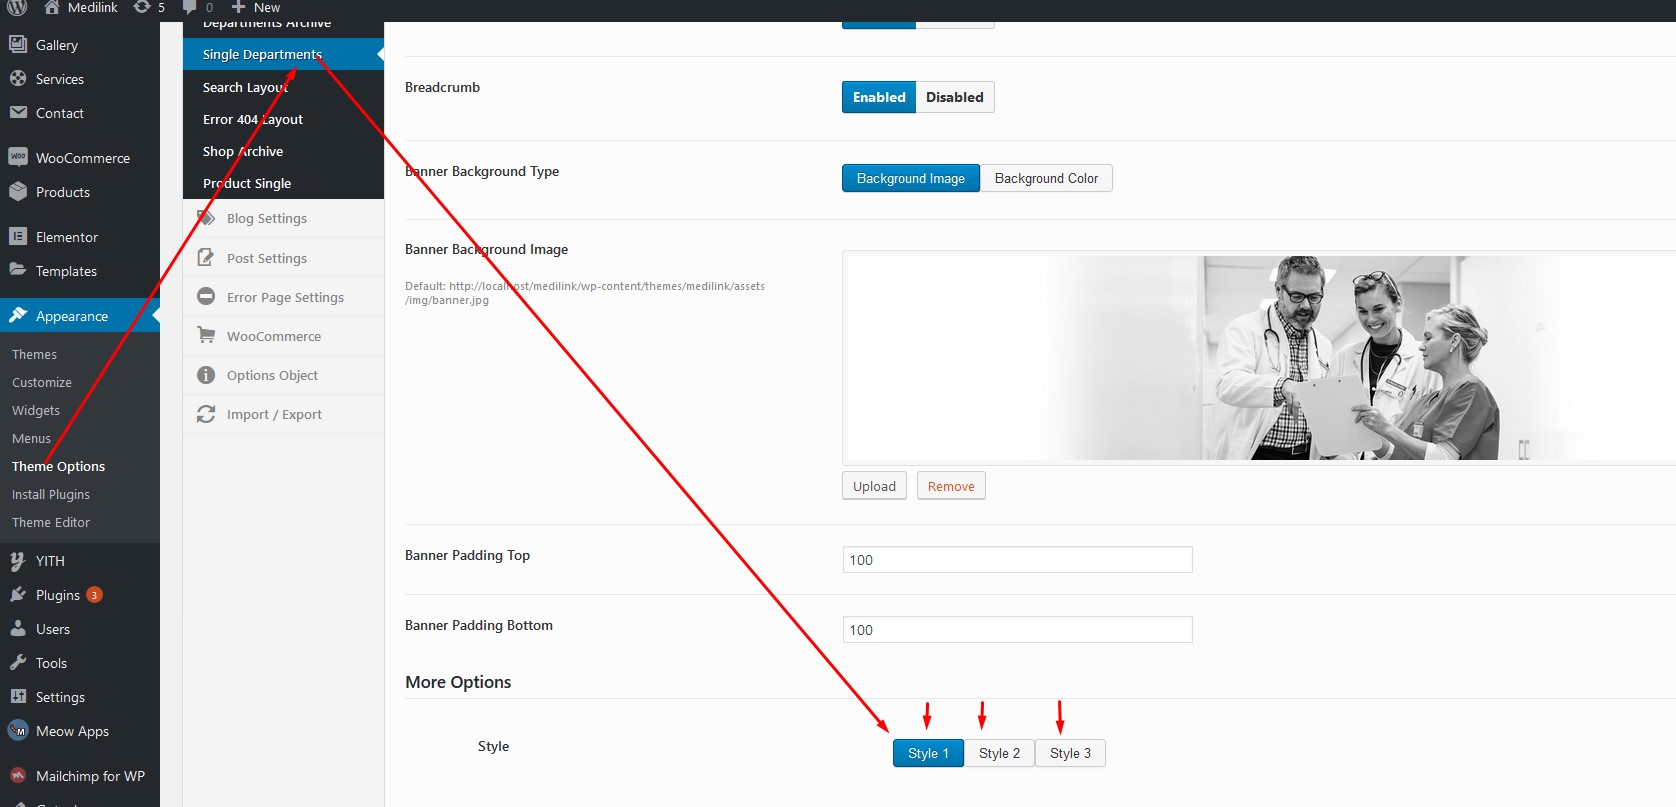
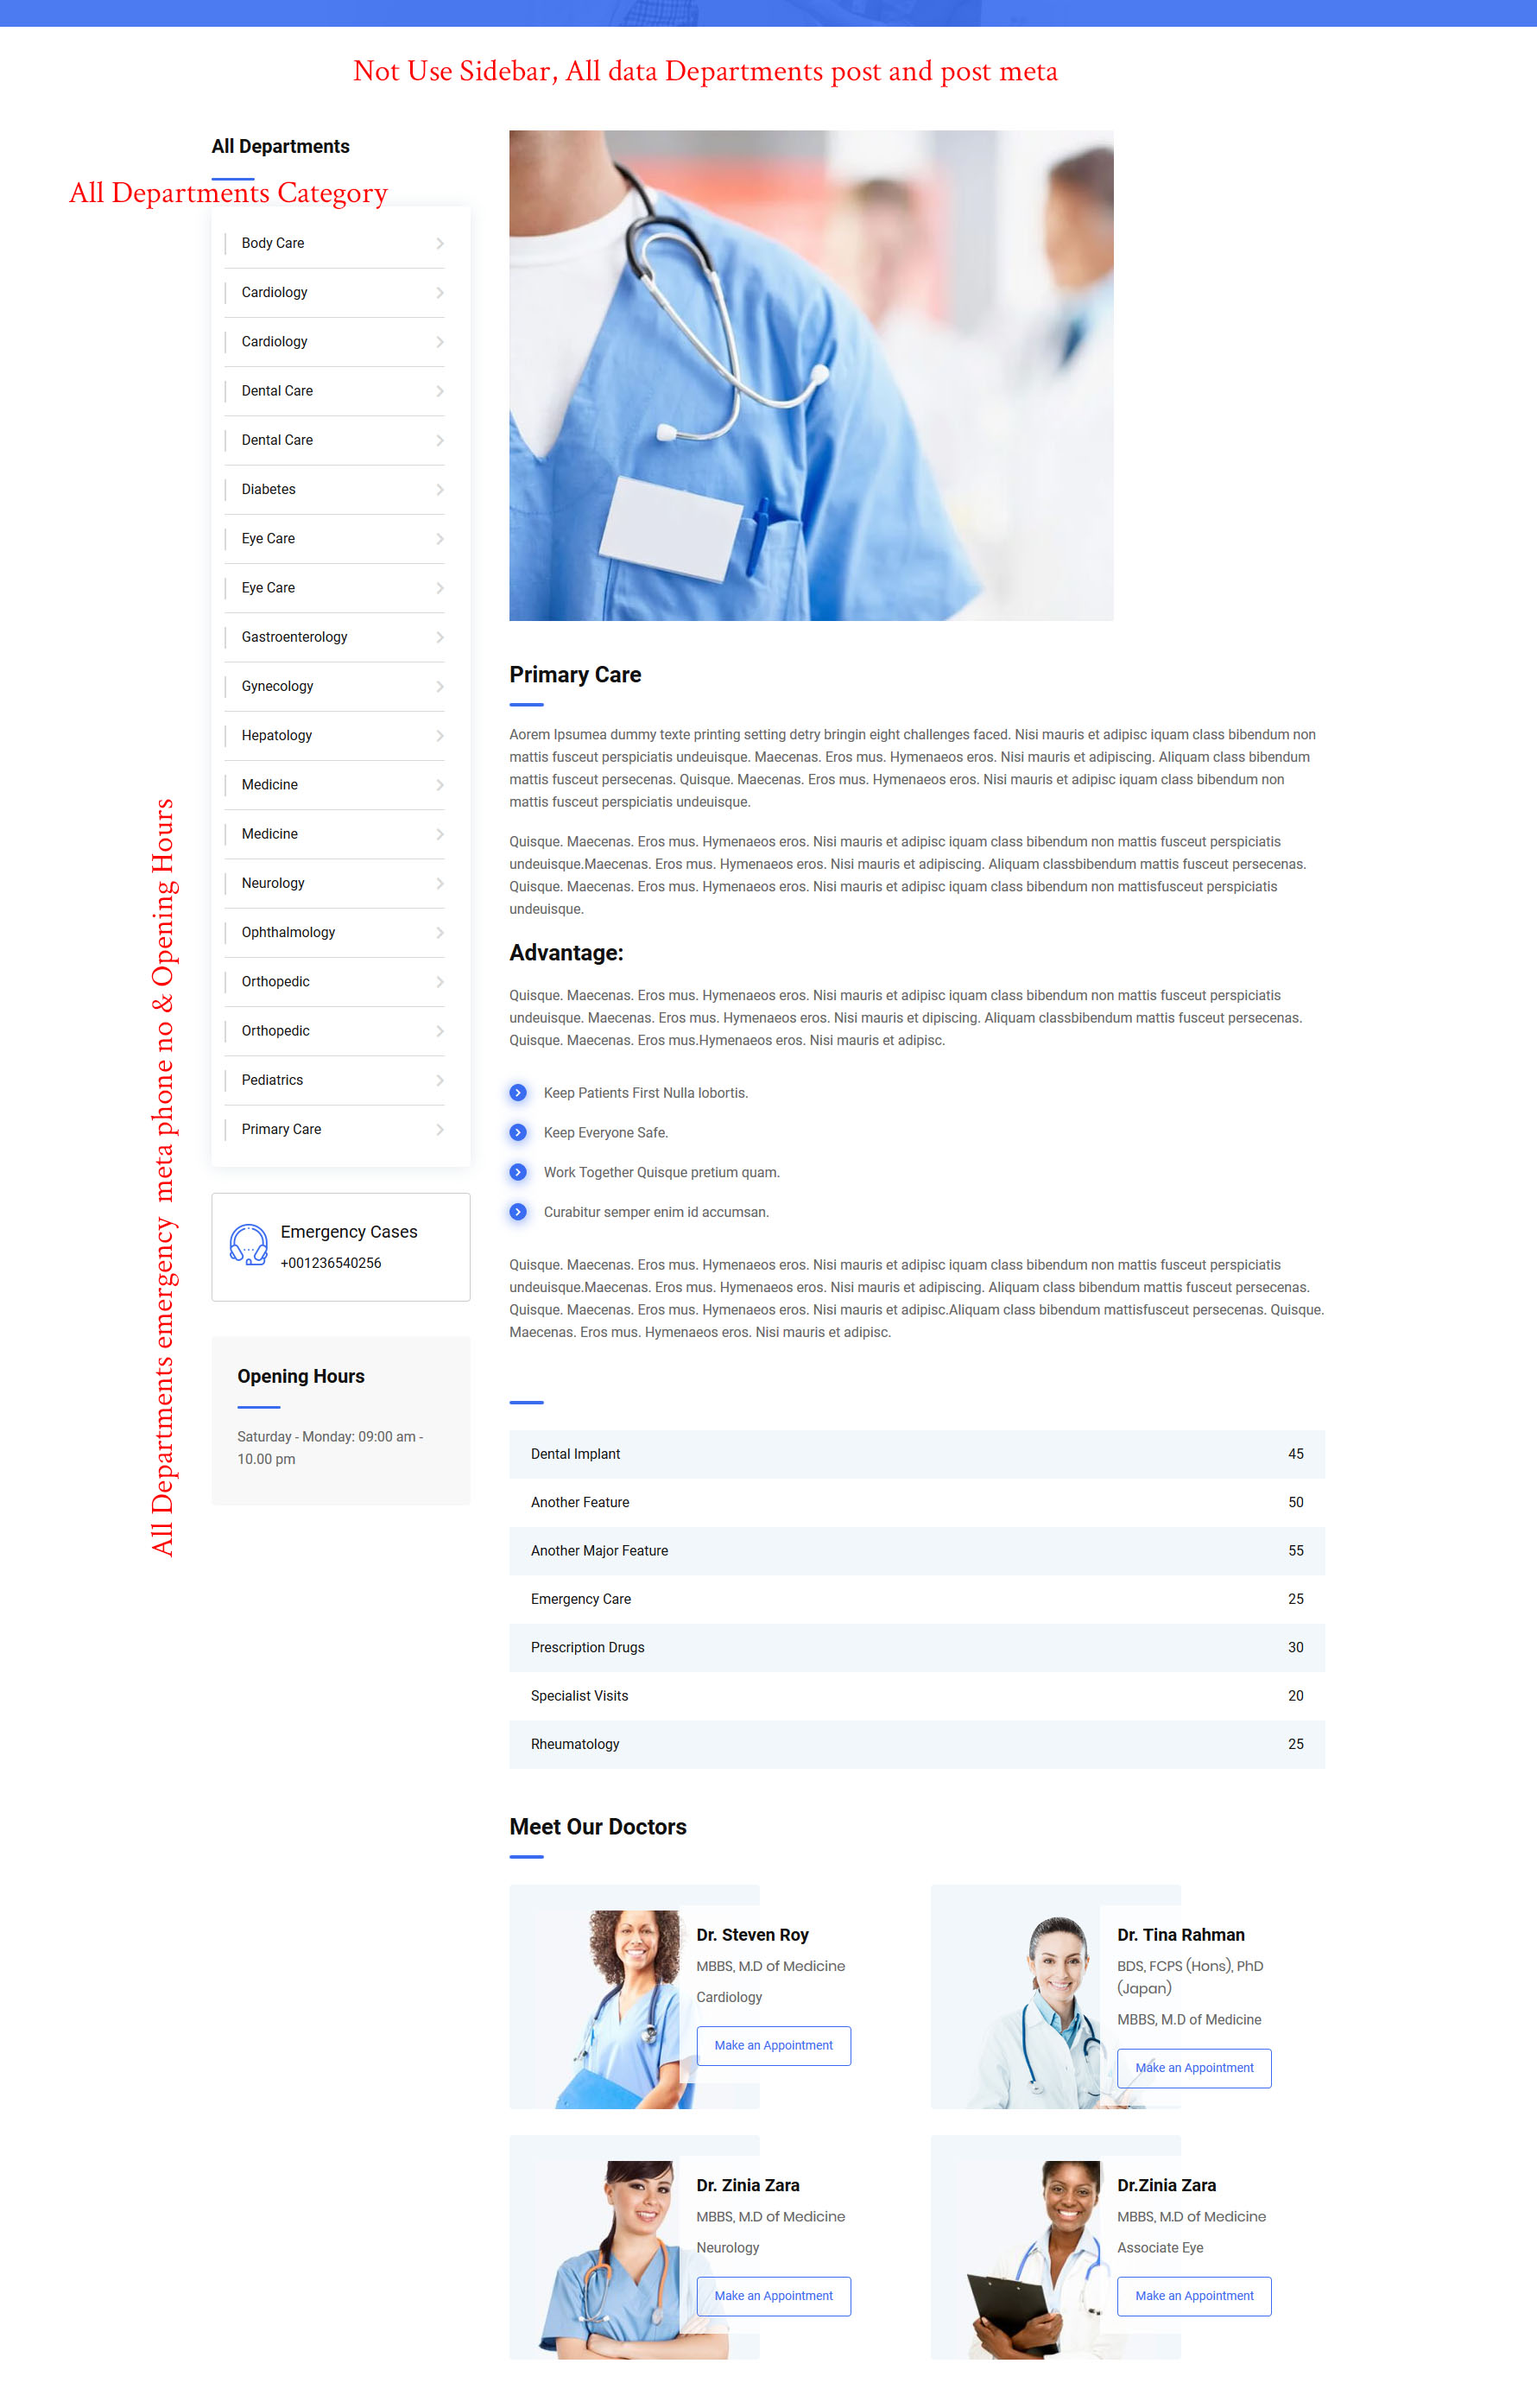
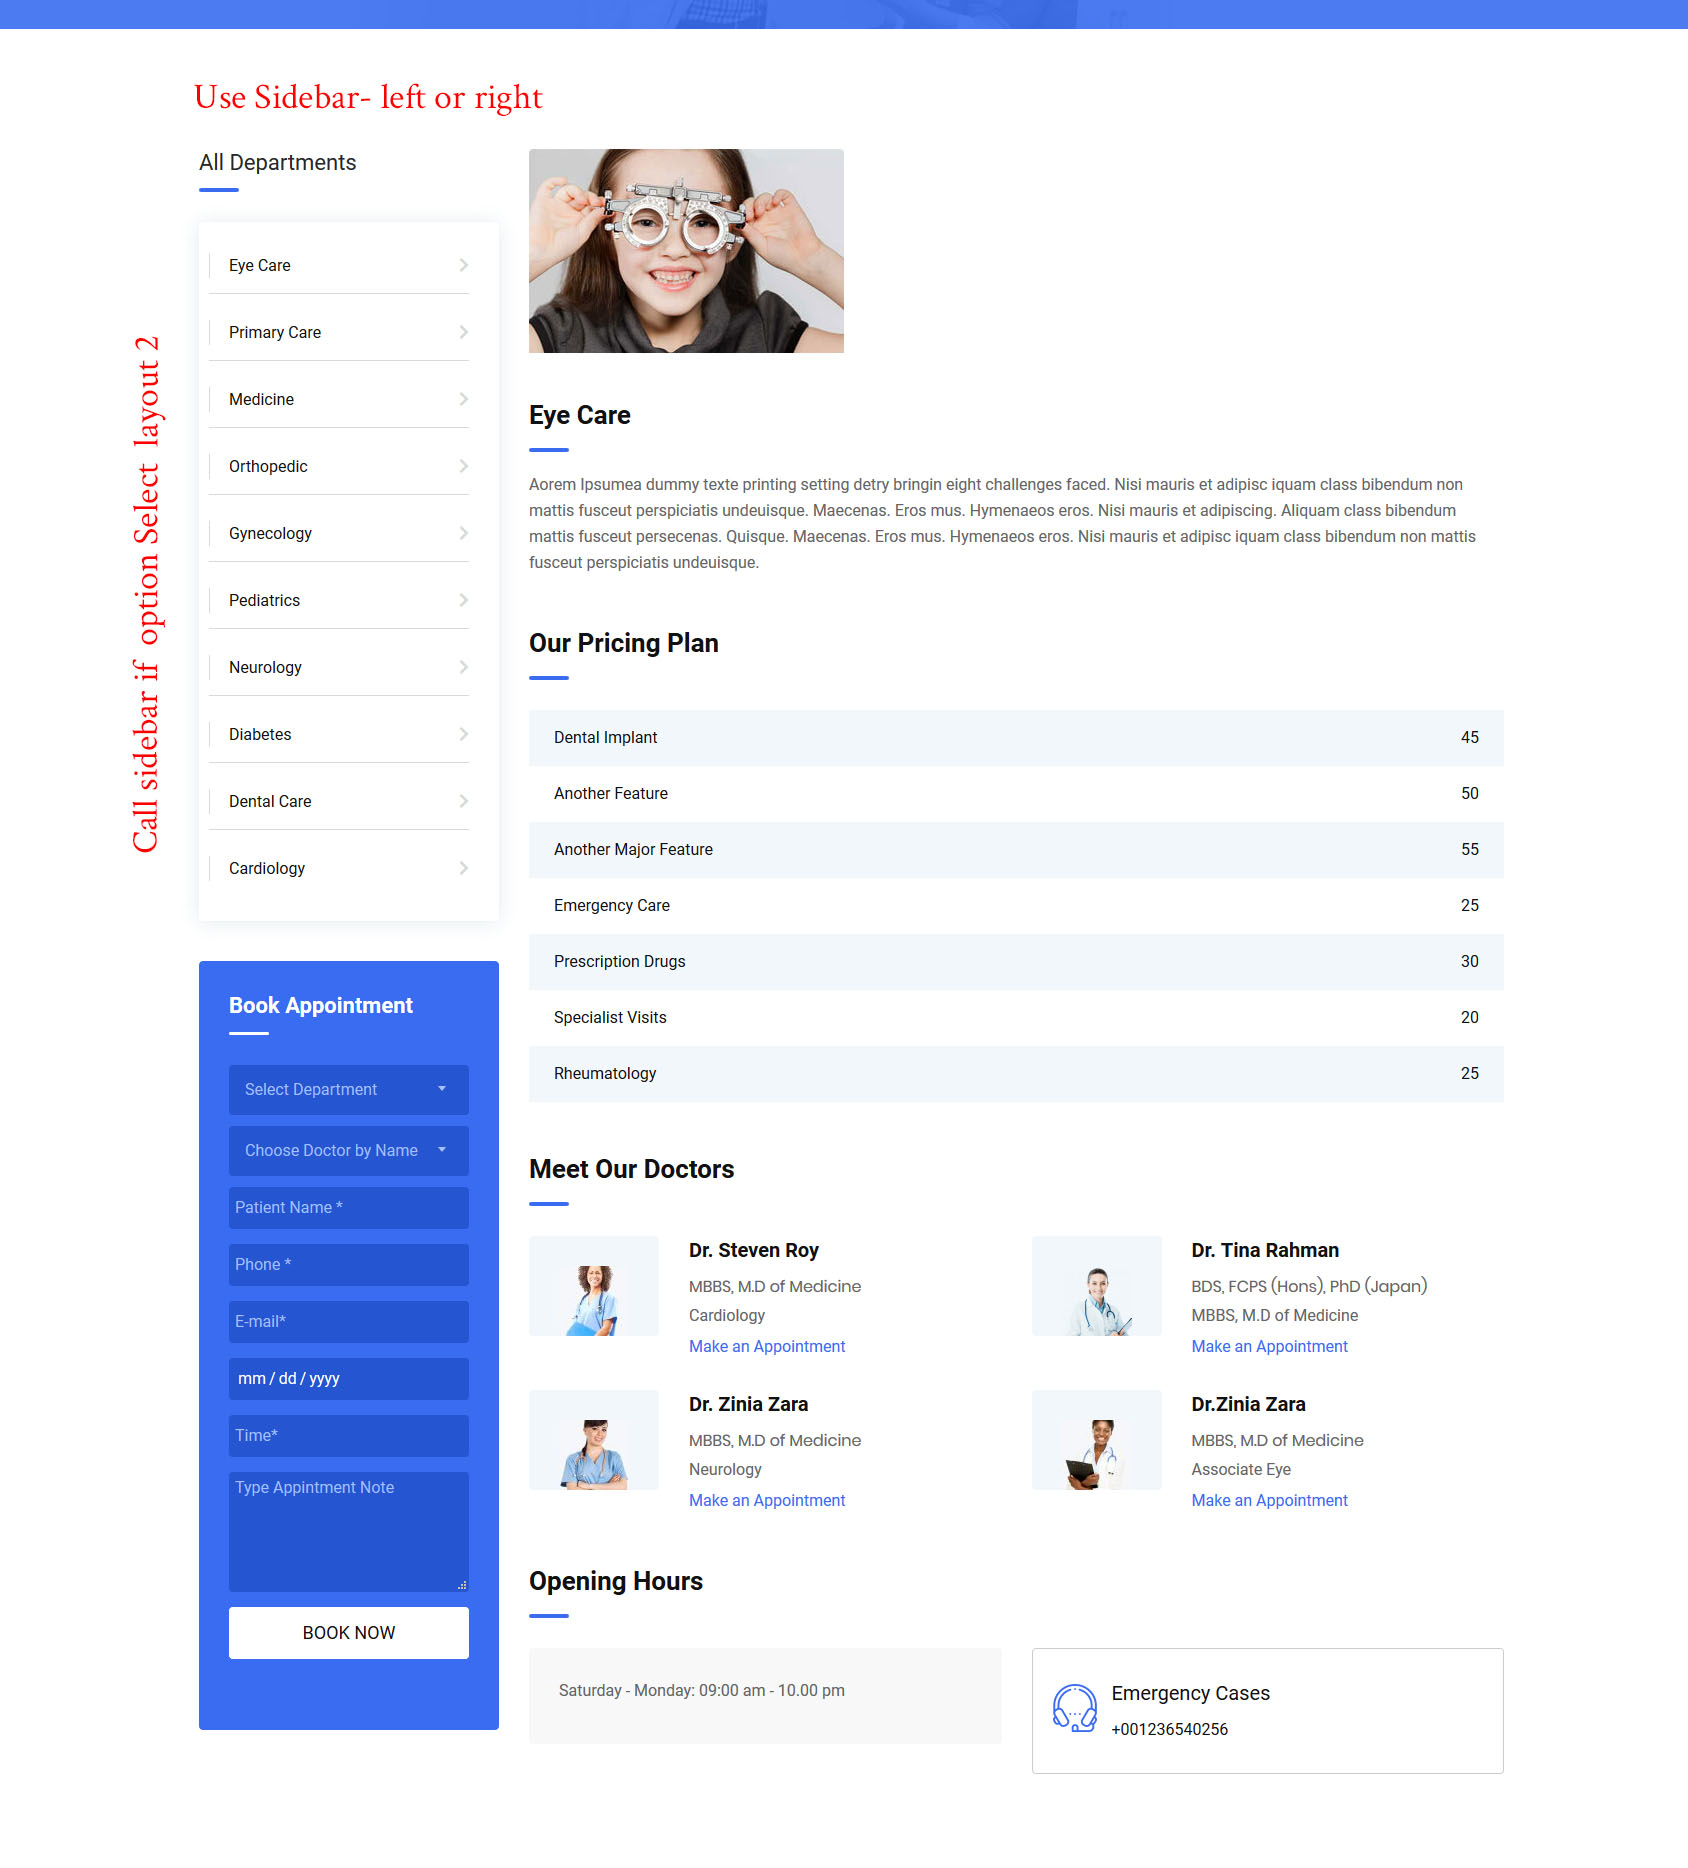
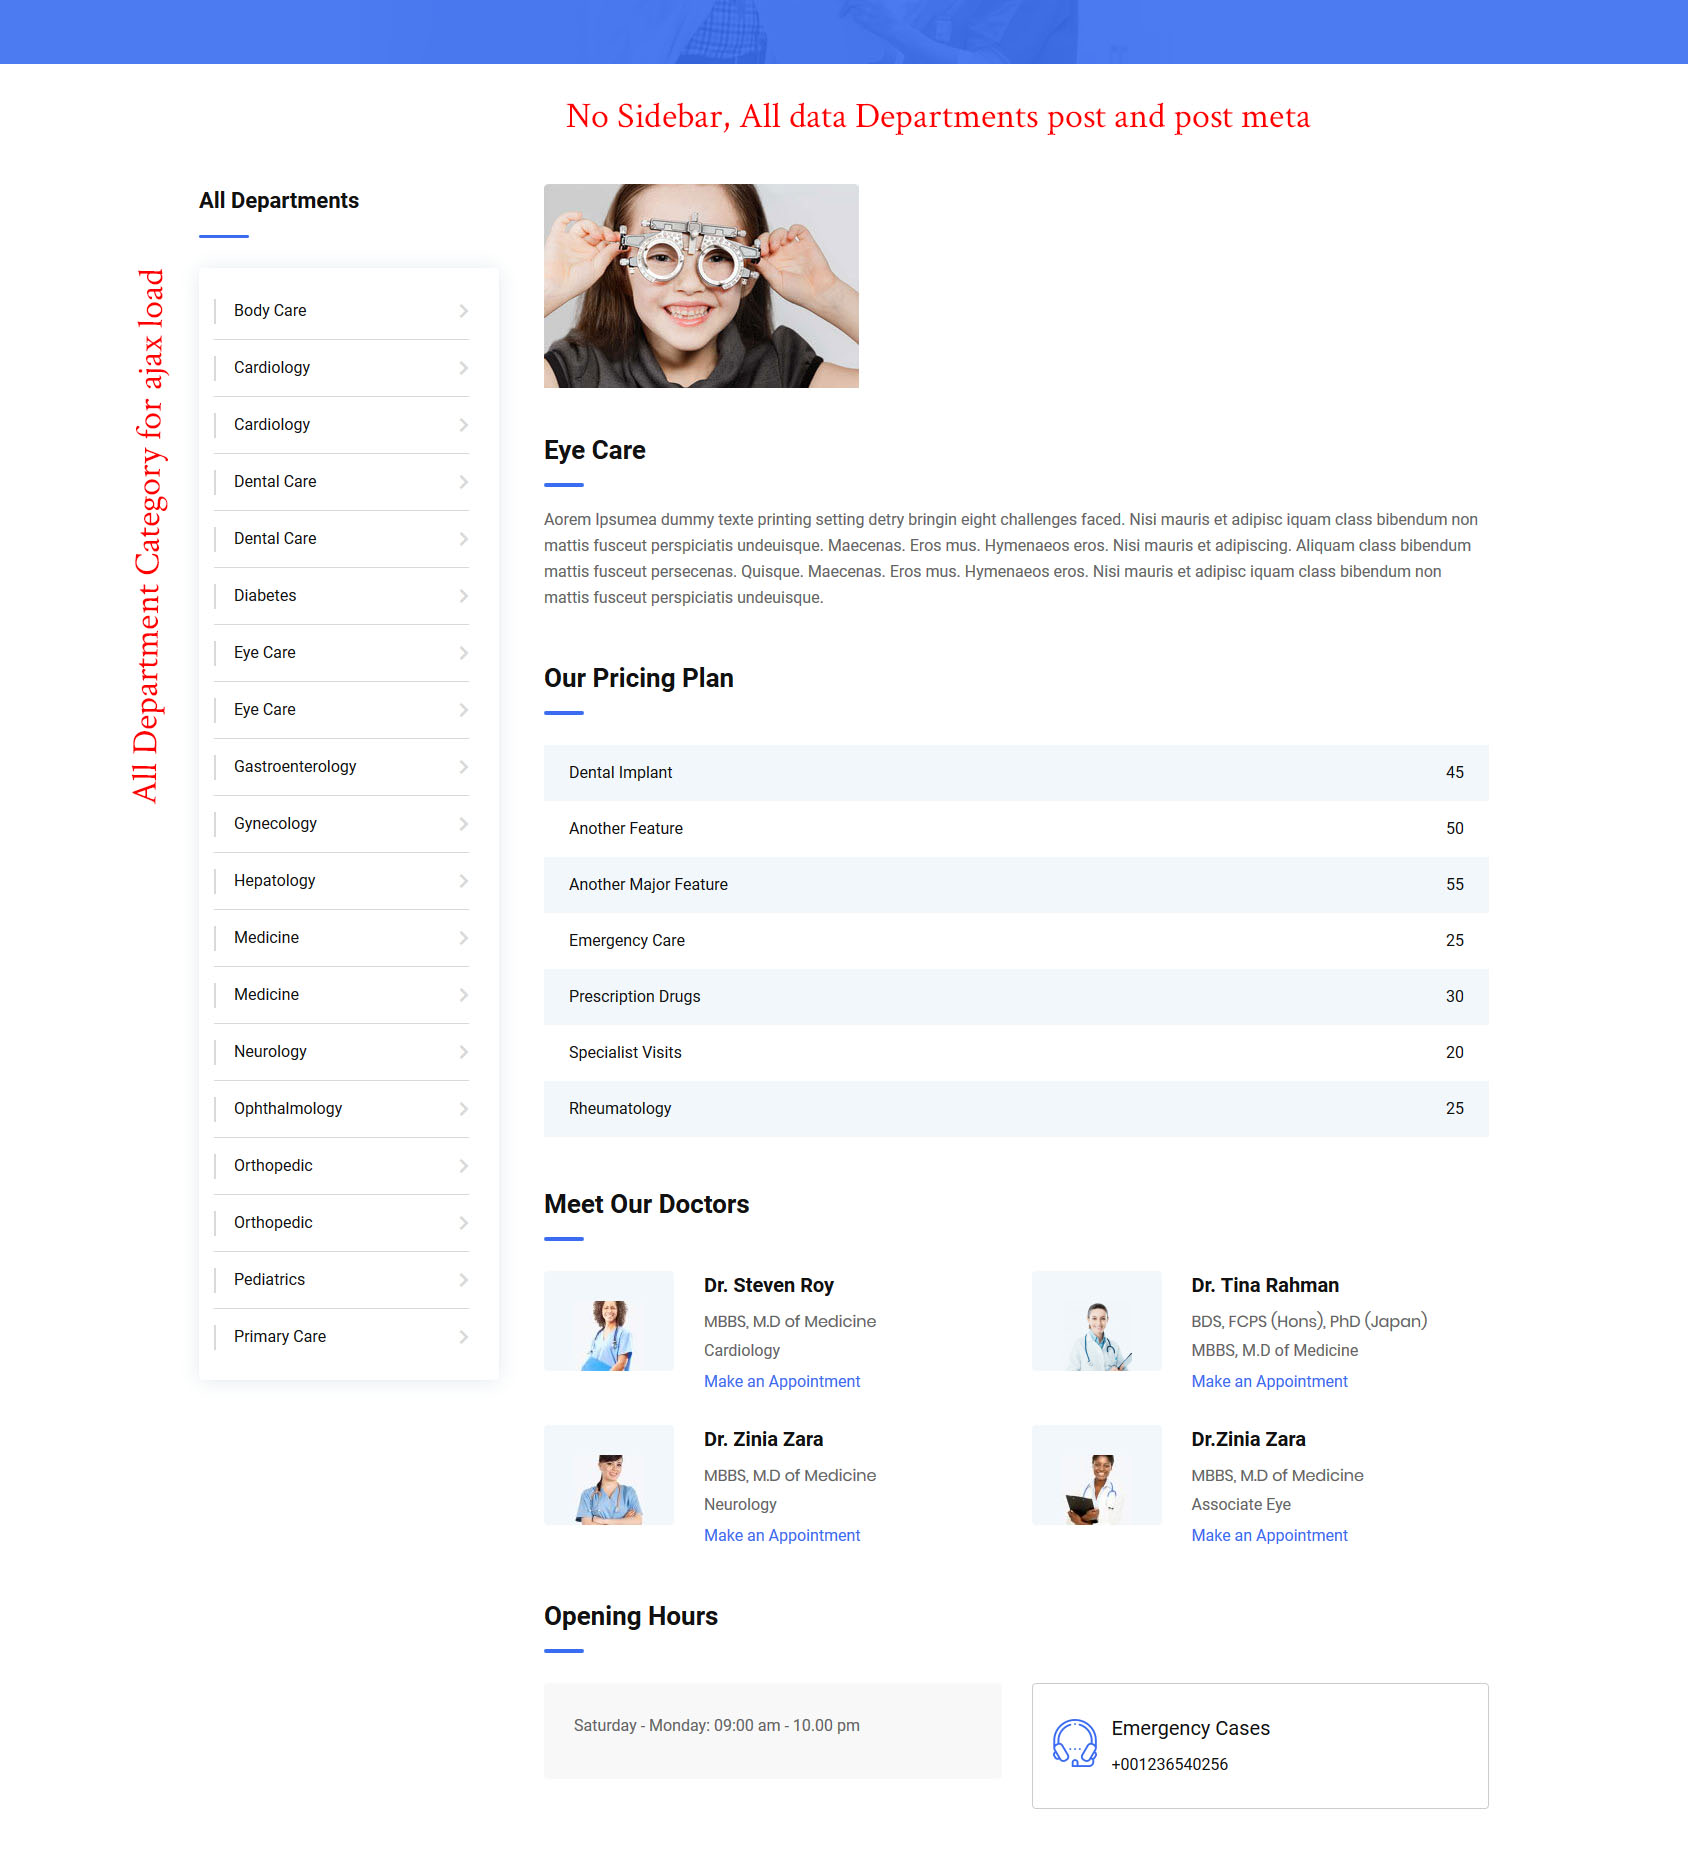
1 | Single Department
| Single Department layout 1
| Single Department layout 2
| Single Department layout 3
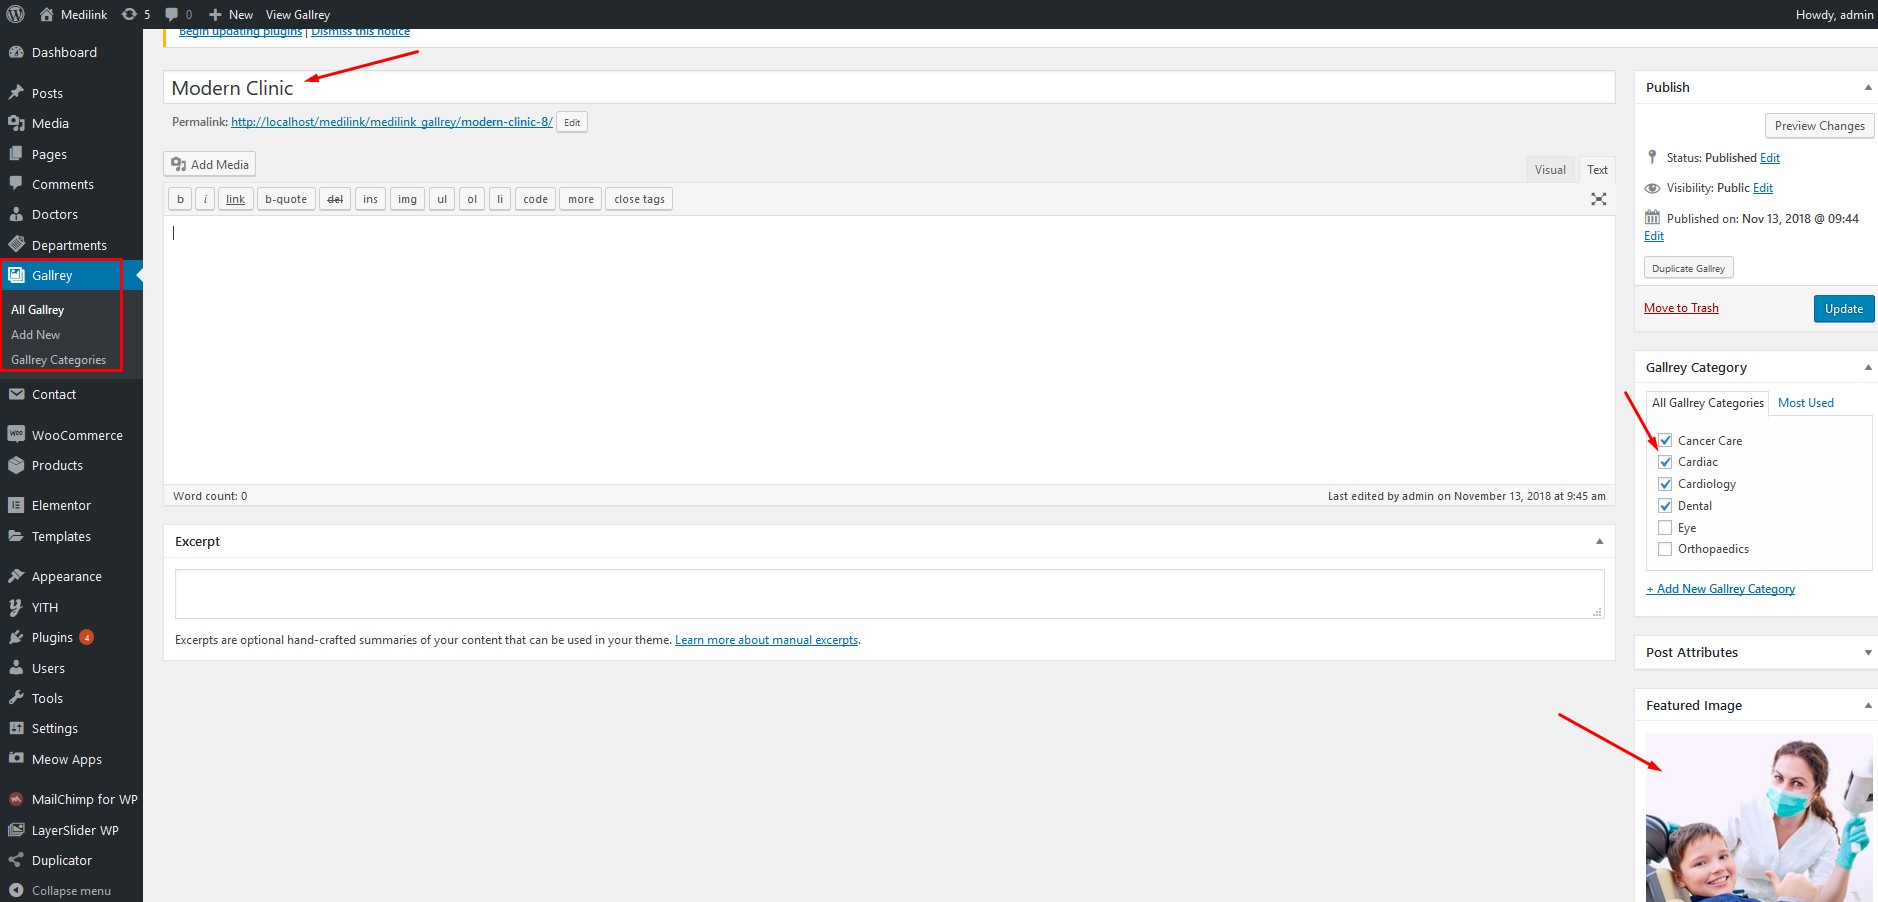
13| Gallery
You can add Gallery from Gallery menu. For each gallery you'll see the following settings:
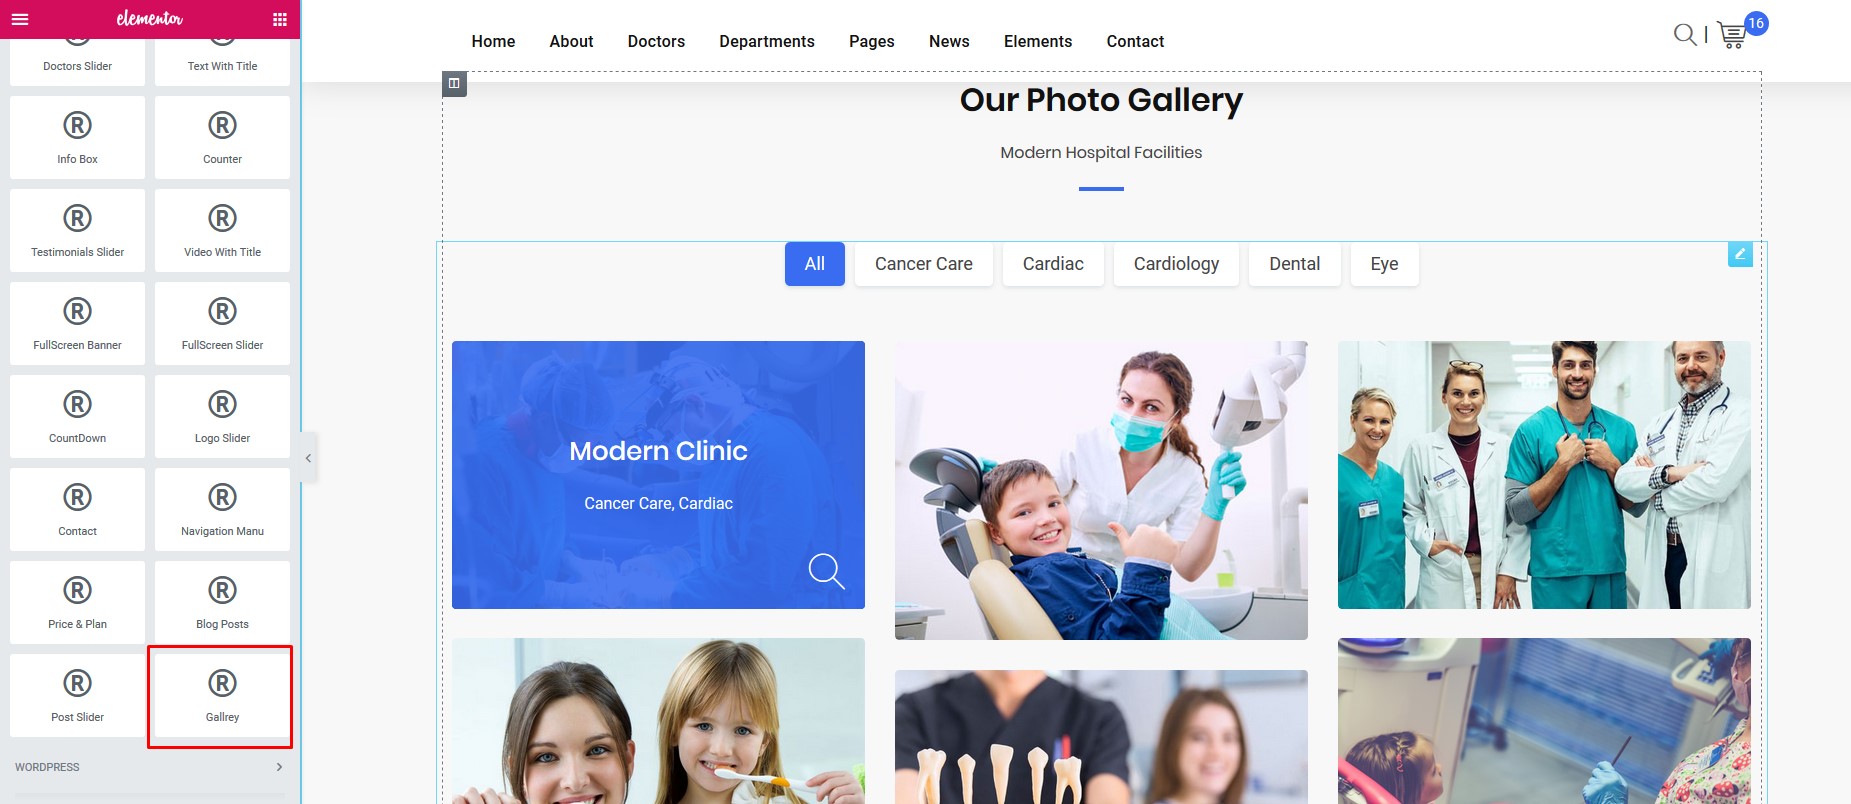
For displaying gallery, we have created Elementor elements for you. From Elementor elements, Go to RadiusTheme Elements Section, here you'll see Gallery element. 2 Style of gallery layout has been added
14 | Testimonial
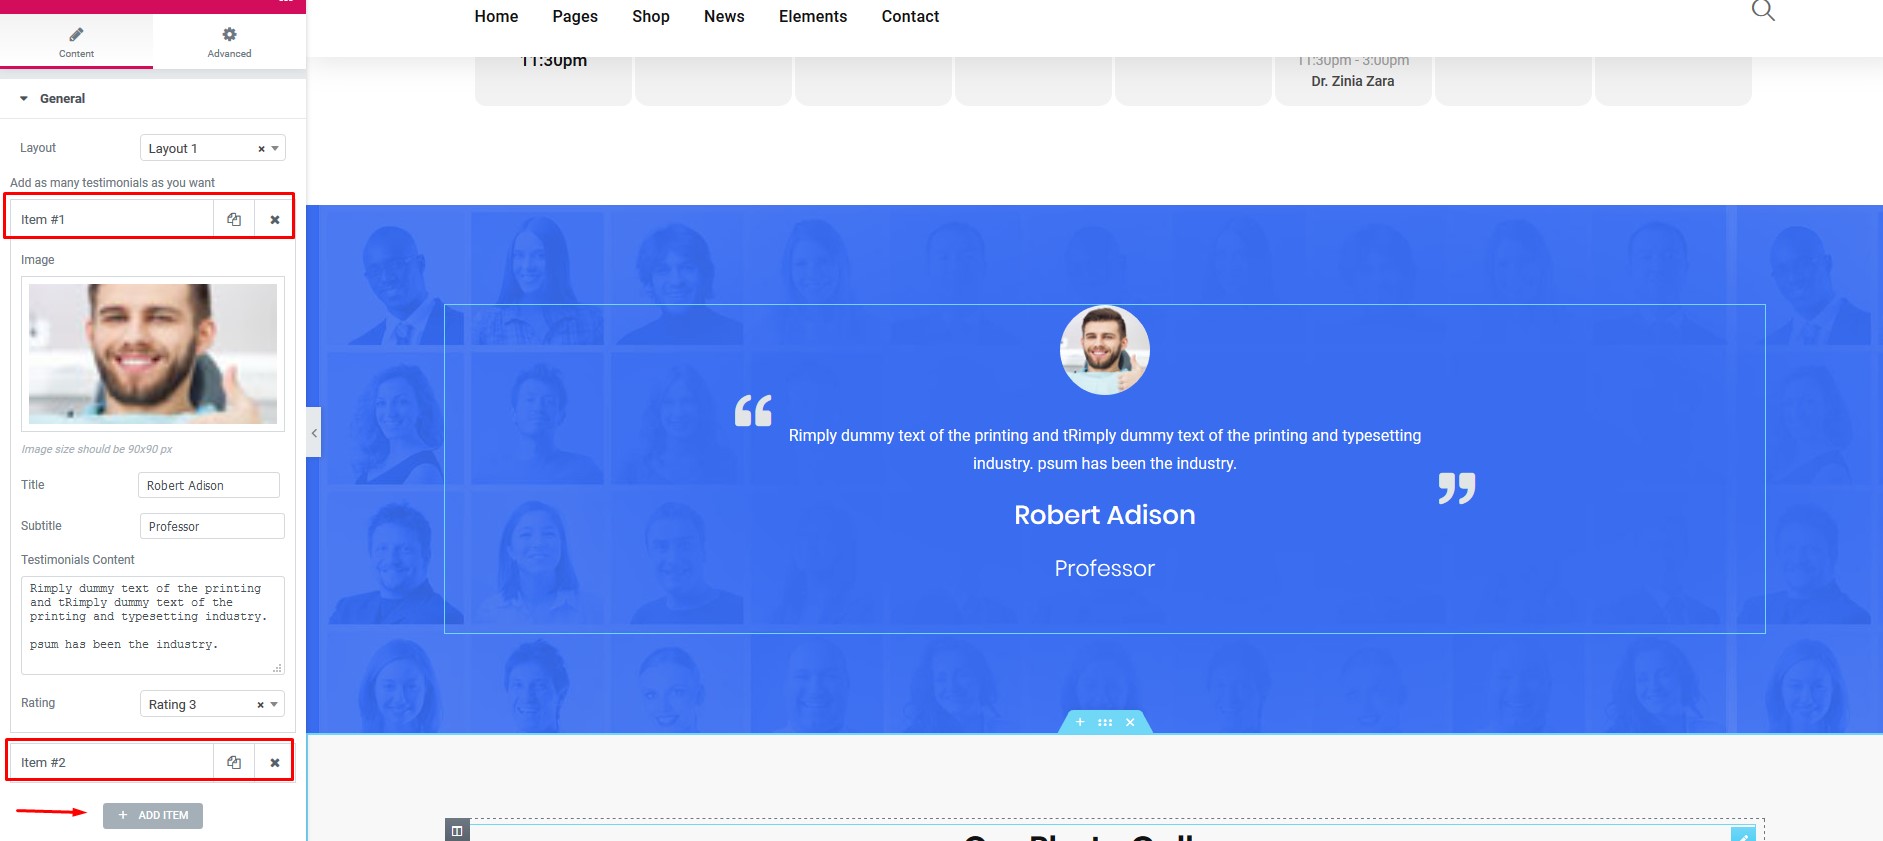
You can add testimonials from Testimonials Elementor. For each testimonial you'll see the following settings:
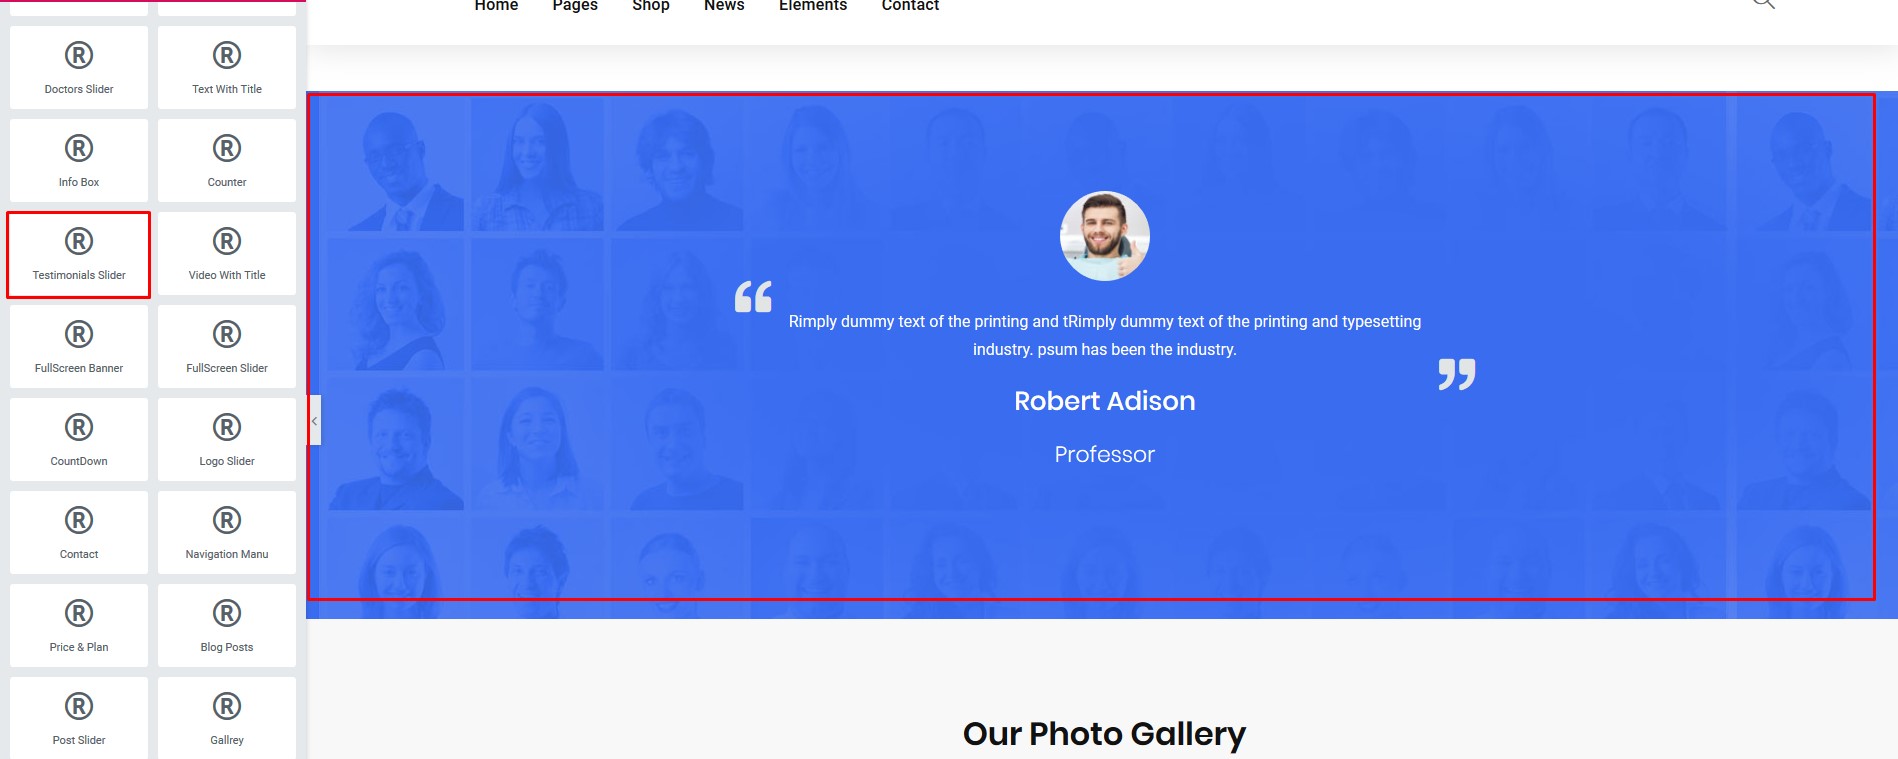
For displaying testimonial, we have created Elementor elements for you. From Elementor elements, Go to RadiusTheme Elements Section, here you'll see Testimonial element. 2 Style of testimonial layout has been added
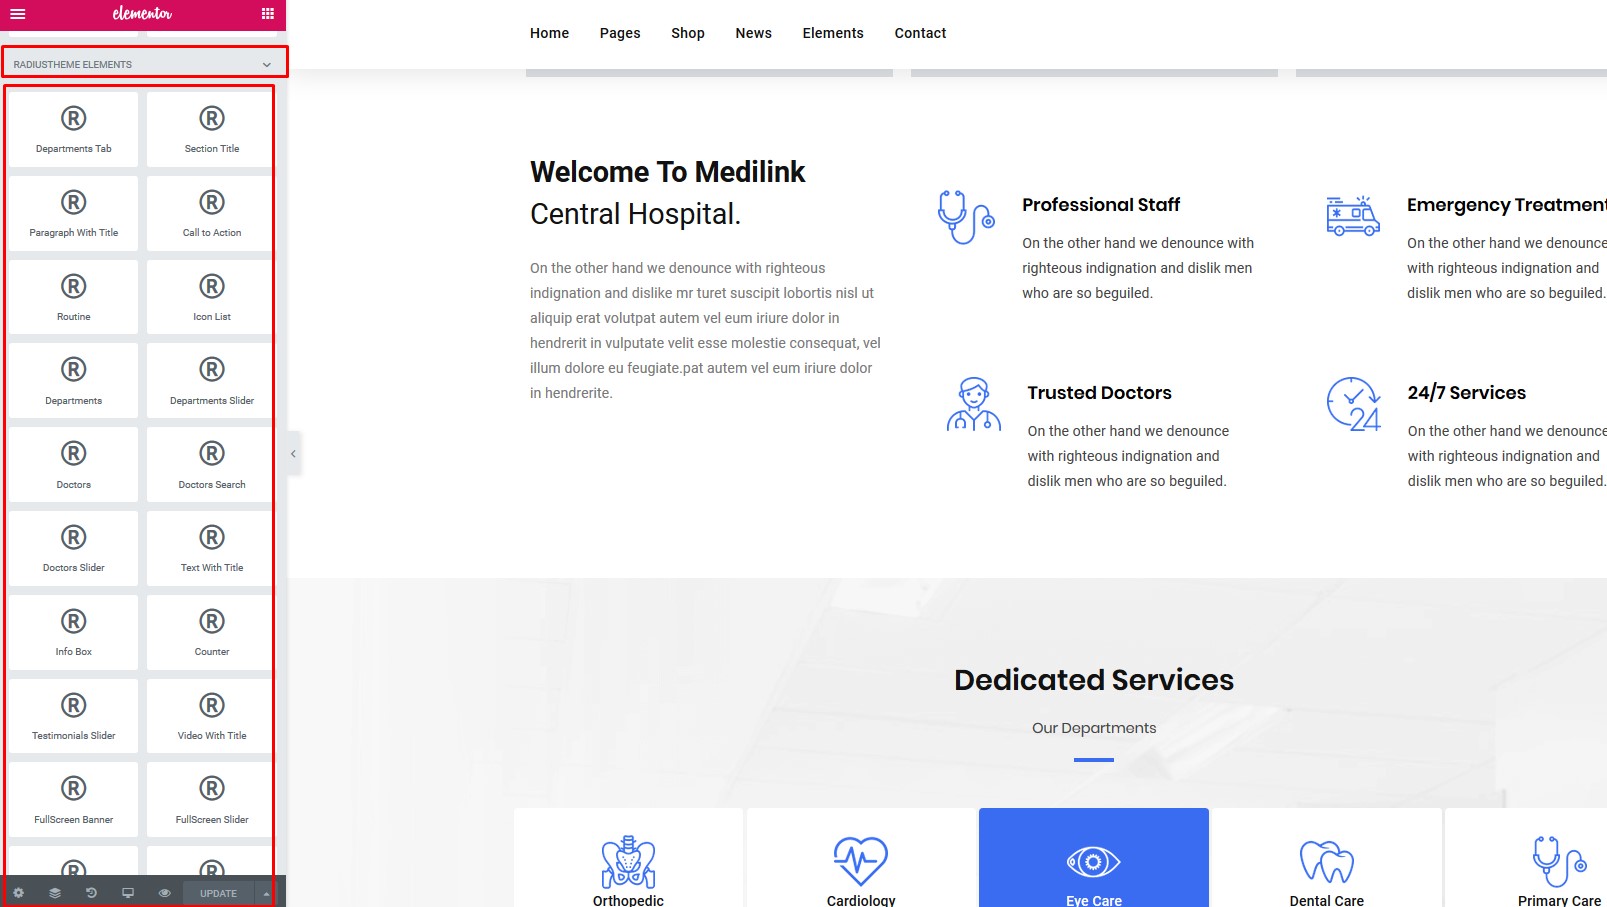
14| Elementor elements
We have created several Elementor elements for you. You can find them from Medilink tab in the Elementor elements
16| Built-in CSS Classes (Advanced)
You can use the following built-in css classes if needed:
bg-primary: Set Primary Background color
bg-primary70: Set Primary Background width opacity 70% color
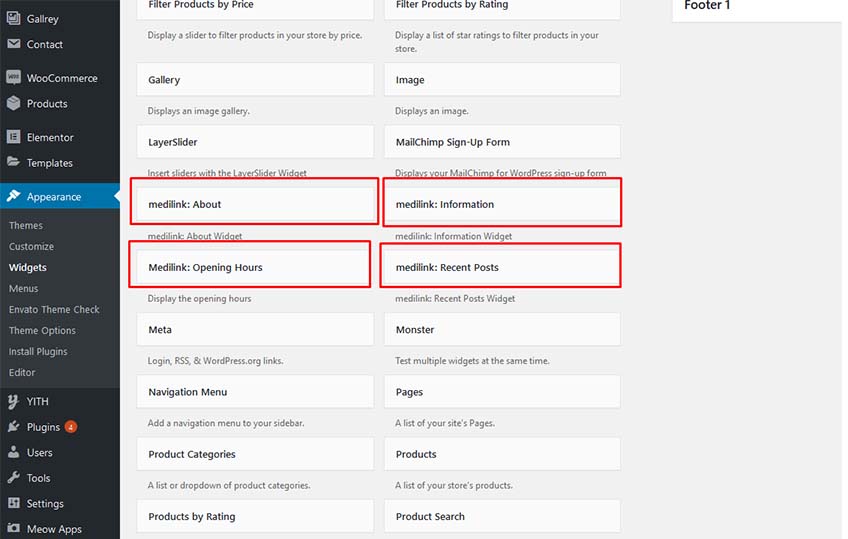
17 | Custom Widgets
You can use the following Widget in any place of your theme ( like in footer & sidebar ). These are custom made
18.1| Setting up Contact Form
We are using plugin "Contact Form 7" for contact functionality. You can see their documentation for better understanding.
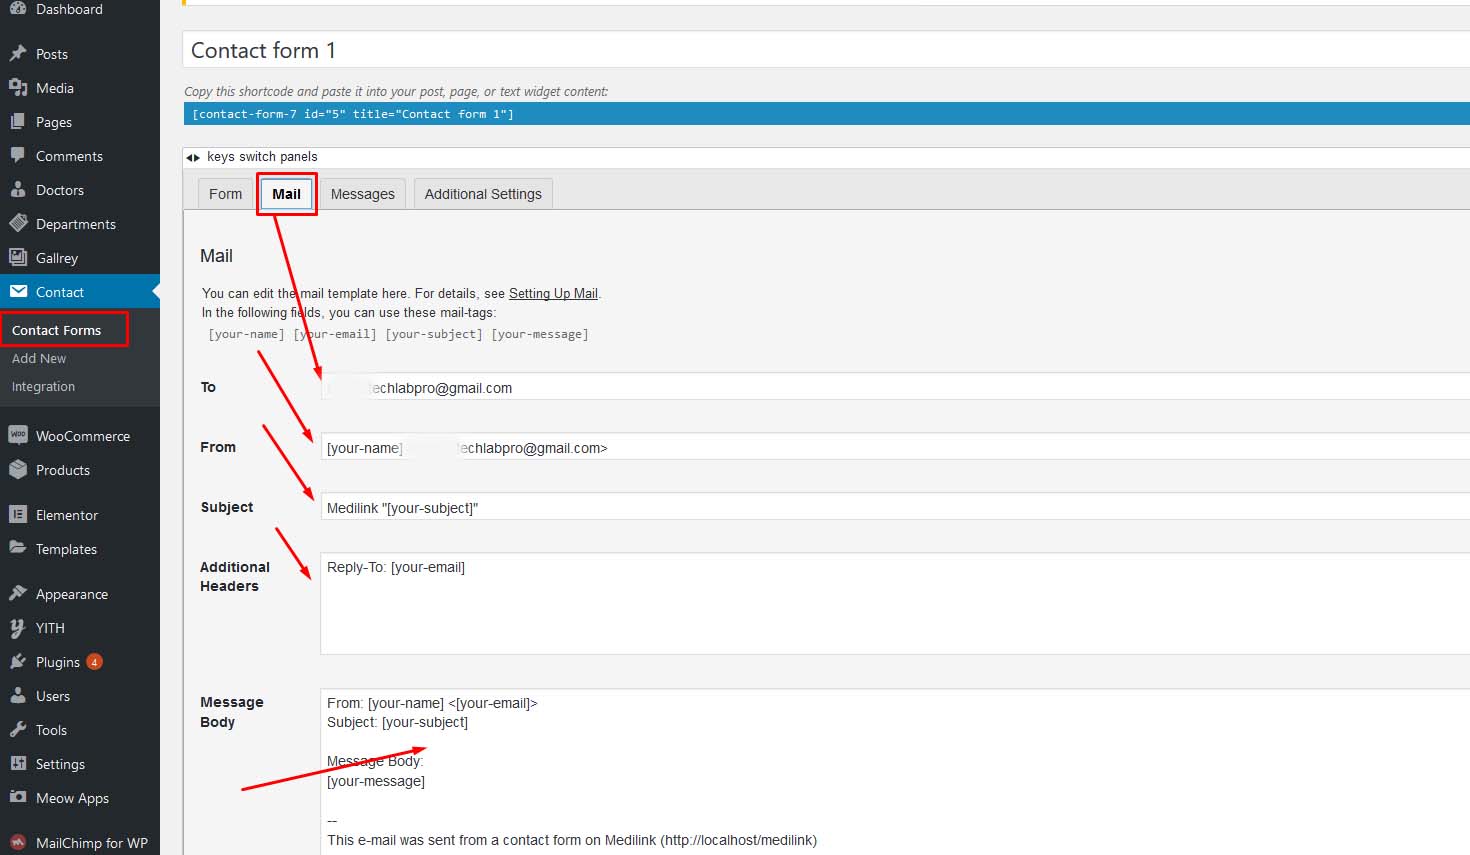
If you don't want to go through all the troubles to check their documentation and just want to use the default contact form we provided with this theme, please at least set up the default emails in contact form settings. (Because if you don't do that, all form submission emails will come to us instead of you). To do that, please follow the steps below:
Step 1: Navigate to Contact, and then click on Contact form 1 link.
Step 2: From this page, click on Mail tab. Here you should set your own email address where you want to receive user submitted forms. Then click on save button.
Step 3: Please submit some dummy forms from Contact page to make sure that it's working properly.
18.2| Translating Theme
You can translate this theme to another language easily. You actually have to translate two things for your website to work properly: "Medilink" theme and "Medilink Core" plugin. This plugin plays a major role in theme functionality, so if you don't translate this plugin along with the theme you can't be able to get the full translation.
There are many tools available for translation. But the easiest way is to use plugin "Loco Translate". Using this plugin, you can literally translate any WordPress themes or plugins if it supports translation.
** Note: Please remember, if you update the theme later your translations might be gone if they are stored inside theme/plugin. So please keep a backup of Medilink theme and Medilink Core plugin first before updating theme. **
Here's a quick video tutorial about how to use Loco Translate:
18.3| Updating Theme
Occationally we provide updates which includes new features and bugfixes. Updating WordPress theme is standard WordPress functionality. There are few ways to update WordPress theme. You can follow any of the methods described below:
** Note: Before updating, make sure to keep a backup of your website to be in safe side. **
Method 1: Automatic Update by Using Envato Market Plugin
From WordPress Admin Panel, navigate to "Envato Market" menu.
After completed the above steps successfully, Navigate to Appearance -> Themes. Here you'll see an "Update now" link beside your theme. Click on that link and your theme will be updated automatically.
Here's a quick video tutorial explaining this method:
Method 2: By Uploading zip File
From WordPress Admin Panel, Navigate to Appearance -> Themes.
Activate any other theme (eg. Twenty Seventeen) than the current one.
Delete Medilink Theme.
Now you have to upload the updated theme zip file. To do this, Navigate to Appearance -> Themes -> Add New -> Upload. Go to browse, and select the zipped theme folder. Hit "Install Now" and the theme will be uploaded and installed.
Method 3: By FTP
Using your FTP client, navigate to "/wp-content/themes/" folder on your server and delete the "Medilink" folder from there.
Now upload the latest non-zipped theme folder into that "/wp-content/themes/" folder .
19.1| Demo Content installation failed
This is a hosting issue. In most hostings demo installation will work fine. But some hostings block certain permissions which may cause this issue. If this happens to you, you can contact your hosting provider or alternatively send a support request to support@radiustheme.com and we will help you to fix this.
19.2| 404 Error in all pages
If you face this type of issue, please update your permalink. To update permalink, navigate to Settings -> Permalink and then click on Save Settings button.